Do you want to notify users only on replies to their WordPress comments?
By default, users won’t know that someone has replied to their comment unless they come back to the comment section and see the response. This makes it hard to generate in-depth discussions and debates on your website.
In this article, we will show you how to easily notify users every time someone replies to their WordPress comment.


Why Notify Users on Replies to Their WordPress Comments?
Comments are a great way to build user engagement, create a community, and increase your pageviews in WordPress. A long and interesting comment section can even keep people on your website longer, as they will want to read through all the comments.
However, by default, WordPress doesn’t notify people when their comment gets a reply. Instead, the commenter will need to revisit the WordPress post and check whether anyone has responded.
By notifying users when their comment gets a reply, you can often get them to come back to your site. It’s also a great way to get more comments on your WordPress posts and spark in-depth and interesting discussions.
With that being said, let’s see how you can notify users when someone replies to their comment in WordPress. We will share 2 methods, using a premium plugin like Thrive Comments and also a free plugin.
Simply click the links below to jump ahead to any section:
The easiest way to notify users when someone replies to their comments in WordPress is by using Thrive Comments.
It is the best WordPress comments plugin and is part of the Thrive Themes plugin suite. With Thrive Comments, you get features to improve engagement with your comments. For instance, it lets you show comment badges, allow upvotes/downvotes, subscribe to comment threads, and more.
To learn more about the plugin suite’s features and benefits, please see our detailed Thrive Themes Suite review.
First, you will need to visit the Thrive Themes website and create a new account.


After signing up for an account, you can go to the account dashboard.
Next, you’ll need to click the ‘Download and install the Thrive Product Manager plugin’ link.
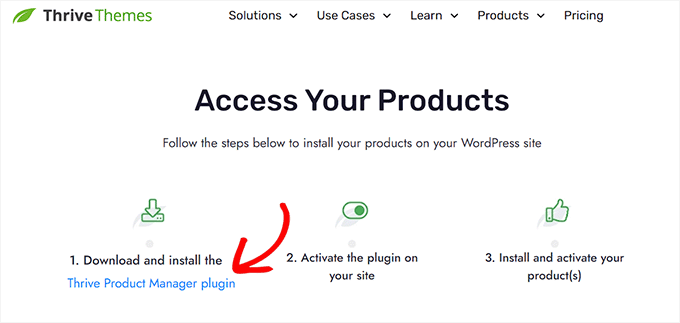

From here, you can install and activate the Thrive Product Manager plugin on your WordPress website. For more details, please see our guide on how to install a WordPress plugin.
Upon activation, you can head to the Product Manager page from your WordPress dashboard. Go ahead and click the ‘Log into my account’ button.
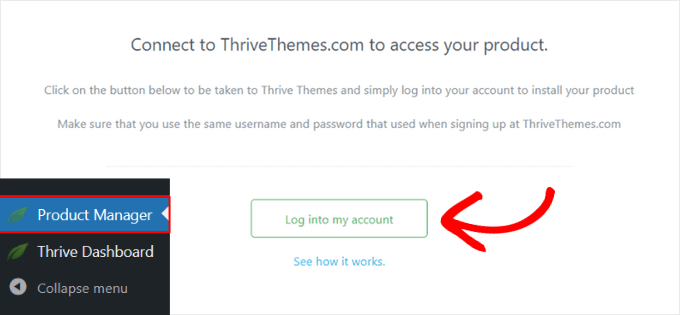

Next, you will see the Thrive Product Manager dashboard after logging in.
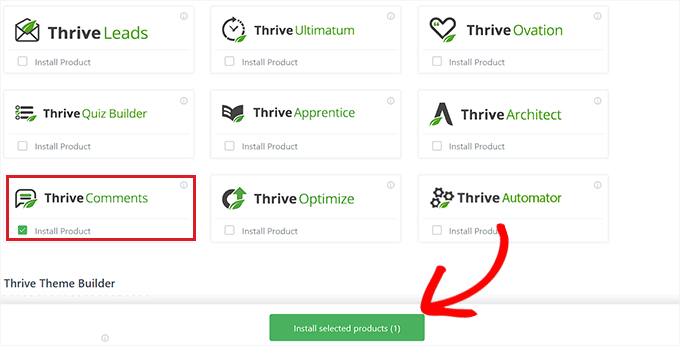
From the dashboard, simply select the Thrive Comments plugin and click the ‘Install selected products’ button.

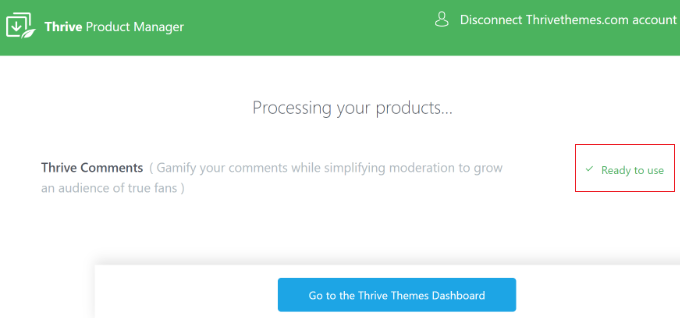
You should see a success message saying ‘Ready to use’ when the installation is complete.
After that, you can click the ‘Go to the Thrive Themes Dashboard’ button at the bottom.

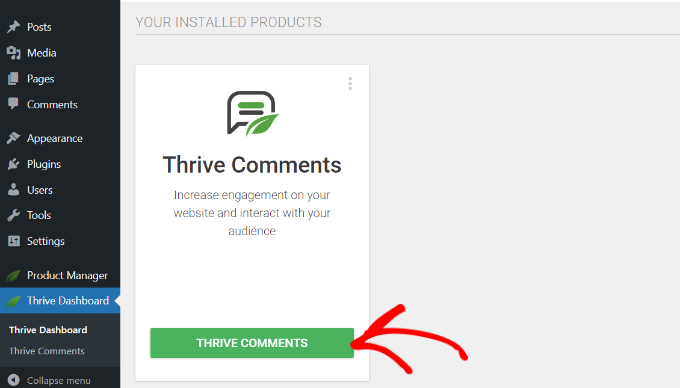
In the Thrive Themes dashboard, you will see all your installed plugins in the suite.
Go ahead and click the ‘Thrive Comments’ button.

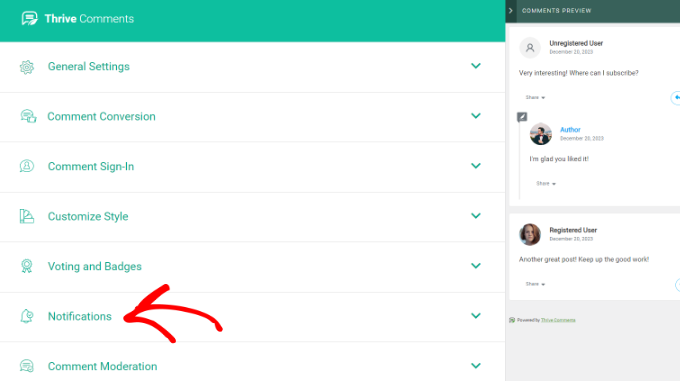
Next, you will see the Thrive Comments settings.
Simply navigate to the Notifications option and click to expand.

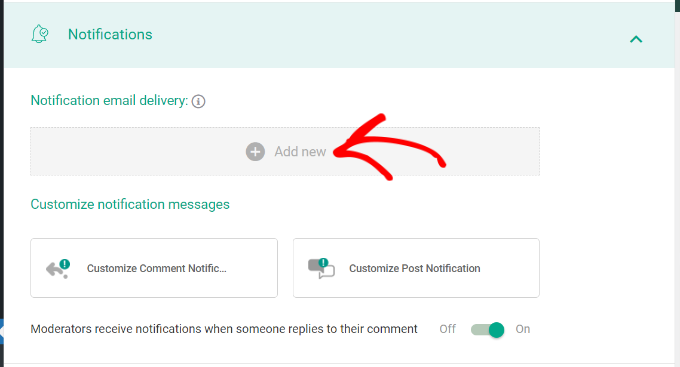
In order to send email notifications, you’ll need to connect to an email delivery service.
Go ahead and click the ‘+ Add new’ option.

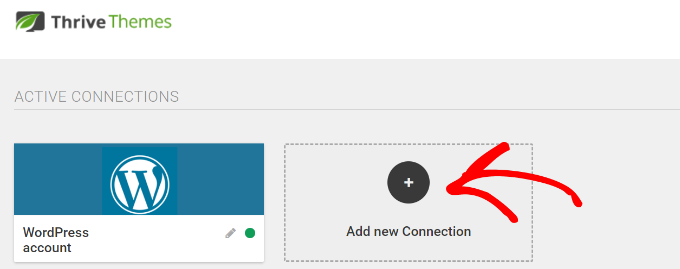
On the next screen, you’ll need to select an email marketing service.
Thrive Comments supports some of the most popular services, like Drip, Constant Contact, Mailchimp, AWeber, ActiveCampaign, and more.
You can click the ‘+ Add new Connection’ option to continue.

After that, you will need to select an app to connect with Thrive Comments.
Simply click the dropdown menu and choose your email delivery service.
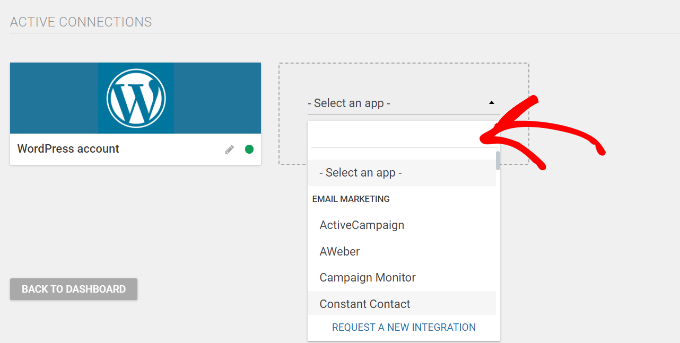

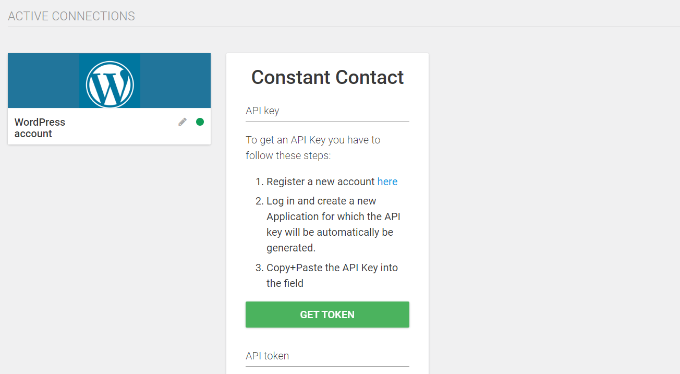
Next, Thrive Comments will require an API key or API token for your selected service.
You can find the API key in your email marketing tools account area or dashboard.
Do note that the steps for accessing the keys might be different for each tool, so we recommend going through the document or reaching out to their customer support for help.

Next, you can customize the comment notifications that users will receive when there is a reply to their comment.
There are 2 types of notifications you can set up in Thrive Comments. The Comment Notification is when users are notified via email when someone replies to their comments. Post Notification is when a user receives an email whenever a new comment or reply is added to that particular post.
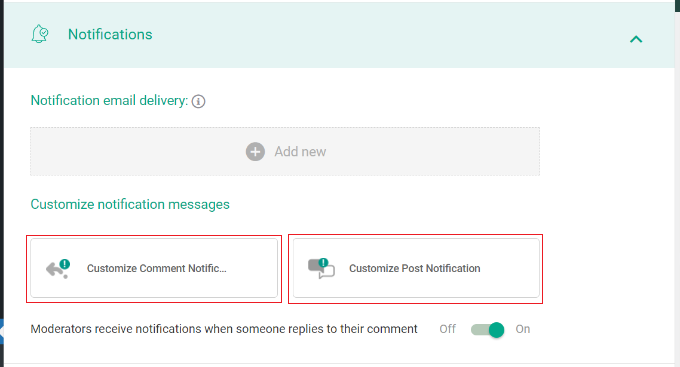

Let’s go ahead and customize these notifications.
To edit the Comment Notification, simply hover over it and click the pencil icon.
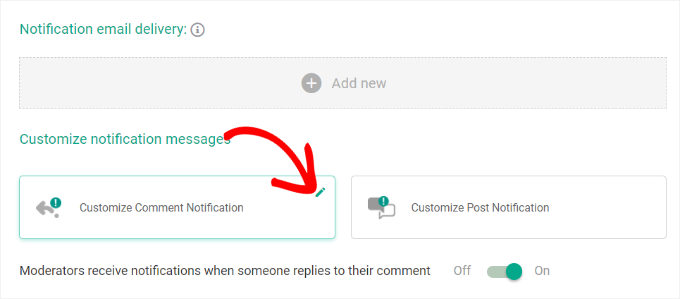

Next, you can edit the text of the email, change the email subject line, and more.
Thrive Comments also lets you use notification shortcodes to add more details to your email notifications. For example, you can add a site title, comment author, unsubscribe link, and more.
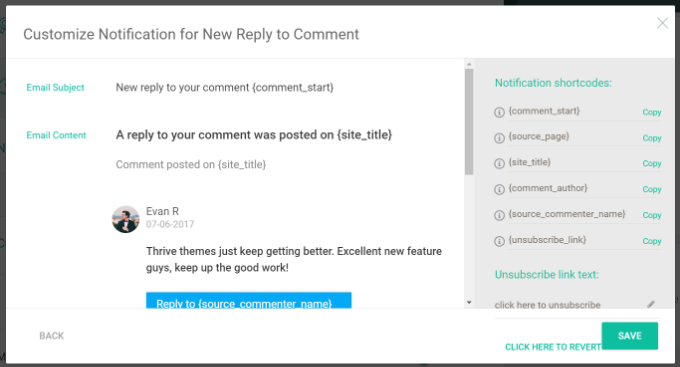

When you’re done, simply click the ‘Save’ button.
Similarly, you can also customize the Post Notifications emails. You can also use shortcodes to add more details to your email text.
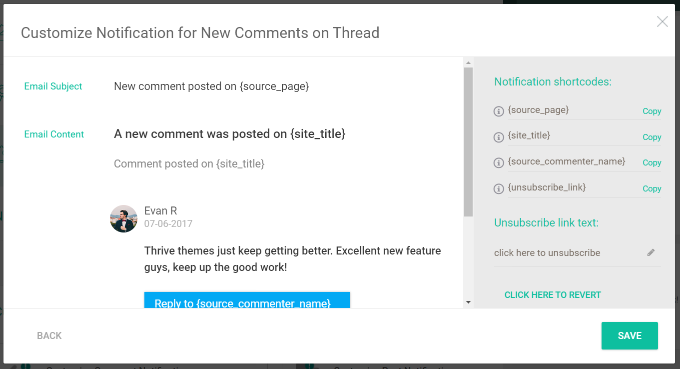

After editing the notification, don’t forget to click the ‘Save’ button.
Now, when a user posts a comment on a blog post and someone replies to it, they’ll automatically get an email notification.
Another way to notify users about replies to their WordPress comments is by using Subscribe to Comments Reloaded. It is a free plugin that allows users to sign up for email notifications every time someone responds to a comment.
You can also manage your subscribers and disable comment subscriptions for specific posts.
The first thing you need to do is install and activate the Subscribe to Comments Reloaded plugin. For more details, see our step-by-step guide on how to install a WordPress plugin.
Upon activation, you can configure the plugin’s settings by going to STCR » Comment Form.
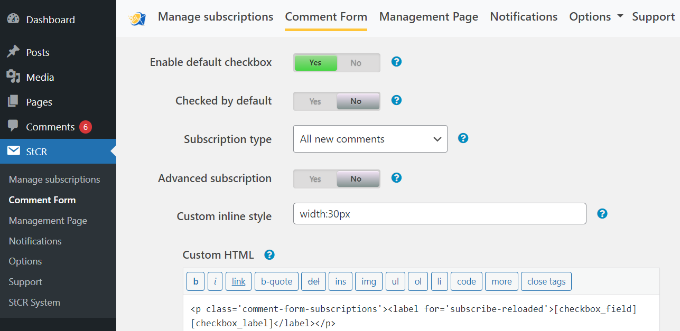

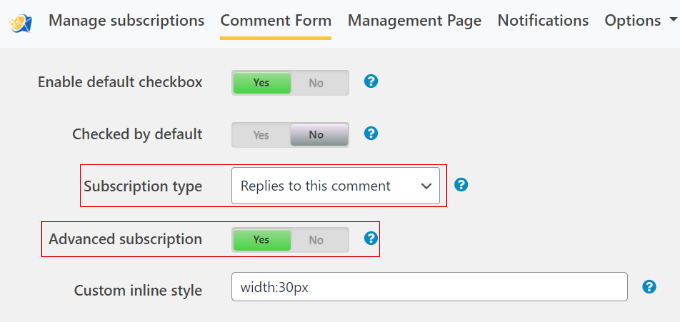
Here, you’ll need to find the ‘Advanced subscription’ section and click on the toggle so it shows Yes.
Then, open the ‘Subscription type’ dropdown and choose the ‘Replies to this comment ‘ option.

By default, the plugin shows a few different messages to your users, which you can see in the ‘Messages for your visitors’ section.
You can change any of these messages by typing into the small text editors. However, we recommend keeping all the links, as they give visitors access to pages where they can manage their subscriptions.
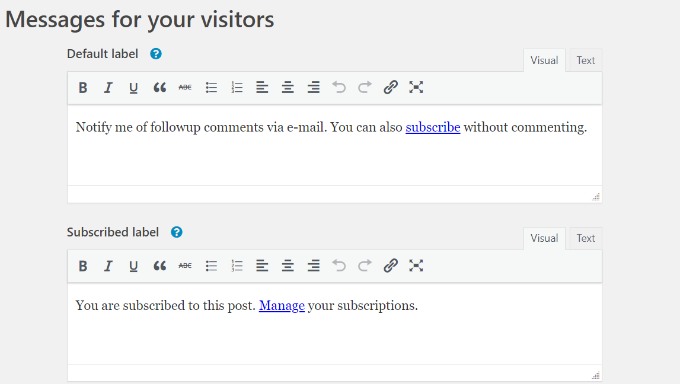

Once you have done that, scroll to the bottom of the page and click on ‘Save Changes’ to store your settings.
Now, if you visit your WordPress website, then you will see a subscription option beneath the comment section.
By default, this is set to ‘Don’t subscribe,’ but visitors can change this to ‘Replies to my comments’ to get a notification every time someone responds.
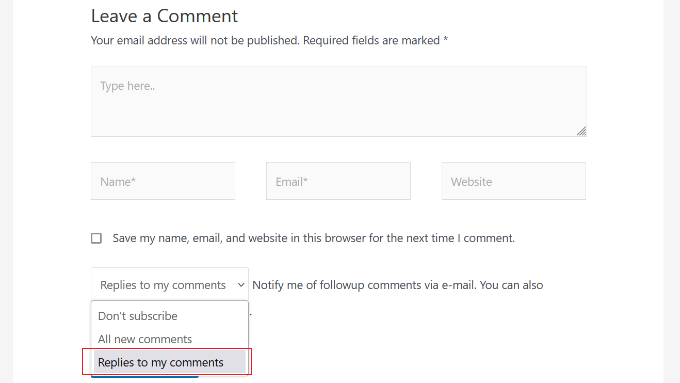

Visitors can also subscribe without leaving a comment. In this way, they can follow interesting discussions or debates on your WordPress blog.
To do this, they simply need to click on the ‘Subscribe’ link.
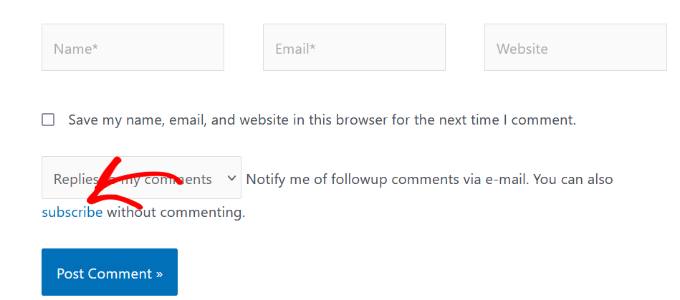

This takes them to the ‘Manage Subscription’ page, where they can type in their email address and create their subscription.
For more details, please see our step-by-step guide on how to allow users to subscribe to comments in WordPress.
The Subscribe to Comments Reloaded plugin has more settings that you can use to customize your comment subscriptions. These include a few security options to help combat comment spam and enable reCAPTCHA.
Expert Tip: After setting up these comment notification emails, you will want to make sure they arrive safely in the user’s inbox and not in the spam folder. With that in mind, we also recommend using an SMTP service provider like WP Mail SMTP to improve your email deliverability rate.
We hope this article helped you learn how to notify users only on replies to their comments in WordPress. You may also want to see our guide on how to track user engagement in WordPress with Google Analytics and must-have WordPress plugins for small businesses.
If you liked this article, then please subscribe to our YouTube Channel for WordPress video tutorials. You can also find us on Twitter and Facebook.


