
Building option panels for plugins have never been a fun task. It is usually the thing developers do at the end, and most developers do not put much effort into designing their options panel at all. But can you make an options page with components from Gutenberg?


Previously in a two-part series, I discussed how to build blocks for Gutenberg, now known as the block editor. But the brilliance of the whole block experience does not end on the front end – with blog posts and pages.
We can also make an options page with components from Gutenberg. While it sounds complicated, it is a straightforward process that actually requires less time than the standard way of doing things.
Here’s a screenshot of Gutenberg Blocks and Template Library by Otter (our plugin) where we built an options page with components from Gutenberg:

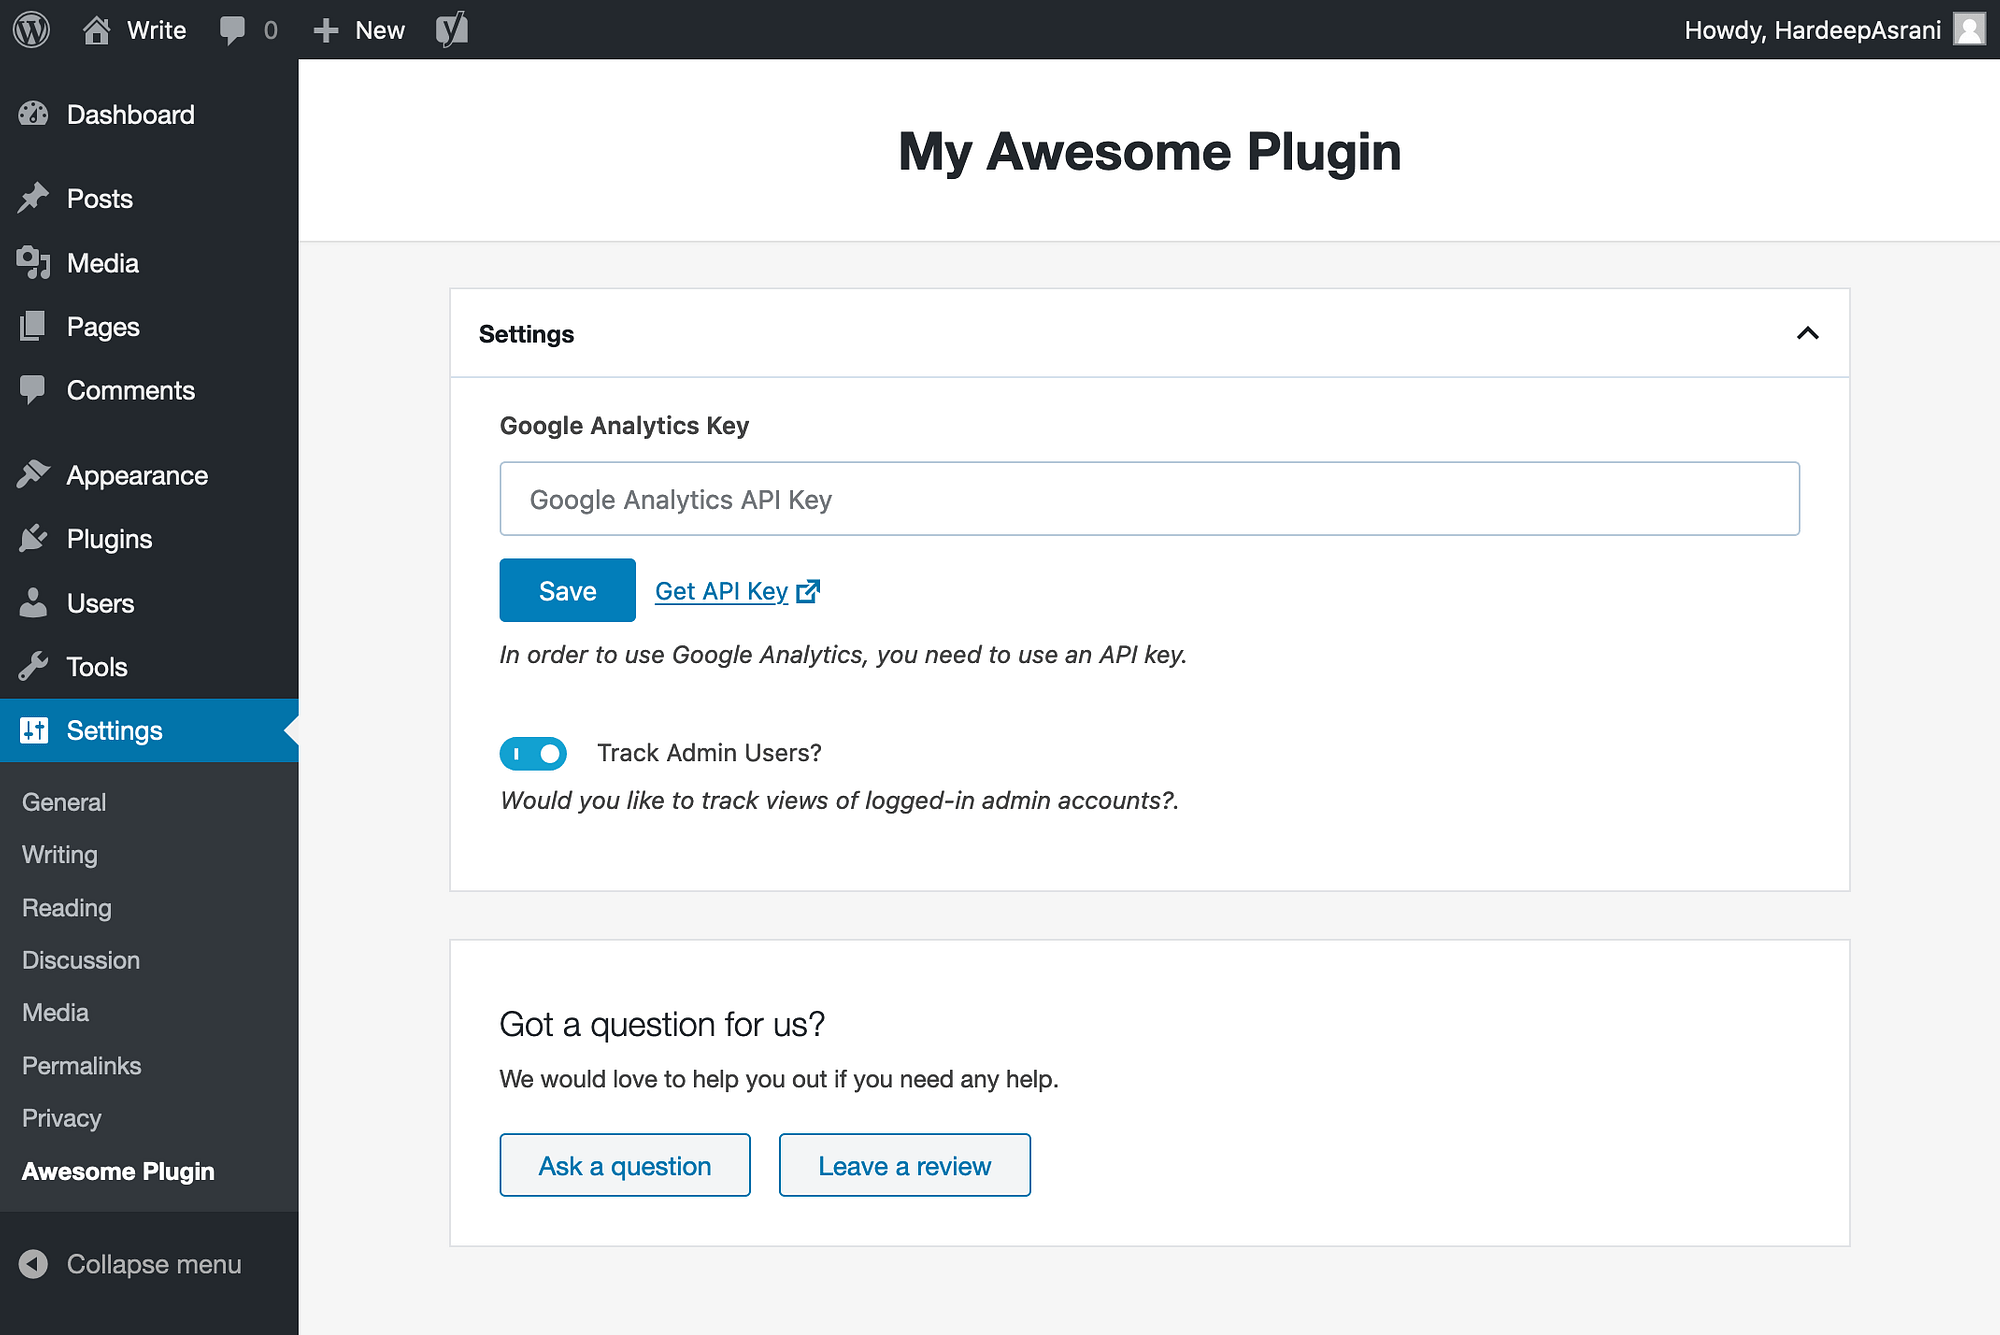
Simple and clean, right? Here’s how to build something like this:
What are these components?
Great question! Gutenberg components are nothing but React components made with an abstraction layer that makes you feel like you are not using React. But yeah, technically it is React.
Also, we will be using JSX to write our code. If you are new to JSX, you are going to love it.
Code files + notes
? Before we go ahead, you can find all the code that we have used here in this GitHub repository. You can install the plugin to see the final product of this tutorial.
In this article, I do not use Block Editor and Gutenberg interchangeably. By Block Editor, I only refer to the editor part of Gutenberg.
Setting up a “plugin options page”
The setup for our project is straightforward. Just like the human heart, it has two parts: the options page & build files.
First, we need to register our plugin & options page as usual:
define( 'CODEINWP_AWESOME_PLUGIN_VERSION', '1.0.0' );

function codeinwp_options_assets() {
	wp_enqueue_script( 'codeinwp-awesome-plugin-script', plugins_url( '/', __FILE__ ) . 'build/build.js', array( 'wp-api', 'wp-i18n', 'wp-components', 'wp-element' ), CODEINWP_AWESOME_PLUGIN_VERSION, true );
	wp_enqueue_style( 'codeinwp-awesome-plugin-style', plugins_url( '/', __FILE__ ) . 'build/build.css', array( 'wp-components' ) );
}

function codeinwp_menu_callback() {
	echo '<div id="codeinwp-awesome-plugin"></div>';
}

function codeinwp_add_option_menu() {
	$page_hook_suffix = add_options_page(
		__( 'Awesome Plugin', 'textdomain' ),
		__( 'Awesome Plugin', 'textdomain' ),
		'manage_options',
		'awesome',
		'codeinwp_menu_callback'
	);

	add_action( "admin_print_scripts-{$page_hook_suffix}", 'codeinwp_options_assets' );
}

add_action( 'admin_menu', 'codeinwp_add_option_menu' );
The codeinwp_add_option_menu function uses add_options_page to hook our options page to the Settings menu of WordPress. The codeinwp_menu_callback callback prints a div on the page, where we use DOM to render our components. And finally, we use the codeinwp_options_assets function to enqueue our scripts/styles to the options page.
Now let us talk about the script that we enqueue. As you see in the above code, the build.js will contain all the code for our options page.
After this much code, your options page should be visible under the Settings menu of WordPress. It is going to be empty with just a div, and the rest gets added later on with JavaScript.
Now we need to register the plugin options that we are going to put in our plugin’s options page. Let us register two options, one boolean & one string, for our options page:
function codeinwp_register_settings() {
	register_setting(
		'codeinwp_settings',
		'codeinwp_analytics_status',
		array(
			'type'         => 'boolean',
			'show_in_rest' => true,
			'default'      => false,
		)
	);

	register_setting(
		'codeinwp_settings',
		'codeinwp_analytics_key',
		array(
			'type'         => 'string',
			'show_in_rest' => true,
		)
	);
}

add_action( 'init', 'codeinwp_register_settings' );
That is all the PHP code that we need. Now let us talk about the JavaScript side of things.
React render in Gutenberg
In the Block Editor, you do not need to handle the rendering of your blocks. You just need to register them, and the rest is taken care of by the editor.
With Gutenberg, React is abstracted as the wp-element package and can be used to do everything React and ReactDOM do.
Let us try to render a sample heading to our options page. We need to import the render, as in ReactDOM.render, from the wp-element package to render our heading:
/**
 * WordPress dependencies
 */
const { render } = wp.element;

render(
	<h1>Hello World</h1>,
	document.getElementById( 'codeinwp-awesome-plugin' )
);
Rendering a component from Gutenberg
Just like we used the render function from wp-element, we can also use other components on our options page. Similar to how we used the PanelBody component in our first Gutenberg tutorial, we will be using it in our options page as well:
/**
 * WordPress dependencies
 */
const { __ } = wp.i18n;

const {
	PanelBody,
	PanelRow,
	ToggleControl
} = wp.components;

<PanelBody
	title={ __( 'Settings' ) }
>
	<PanelRow>
		<ToggleControl
			label={ __( 'Track Admin Users?' ) }
			help={ 'Would you like to track views of logged-in admin accounts?.' }
			checked={ true }
			onChange={ () => {} }
		/>
	</PanelRow>
</PanelBody>
The components will look good, but they do not work on their own. We need to have some mechanism to get and change options in the database as they change on the options page.
State management
We can use WordPress’ Backbone API in the componentDidMount lifecycle to get and update the values as our component’s state. This saves us from writing a REST route or using AJAX.
constructor() {
	super( ...arguments );

	this.state = {
		isAPILoaded: false,
		isAPISaving: false,
		codeinwp_analytics_status: false,
		codeinwp_analytics_key: ''
	};
}

async componentDidMount() {
	wp.api.loadPromise.then( () => {
		this.settings = new wp.api.models.Settings();

		if ( false === this.state.isAPILoaded ) {
			this.settings.fetch().then( response => {
				this.setState({
					codeinwp_analytics_status: Boolean( response.codeinwp_analytics_status ),
					codeinwp_analytics_key: response.codeinwp_analytics_key,
					isAPILoaded: true
				});
			});
		}
	});
}
Now the componentDidMount lifecycle fetches options from the database and sets them in its state. We can use those states in our controls to set the values.
And finally, we need to write an onChange function to update the state to the database.
changeOptions( option, value ) {
	this.setState({ isAPISaving: true });

	const model = new wp.api.models.Settings({
		// eslint-disable-next-line camelcase
		[option]: value
	});

	model.save().then( response => {
		this.setState({
			[option]: response[option],
			isAPISaving: false
		});
	});
}
The changeOptions function, once you bind it to this can be used to change the state. Like this:
<ToggleControl
	label={ __( 'Track Admin Users?' ) }
	help={ 'Would you like to track views of logged-in admin accounts?.' }
	checked={ this.state.codeinwp_analytics_status }
	onChange={ () => this.changeOptions( 'codeinwp_analytics_status', ! this.state.codeinwp_analytics_status ) }
/>
And that is how you can create a plugin options page with components from Gutenberg! The possibilities are endless with this.
In my code example, I also added an input field and footer section to the options page:

But using Gutenberg components is not all; you can also use third-party React libraries, like adding a chart to your page with the react-chartjs2 package.
Gutenberg has become an integral part of the WordPress core and it is here to stay. It brings a lot of tools that we, developers, can use in our projects.
At ThemeIsle, we have been using components from Gutenberg in WordPress’ Customizer to enhance the experience in the Neve theme, for instance.
So, have you tried using Gutenberg components outside the editor? Let us know in the comments!
…
Don’t forget to join our crash course on speeding up your WordPress site. With some simple fixes, you can reduce your loading time by even 50-80%:

Layout, presentation and editing by Karol K.