
When your website becomes popular, chances are you will need to either upgrade your hosting plan or switch to a different company.
The biggest problem with switching hosts is the risk of losing data as well as potential downtime.
Nobody wants to see months of their hard work go down the drain, much less having readers complain they can’t access your website.
In this post, I’ll show you how to move your WordPress website a new host with no downtime.
The goal is to make the process as painless and swift as possible so let’s get started.
What you will learn in this tutorial
- How to migrate your WordPress website to a new host with no downtime
Tutorial information
Difficulty: Intermediate
Time Required: 1 hour + (24-72 hours for changes to propagate)
Content Management System:Â WordPress (self-hosted)
Summary of steps:
- Step 1 – Clone your site
- Step 2 – Migrate your site
- Step 3 – Running the installer
- Step 4 – Switching nameservers
Two important points before we start:
- Do not cancel your current hosting package until the entire migration process is complete as this is what most commonly leads to downtime.
- We are only covering the migration of your website in this tutorial, there may be other things youâll need to migrate such as email boxes and email forwards we recommend checking with your host on the best way to migrate those.
Step 1: Clone your site
For this tutorial, we’ll use a free plugin called Duplicator which as the name suggests makes a duplicate of your website. To get started navigate to your dashboard, click on Plugins > Add New and search for Duplicator. Install and activate the plugin.
Package your website
The next step is to create a package of your website. This plugin will create two files: an installer file and a zipped folder containing all your website’s files and your database.
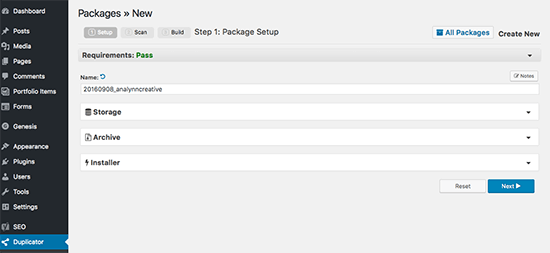
Click on Duplicator’s menu in the sidebar and then click on Create New Package. The plugin will generate a name for your package which you can change to something more meaningful.
Click on Scan to allow Duplicator to make sure everything is working fine. You might get a warning that your WordPress installation contains large files, especially if you didn’t properly compress your images, but in most cases, you can safely ignore that particular warning.
Bear in mind that you need to pass the scan in order to make sure the package creation and later restoration will go over smoothly.
Once the scan is done, click on Build to create the package. This process might take a while, depending on the size of your website. Once the package is created, download both files to your computer.
Upload the files to your new host
The next step is to download an FTP program like WinSCP (which is completely free) and upload the downloaded files to your new hosting provider. They should have sent you an email containing a username and password which allows you to connect to your website via FTP.
Install WinSCPÂ and then enter the username and password to connect to your new host. Once the connection has been established, click on the /public_html folder which should be empty. Drag your files into that folder without unzipping the zipped folder.
Again, this is a part of the process that could take a while, depending on the size of your website. Once that part is complete, proceed to the next step.
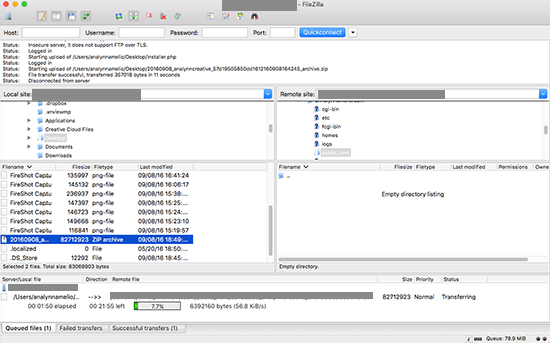
Note: The above image shows software called FileZilla. We have started recommending WinSCP instead but both do the same job. If you have FileZilla installed already – using that is fine.
Step 2: Migrate your site
Once you have uploaded both files to your new host, you need to access the installer.php file in a browser. The complete path will look like this:
http://www.yourawesomewebsite.com/installer.php
However, right now the URL will take you to your old web host and you will get a 404 error. This is because your domain name is still pointing to your old web host.
Usually, most people will recommend changing your domain nameservers to point to your new host. This will result in people seeing a broken site as you migrate it, so donât do it just yet.
Iâll show you how you can access your new site temporarily on your computer without affecting your old site.
Changing the hosts file
The hosts file tells your computer to map domain names to specific IP addresses. In this step, we will add an entry for your domain name in the hosts file, so it points to your new host.
Making these changes will allow you to access the files on your new host using your own domain name whereas the rest of the world will still be accessing your site from the old host. This will guarantee 100% uptime.
The first thing you need to find is the IP address of your new hostâs server. That information should have been included in the welcome email from your new host, but in case it wasn’t, you can easily find it yourself.
You will need to log into your cPanel dashboard and click on expand stats link in the left-hand sidebar. This will expand the sidebar showing you information about the status of your server. The information you need to copy is the Shared IP Address.
Editing your hosts file
If youâre using Windows, go to Programs > All Programs > Accessories and then right click on the Notepad and select Run as Administrator. Windows UAC prompt will appear, click on yes to launch Notepad with administrator privileges.
On the Notepad screen, go to File > Open and then go to C:WindowsSystem32driversetc. Select hosts file and open it.
If youâre using a Mac, click on the Finder, and then in the top menu click on Go to Folder and enter: Â /private/etc/hosts
Click on the hosts file and drag it to your desktop, then use TextEdit to open it.
At the bottom of the hosts file, you need to enter the IP address you copied and then enter your domain name. Like this:
192.168.1.22 www.example.com
Replace the IP address with the one you copied from cPanel, and example.com with your own domain name. Save your changes.
Mac users will need to drag the hosts file back to the /private/etc folder and select to replace the file thatâs there.
Now you can access your files on the new host using your domain name on your computer.
Step 3: Running the installer
To run the installer.php file type in your domain name followed by /installer.php
For example: http://www.example.com/installer.php
Replace example.com with your own domain name. You will be taken to an installation screen which will ask for your database information. Select the option to create a new database, then enter your MySQL username and password which should have been provided to you by your host.
If you don’t have a database setup, your host will have instructions on how to do this. If your host uses cPanel, you can follow this tutorial by InMotion to create a database.
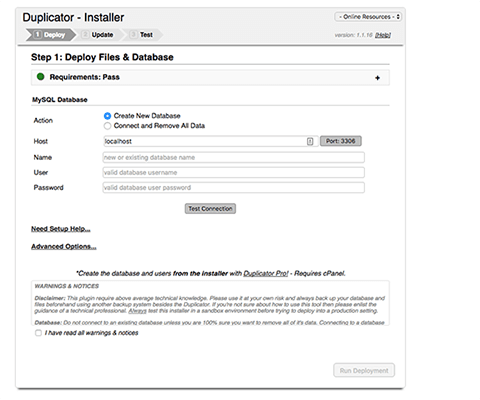
Once you’ve entered all the information click on Test Connection. Itâs important to make sure you get a green check mark for both the Server Connection and Finding the database, otherwise the installer wonât work. Click on Deploy to run the installer.
Once the process is complete, you will need to complete four more steps which include saving your permalinks, removing installer data, reviewing the report and testing your live website.
Saving permalinks will immediately take you to your dashboard so go ahead and click on Save. Then click the link to remove the migration and cloning data and finally, click on Test site to make sure everything is ok.
Important: Now you can remove the changes you made to your hosts file.
Step 4: Switching nameservers
The final step is to change the nameservers so that your visitors can access your new website.
Many people usually buy the domain as part of buying their hosting package in which case, you will need to either change your nameservers there and cancel your hosting package only (your domain must stay active).
Itâs best however, to transfer the domain to a different company. We recommend using a different company to the one that you host your website with.
The exact steps how to migrate your domain will vary from host to host but will involve unlocking your domain and then submitting a support request with your new host to migrate your domain.
In an ideal scenario, you used a separate domain name registrar to purchase your domain and then a separate hosting provider to actually host your website.
The reason this is ideal is because even if something happens to your website â a hacker gains access to your website, someone performs a DDoS attack on your web host or on WordPress itself, your domain is still safe and intact.
Not to mention the fact that some hosting providers like to make it extremely difficult to transfer the domain out to a new provider.
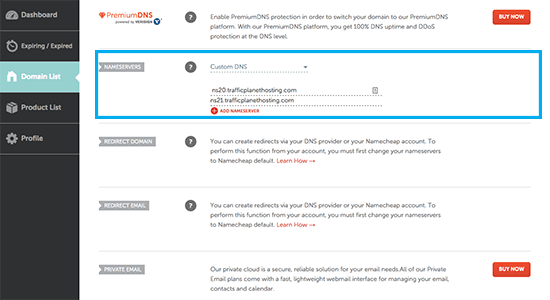
If you used a domain registrar like Namecheap to purchase your domain, you will need to log into their dashboard and update your nameservers â your new web host should have provided this information as well.
The nameservers will look something like this:
ns1.hostname.com
ns2.hostname.com
Depending on your domain registrar or web host, the setup may vary in how you access the DNS settings. However, the basic concept is the same â look for domain management or DNS settings. There will be a Manage button next to it, so click on and then enter your new nameservers.
Save your changes and you are done.
These changes can take anywhere between 24 to 72 hours to propagate throughout the world during which time your website will load intermittently from both your old and your new host. Your users however, won’t see any difference.
After the propagation has been completed, you can go ahead and cancel your old hosting account.
Note: There may be other tools/services that you’ll need to change after your migration. For example, if you use a CDN like MaxCDN, you’ll need to login and change your origin server IP address to the one for your new web host.
Final thoughts
Migrating your website to a new website can be a hassle.
An alternative way would be to change your hosts file as described above and then creating a fresh WordPress install.
Once that’s done, you would need to use the Import tool in WordPress to import all your posts, pages, comments, media files, etc.
The downside of this approach is that it can be quite time-consuming and you will have to manually install and set up your theme and all your plugins.
In some cases, your media files might not import properly. For a large site that’s a lot of work.
That’s why we recommend using the method described in this article. It can save you a lot of headaches not to mention time.


