Looking to migrate WordPress.com to WordPress.org?
If you’ve ever read WPLift before, you know that we’re big fans of the self-hosted version of WordPress (that’s WordPress.org). However, when you’re just getting started, the simplicity of WordPress.com can be attractive.
But don’t worry – if you started on WordPress.com and want to make the switch to self-hosted WordPress.org, the process of moving over is pretty painless.
To help, I’m going to spend the rest of this post showing you exactly how to move your site from WordPress.com to WordPress.org.
Step-by-Step: How to Migrate WordPress.com to WordPress.org
Here’s a high-level look at the process, and then I’ll get much more detailed:
- Set up the basics at your new WordPress.org site
- Choose your theme (if you’re lucky, you can use your same WordPress.com theme)
- Export your content from WordPress.com
- Import that content to WordPress.org
- Test your site to find any bugs (I’ll share some tips to fix common issues)
- Redirect your WordPress.com site to WordPress.org (helpful if you want to maintain traffic/SEO rankings)
Let’s dig in…
Step 0: An Important Consideration for Your Site’s Domain Name
Before digging into the tutorial, you’ll want to consider the domain name of your WordPress.com site and the domain name of your WordPress.org site.
If you’re using a WordPress.com subdomain (e.g. yourblog.wordpress.com), you can just jump right into the tutorial and purchase a new domain name to use with your self-hosted WordPress site.
However, if you purchased a domain name from WordPress.com – like yourblog.com – you’ll need to point that domain to the hosting you purchase in Step 1 (instructions here).
Step 1: Purchase Hosting and Install the WordPress.org Software
To get started, you’ll want to have the basic foundation of your new self-hosted WordPress site up and running.
That is, you’ll need to:
- Sign up for WordPress hosting (and purchase a domain name if you’re currently using a WordPress.com subdomain)
- Install WordPress
- Set your permalink structure
If you’ve already installed WordPress at your own host, you can skip ahead to Step 2.
If you’re not sure where to get started, we recommend SiteGround as a good, affordable option. SiteGround is where we host this very blog you’re reading, and SiteGround has:
- Great support
- Nice managed features like automatic updates
- Affordable prices, starting at just ~$4 per month
You’ll also be able to purchase a domain during the signup process if needed.
You can learn more in our full SiteGround review.
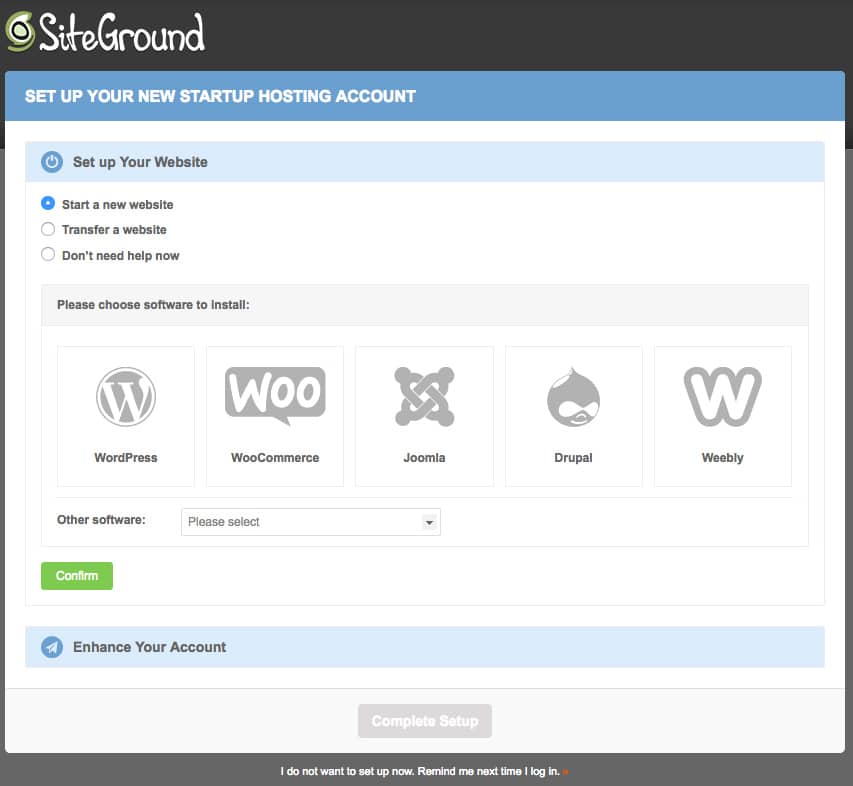
Once you sign up for SiteGround, their setup wizard will give you an option to have WordPress pre-installed, which is another convenient part of hosting with SiteGround:
After you’ve installed the self-hosted WordPress software, you’ll need to choose one important setting – your site’s permalinks.
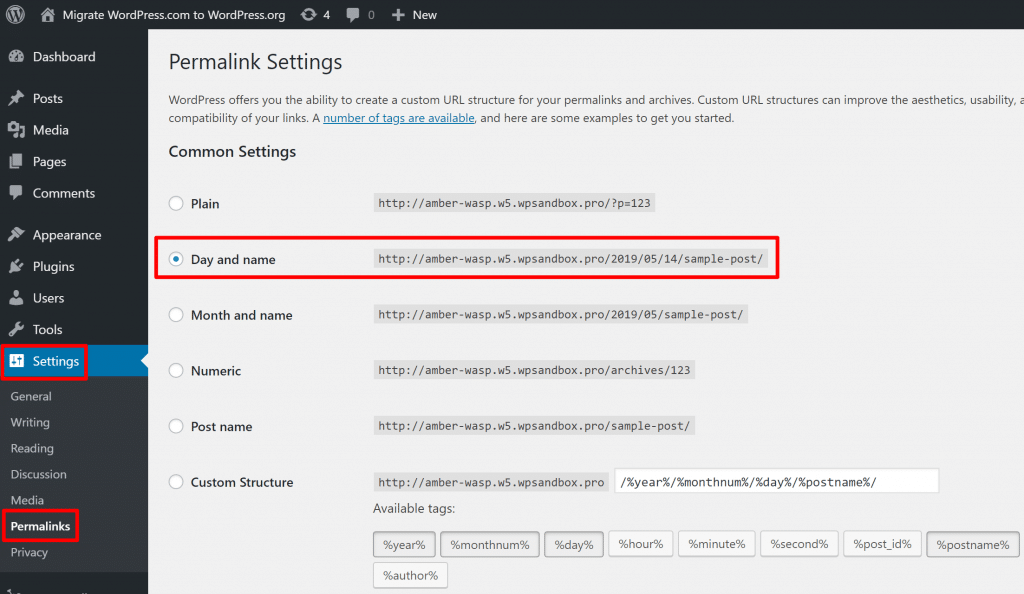
The permalink settings control how your URLs look. And because you’re moving your content from WordPress.com to WordPress.org, you want to make sure you use the same permalink structure.
To set this, go to Settings → Permalinks in your WordPress.org site’s dashboard and choose the Day and name option, which is the default structure that WordPress.com site’s use:
You can always change this later by setting up a 301 redirect.
Step 2: Choose Your WordPress.org Site’s Theme
Once you’ve installed WordPress, you’ll want to choose your WordPress.org site’s theme. If you’re lucky, you’ll be able to use the same theme that you’re using at WordPress.com.
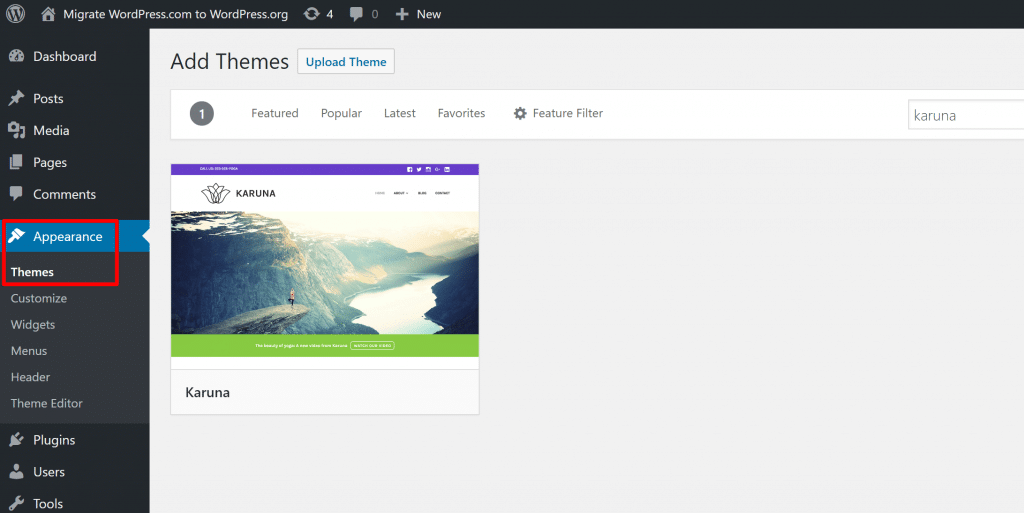
Many, but not all, of the WordPress.com themes are also available for free at WordPress.org. For example, the Karuna theme is available at both WordPress.com and WordPress.org.
You can install a new WordPress theme by going to Appearance → Themes → Add New:
If you can’t find the theme that you’re using at WordPress.com, you’ll just need to pick a new theme, unfortunately.
Here are some of our collections of free WordPress themes to get you started:
Step 3: Export Your WordPress.com Content
Once you’ve got the foundation of your new WordPress.org site set up, you’re ready to move your content from WordPress.com to that new WordPress.org site.
To get started, you’ll need to export all of your existing WordPress.com content.
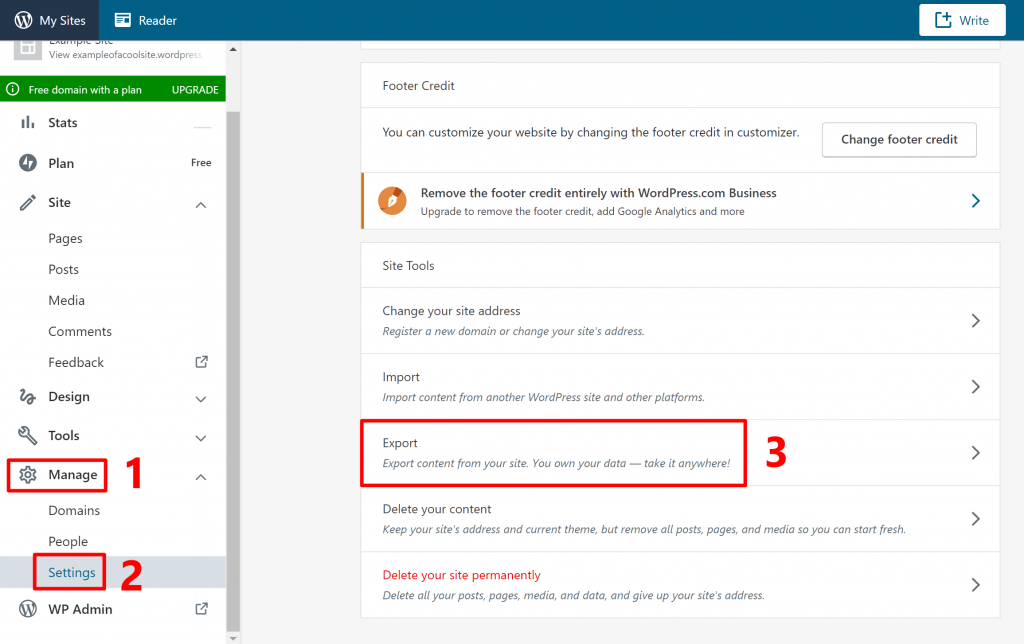
To do this, head to the WordPress.com dashboard for the site you want to move. Then, find the Manage section in the admin sidebar and select the Settings options. Scroll down and look for the Export option:
On the next screen, click the Export All button in the Export your content section:
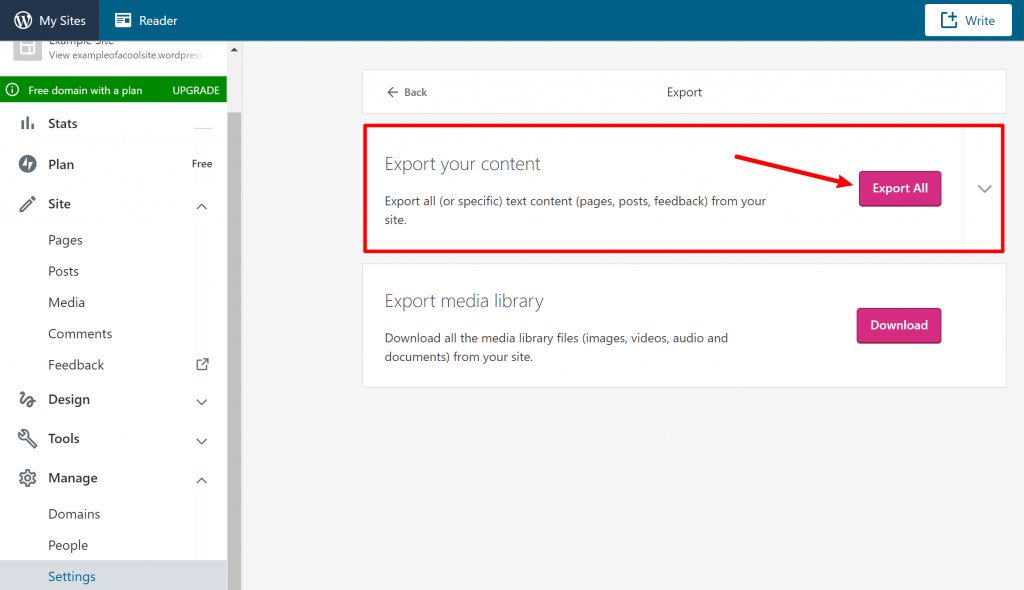
This will start the export process, which might take some time depending on the size of your site.
Once it finishes, you’ll get an email with a download link, or you can also click the Download link in the interface:
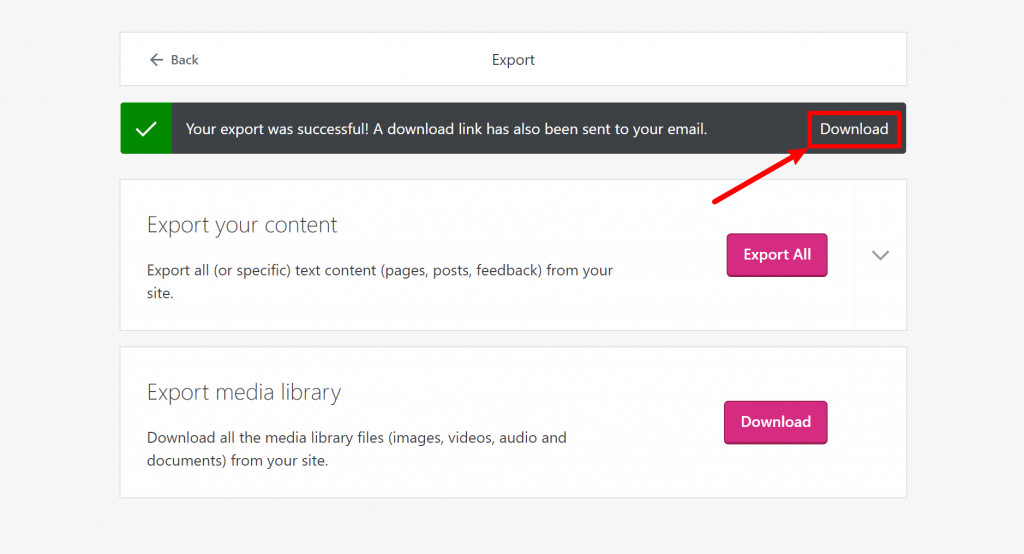
The download will be a ZIP file. Open that ZIP file and extract its contents. Once you do that, you’ll find an .xml file inside the folder. Keep this .xml file handy, as it’s what you’ll need in the next step:

Step 4: Import Your WordPress.com Content to WordPress.org
Now that you’ve exported your content from WordPress.com, you need to import that same content to your new WordPress.org site.
To do that, open your new self-hosted WordPress site’s dashboard and go to Tools → Import. Find the WordPress importer tool and click Install Now:
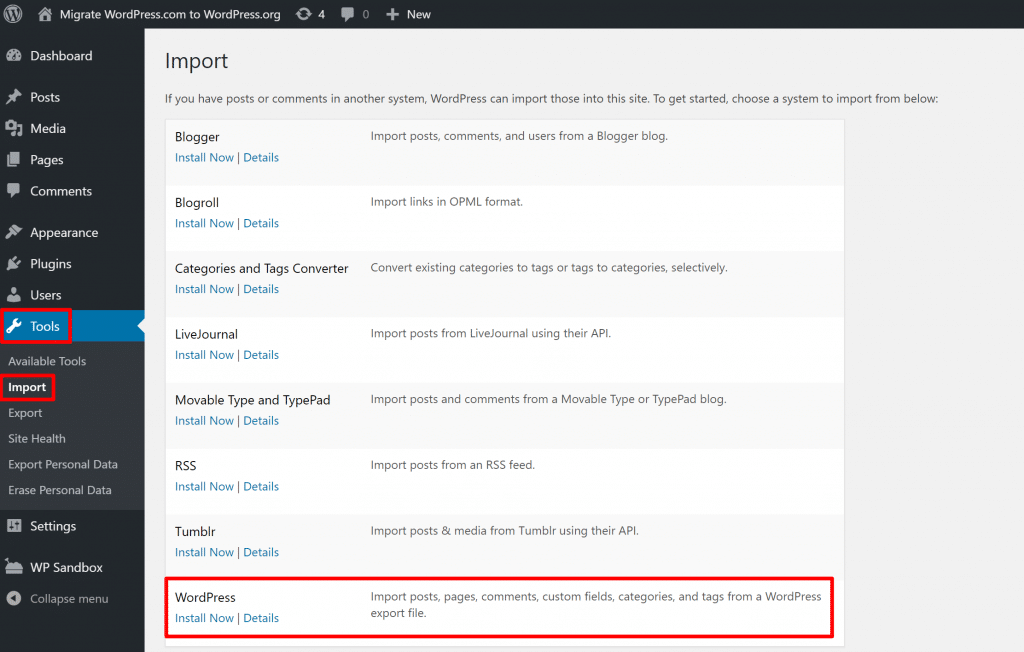
After a short wait, you should see a new option that lets you Run Importer. Go ahead and click that:
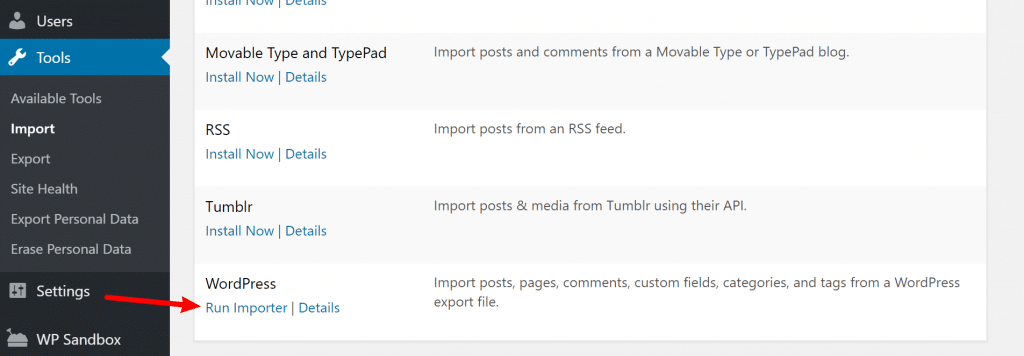
On the next page, you’ll need to select the .xml file from the previous step. Then, click Upload file and import:

On the next screen, use the assign posts to an existing user drop-down to select your username. This sets your new self-hosted WordPress account as the author for all the content that you import from WordPress.com.
Beyond that, make sure to check the box for Download and import file attachments. This tells WordPress to also import all of your images and other media:
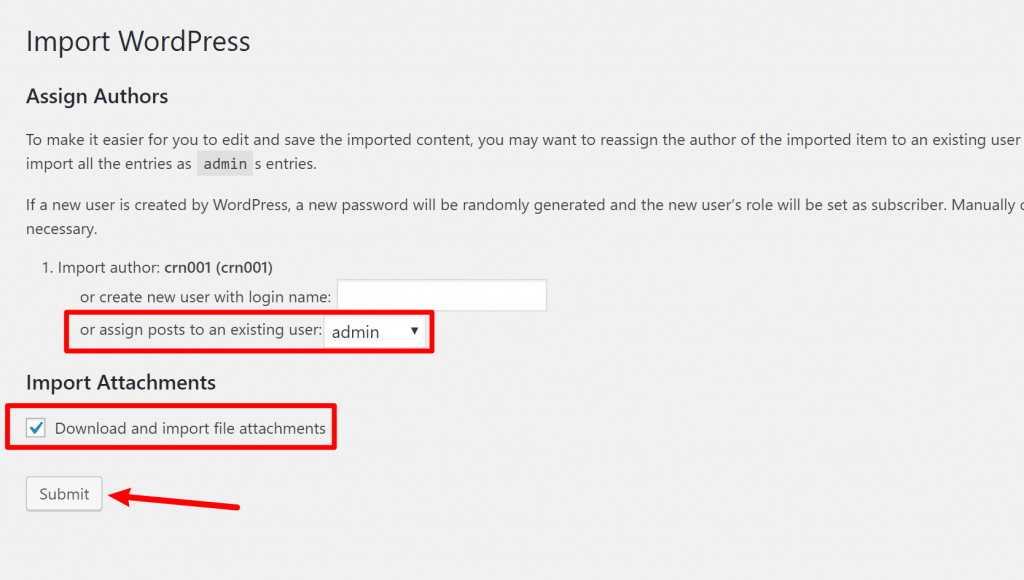
Then, click Submit.
Depending on the size of your WordPress.com site, you might need to wait a bit. But once it finishes, you should see a success message:
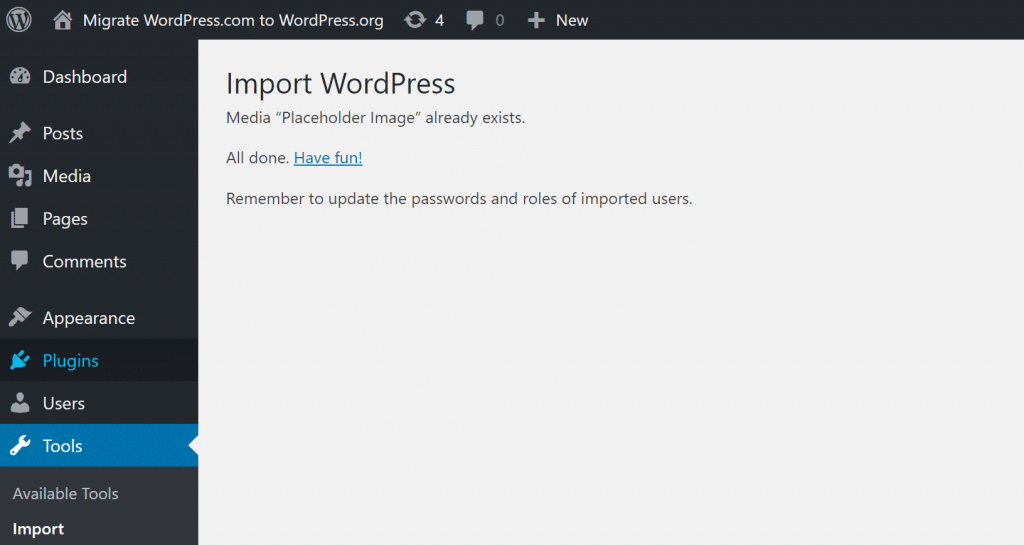
That means all of your WordPress.com content should successfully be at your self-hosted WordPress.org site.
Step 5: Test, Test, Test (And How to Fix Any Issues)
Now, you’ll want to thoroughly test your site to make sure there aren’t any issues with the content that you imported.
Go check out your content and pay special attention to whether or not:
- Images and other media are available (you’ll want to make sure that the images are being loaded from your new self-hosted site, rather than your old WordPress.com URL)
- The internal links in your content work properly
If you changed URLs as part of the process – like moving from yourblog.wordpress.com to just yourblog.com, you’ll probably have a bunch of broken links inside your content. That is, if you linked to a blog post from another blog post, that link will take people back to your WordPress.com site instead of to that blog post on your new self-hosted site.
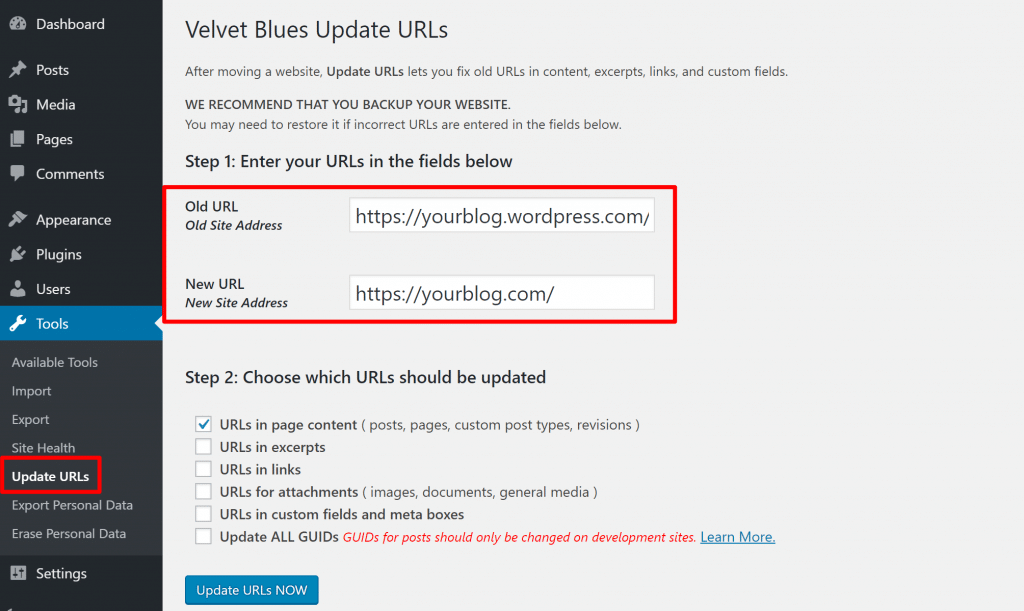
To fix this, you can use a free plugin called Velvet Blues Update URLs. Once you install and activate the plugin, go to Tools → Update URLs and:
- Enter your old WordPress.com URL in the Old URL box
- Enter your new self-hosted WordPress URL in the New URL box
- Click the Update URLs NOW button
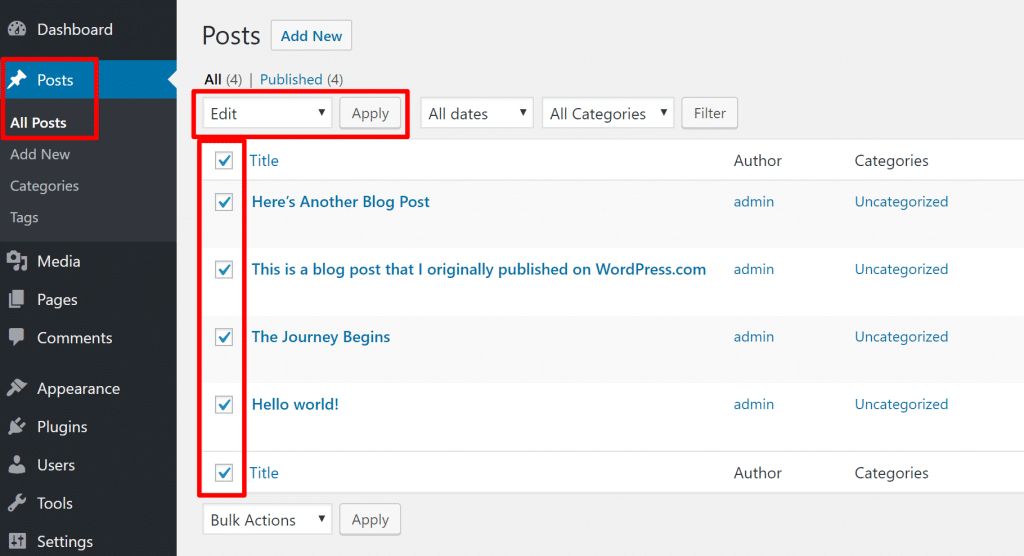
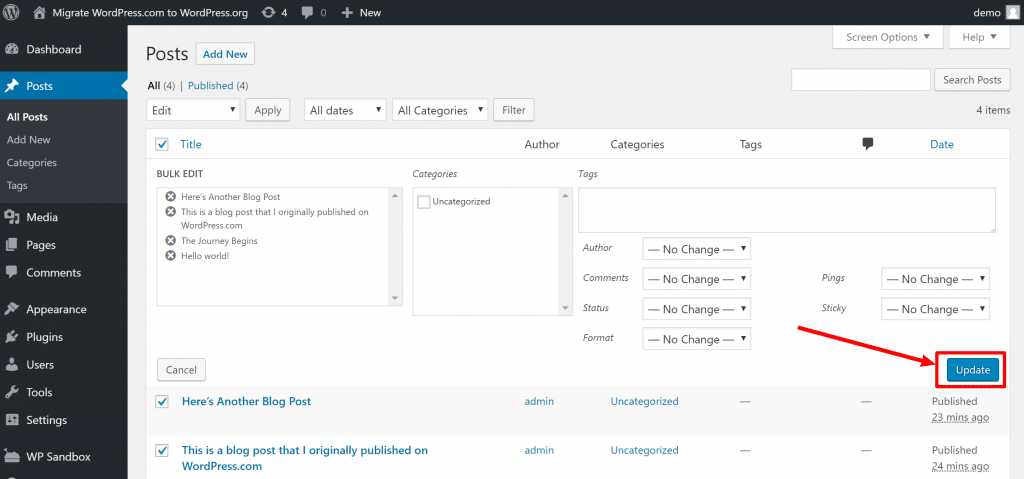
If you’re experiencing missing images, you can use the free Auto Upload Images plugin. Once you install and activate the plugin, go to the Posts area in your WordPress dashboard. Select all of your posts and use the Bulk Actions drop-down to Edit them:
Then, just click the Update button (no need to make any changes):
Step 6: Redirect Your WordPress.com Site to Your New WordPress.org Site
After completing the first 5 steps, you’re pretty much done. That is, you should have a working clone of your WordPress.com site.
Now, you just need to decide what to do with your old WordPress.com site. This choice depends on the URL/domain of your sites…
If you’re using the same domain for WordPress.com and WordPress.org…
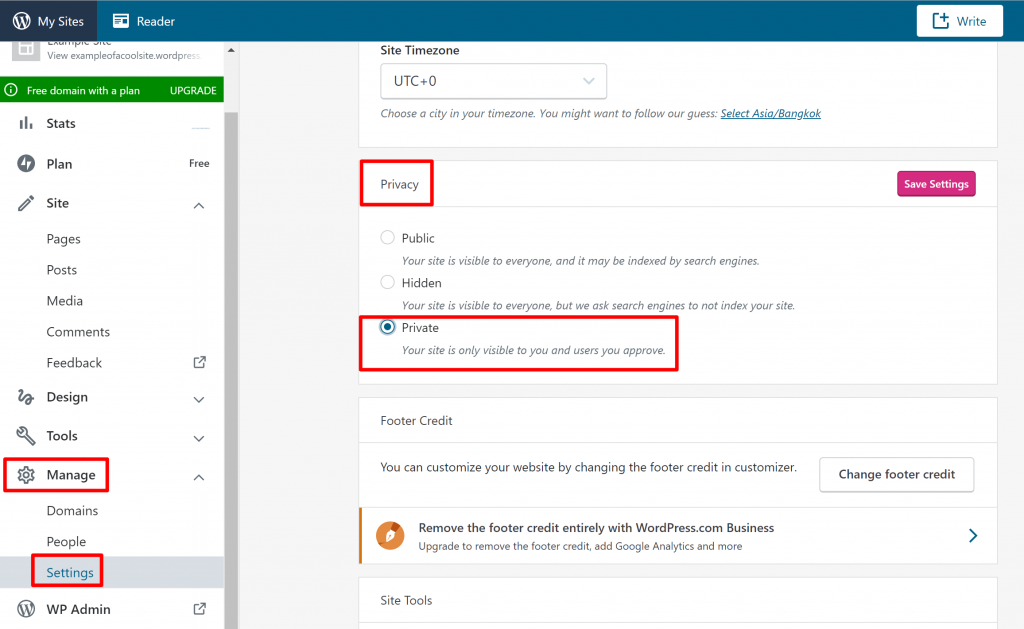
Then all you need to do is make your old WordPress.com site private. You can do this by going to Manage → Settings in your WordPress.com dashboard and selecting Private under the Privacy settings:
If you’re using different domains for WordPress.com and WordPress.org…
Then you’ll want to set up a redirect. For example, if you go from yourblog.wordpress.com to yourblog.com, you’ll want to redirect all the traffic and links to your old WordPress.com domain to your new self-hosted domain.
This is not free – you’ll need to pay WordPress.com $13 per year for the privilege – but it ensures that you don’t lose out on the traffic and reputation that you’ve already built.
To do it, go here and select the domain that you want to redirect. From there, all you need to do is enter your new domain name in the box and pay:

If you don’t want to pay this $13 per year, you don’t have to. Just be aware that you will lose all the existing traffic and SEO optimization for your WordPress.com site, which can cost a lot more than $13 if you’ve put a lot of work in already.
That’s How to Migrate WordPress.com to WordPress.org
Congrats! You just successfully moved your site from WordPress.com to WordPress.org.
What’s next? Well, now you get to explore the whole wide world of WordPress plugins.
If you miss some of the functionality from WordPress.com, you can use the Jetpack plugin to connect your self-hosted site to WordPress.com and get a lot of those features back. And I also recommend that you check out our collection of must-have plugins for all self-hosted WordPress sites.
Any questions about how to move WordPress.com to self-hosted WordPress? Ask away in the comments!


