
Back in June of 2016, we were one of the first sites to write an Elementor review. It’s been almost four years since then. And in those four years, we’ve seen Elementor undergo some incredible growth. Not only have they gone from zero to 700,000+ active installs (our 2018 update) to over five million installs (our 2020 update), but we’ve also seen the Elementor team continue to push out tons of great new features at a rapid pace.
That growth is why we actually use Elementor to power this very site you’re reading right now. Yup – we put our money where our mouth is and use Elementor (and GeneratePress) to style WPLift.
Because Elementor has pushed out so many new features, we decided that we needed to update our Elementor review again. We originally published it in 2016. Then we updated it in 2018. Now, we’ve updated it once again in 2020 to account for all the new features such as:
- Theme Builder
- Dynamic content
- Popup Builder
- WooCommerce Builder
Basically, our Elementor review is accurate to every single feature that Elementor has released up to May 2020.
Ready to check it out? Let’s dig in…
Elementor Review: What Does This Thing Do?
At its core, Elementor is still a WordPress page builder.
If you’re not familiar with that terminology, it just means that Elementor helps you build your content and website using simple drag and drop controls and a live visual preview of your website, rather than requiring you to mess around with the underlying code. Again, you:
- Put your page together like Legos. You just drag and drop different “elements” together to create a design.
- Don’t need to know any code.
- See exactly what your visitors will see, which makes it easy to know exactly how your finished design looks.
Most non-developers absolutely love page builders because they let you create more styled content without needing to learn HTML/CSS. You can even import premade templates that have already done much of the work for you.
The core Elementor page builder is 100% free. Just by itself, you can already make some pretty stellar pages with just the free version.
If you purchase the Elementor Pro add-on, though, you’ll also get access to:
- Theme building – as of Elementor Pro 2.0, Elementor lets you build your header, footer, archive pages, single pages, and more with the same drag and drop interface.
- Dynamic content – you can insert dynamic content from custom fields in your designs.
- Popup Builder – you can design flexible popups using Elementor and display them on your site.
- WooCommerce Builder – you can design your store’s shop and archive pages.
- More elements – you get lots of helpful new elements to build your website.
- Pro templates – while the free version of Elementor includes some free templates, most of the best templates are part of Elementor Pro.
- Global widgets – these let you reuse the same widget on multiple pages and then edit that widget from one location.
- Live custom CSS – easily add custom CSS right from the Elementor interface.
How The Main Elementor Interface Works
There’s a lot of nitty-gritty details to cover, but let’s start things off with a basic look at how you can build a page with the free Elementor page builder.
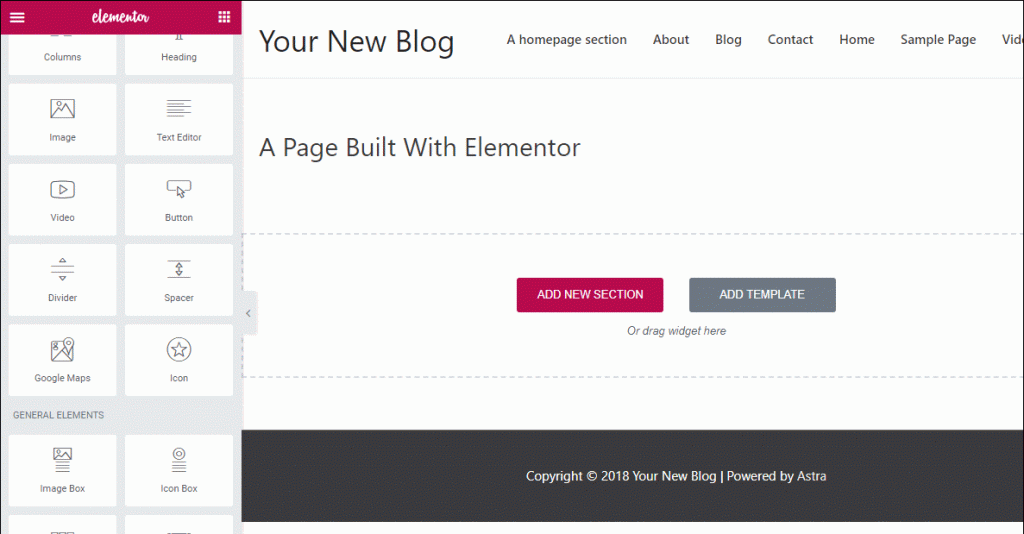
When you first launch Elementor, you’ll see a live preview of your website, with some added elements (these are what let you actually create your designs).

There are three core areas you’ll work in (marked below):
- 1 – this is where you see a live preview of your design. You see exactly what your visitors will see when they come to your site, which makes it very easy to design. This is also where you can create “sections” which help you organize your “widgets”
- 2 – these are the widgets you can use to build your designs. You just drag them over to the live preview. Then, you’ll be able to customize each widget using the same sidebar.
- 3 – these are helpful controls that let you see how your design will look on a different device (like a smartphone), undo/redo changes, and some other helpful functionality.
Building Your Page With Widgets/Elements
If you’re already familiar with page builders, this might not blow your mind. But if you’re not…this is pretty cool.
Here’s why people love page builders:
Let’s say you want to add a button to your page…
Rather than needing to mess around with HTML/CSS like you normally would, all you do is drag over the element:
To add more design elements, you just keep dragging over widgets. Once you get the hang of things, you’ll be able to create something like this without writing a single line of code:

This example is taken from our post on how to create a landing page with Elementor. You can see the process in more detail there.
Editing Individual Elements
Once you drag over an element, you’ll likely need to edit it to make it behave the right way.
There are two main ways to edit your elements.
First, if you’re dealing with an element that has text, you can just click on that text and type (this is called inline editing):
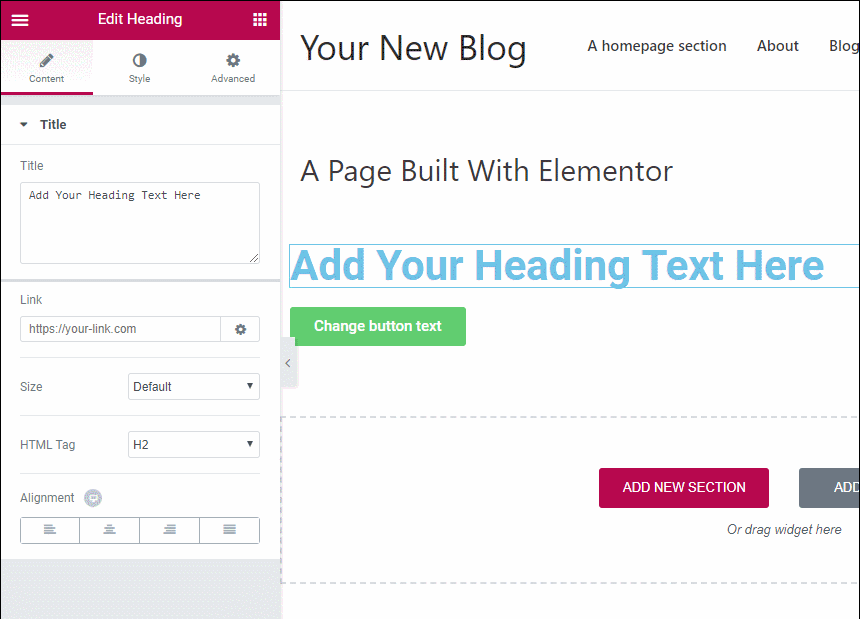
Then, you also get the sidebar area with 3 different tabs. The settings available in each tab vary depending on which element you’ve used, but the general idea is the same no matter what:
- Content – this is where you control basic functionality. E.g. for a button, it’s where you choose the button size, where the button links to, etc.
- Style – this is where you control fonts, colors, and other basic stylistic elements.
- Advanced – this is where you can control responsive settings, add custom margins/padding, use custom CSS (in Pro) and other more advanced things.

These controls are what allow you to really dig in and make the page design your own. And because you’re working in a visual editor, the instant that you tweak something small (like font size or padding), you’ll immediately see those changes on the preview of your site so you know exactly how things look.
Styling Your Sections Or Columns
If you just want to add some styling to regular posts, you might not need to ever dig into sections or columns. But if you want to create landing pages or otherwise build a more “full” website, you’ll need to use them.
Sections are kind of like a container for one or more widgets. They’re helpful because they let you:
- Group things together to provide better spacing
- Control that entire group as a single entity (like adding a background to the entire section, rather than just a specific widget)
- Add shape dividers and other cool features
Columns are another grouping element that sit inside a section. They help you divide up your page horizontally if needed.
For example, in the screenshot above, I had two different elements. By editing each element individually, I could add backgrounds to those actual elements like this (this is ugly – I’m just proving a point!):

But most of the time, that’s not what you’ll want to do. Instead, by editing the section directly, I could add one cohesive background like this:

You can view this as a kind of hierarchy:
A section contains one or more columns. Each column can then contain anywhere from zero to unlimited widgets/elements.
Once you get the hang of the interplay between these different classes, you’ll be able to unlock the full power of Elementor.
Previewing And Controlling How Your Design Looks On Different Devices
Ok, now that I’ve done a basic introduction to how Elementor works, let’s look at some of the specific features that take Elementor from “just a page builder” to “one of the fastest growing and most popular page builders”.
First up, you have Elementor’s responsive design controls. In a world where mobile Internet traffic is huge, you need your design to look as great on mobile devices as it does on desktops.
To help you make that a reality, Elementor gives you two helpful options.
First, you can preview how your design looks on different devices using a button in the bottom-left corner:

But beyond that, you can also show or hide elements, columns, or sections based on a user’s device in the Advanced tab:

This feature is super helpful because you’ll almost always have some elements that look great on desktops, but get in the way on mobile (think big images).
Using Revisions To Undo Mistakes
We all make mistakes…
And while the rest of life might not make it easy to undo a mistake, Elementor does.
At any time, you can click on the History button to review a list of:
- Actions – specific actions that you’ve taken during a session are listed here.
- Revisions – each time you save or publish the content, it’s listed here
To roll back to a previous version, all you do is click:

While many page builders offer this functionality, Elementor stands out for how flexible it is in letting you move back to past versions.
Changing The Template To Design A Page From A Blank Canvas
This is a super simple feature…but massively important and one of the reasons I’ve always loved Elementor.
If you want to use a page builder to create a landing page, you need a way to hide your WordPress theme’s header, footer, and sidebar.
While you can find themes that make this easy, most themes don’t offer this functionality.
With many other page builders, that means you’re out of luck. But with Elementor, you can just use the included Elementor Canvas template to instantly work from a blank slate:

Pre-Built Templates Save You Tons Of Time
Sometimes, you don’t want to build your entire design from scratch. When that happens, Elementor templates save the day.
Elementor templates let you easily import designs that you can then edit and tweak using the regular Elementor interface.
Elementor itself includes a built-in library of templates (some are free, while others require Elementor Pro):

Templates come in two different formats now, which is another improvement from Elementor 2.0:
- Blocks – these are individual page sections that you can put together to build a page (kind of like Legos). They also come in handy for the theme building features of Elementor Pro.
- Pages – these are full-page designs where everything is already put together for you.
Beyond the templates that Elementor offers, you can also:
- Save your own designs as templates to reuse them later
- Import Elementor templates from third-party sources
For example, EasyThemePacks sells premium Elementor templates that you can use on your own site (check out our EasyThemePacks review).
New Theme Building Functionality In Elementor Pro 2.0
If I told you that you could use the same interface from above to design your entire WordPress site – header, footer, blog post page, etc. – that would be pretty cool, right?
That’s what people are so excited about in Elementor Pro 2.0. This version adds true theme building functionality to Elementor.
That means you can essentially use Elementor to design 100% of your WordPress site. Elementor even created a free theme that’s designed to make this as easy as possible.
Here’s how the new Elementor Pro theme builder functionality works…
Create A New Template
The theme builder works via “templates”. When you create a template, you can choose what type of template it is from the drop-down:

For example, to design your header, you’d choose Header. Similarly, to design a single post template, you’d choose Single.
I’m going to design a Header post template, but the same general principles apply no matter what part of your theme you’re working on.
Choose A Block Or Build From Scratch
Once you choose what type of template to create, Elementor will display a list of Blocks that fit that type of content

While you can always build everything from scratch, these blocks can save you some time.
Once you launch the interface, you can edit or build your theme part using the exact same Elementor interface from above.
You’ll also get a new set of Theme Elements to use. For example, while “Your New Blog” in my demo doesn’t look very impressive, that’s actually using the Site Title widget (which pulls automatically from your WordPress settings):

All of these Theme Elements pull in information dynamically. For example, if you use the Post Title element, it will dynamically show the actual title of each post.
You’ll also get new styling options that apply to that specific theme part.
For example, if you style the section that contains your header elements, you’ll get a Scrolling Effect option that lets you create a sticky header on certain devices:

Publish Your Theme Part
Once you go to publish your theme part, Elementor will let you use Conditions to control exactly where your theme part displays.
For a header, you might want to choose the Entire Site option to display it everywhere.
But these controls are actually pretty detailed, which can come in handy if you, say, just want to apply a specific post template to a certain category of blog posts:

And once you publish it, your theme part will start working right away. You can see that, while I didn’t design an especially nice-looking header, it is indeed live on my site:

Create Templates for Custom Post Types
Up until now, I’ve mainly focused on how Theme Builder applies to your regular WordPress site.
However, if you’re building custom content sites, another powerful option is the ability to create templates for custom post types. This, combined with the dynamic content feature that I’ll discuss next, allows you to build some truly custom WordPress sites.
For example, if you’re creating a real estate listing site, you could create a custom post type for “House” and then use Elementor Pro to design the template for your house listings:

Again, to really harness the power of this feature, you need to pair it with dynamic content, so let’s cover that next.
Include Dynamic Content in Your Theme Designs
If you want to build custom WordPress sites, Elementor includes another incredibly powerful feature with its Theme Builder:
Dynamic content.
With Elementor Pro’s dynamic content, you can dynamically insert content from WordPress and/or custom fields that you’ve added.
The possibilities for this feature are endless and this is what really lets you use WordPress as a full-service content management system.
Let’s go back to our real estate listing example…
To go along with your “House” custom post type, you’d probably want to include custom fields for a house’s details such as:
- Bedrooms
- Bathrooms
- Square footage (or meters!)
- Etc.
With the dynamic feature, you could then automatically insert those details in your “House” template. Then, Elementor will fill in the proper details for each house listing by automatically pulling all of that information from custom fields.
On my Elementor review test website, I’ve already set up a custom post type and a few custom fields that I added with Advanced Custom Fields. Here’s what it looks like when I add a new “House” in the WordPress editor:

Now, here’s how you can use that information when you’re creating a template using Theme Builder.
To add the house title and description from the native WordPress editor, you could use the regular Post Title and Post Content widgets that come with Theme Builder.
But what about those custom fields?
To insert them, you could add a regular Text Editor. Then, in the text editor, you click the Dynamic button, from which you can select ACF Field to target your custom field.
Then, you can choose the specific field and also prepend or append content after the data:

And voila! You just dynamically pulled in content from a custom field to your design. You can repeat the process for additional custom fields as needed.
You can use dynamic content with more than just the text editor, too. For example, you can dynamically populate:
- Images into image widgets, backgrounds, sliders, etc.
- Numbers into countdown timers or pricing tables.
- Links (URLs) into buttons or text links.
- User profile information for logged-in users (for example, you can create a front-end user profile page).
Overall, this feature is incredibly flexible, and it’s definitely one of my favorite features in Elementor Pro.
With it, you can use WordPress to build truly custom websites without needing any special technical knowledge.
Elementor Review: Elementor Pro WooCommerce Builder
When Elementor Theme Builder first launched, it was just for regular ‘ole WordPress sites. Not anymore!
Now, Elementor Pro includes WooCommerce Builder alongside Theme Builder.
The basic idea is exactly the same – it’s just taking Theme Builder and applying it to your WooCommerce store, while also adding new widgets for all the important details of a WooCommerce store.
With Elementor WooCommerce Builder, you can design both your shop archive page(s) and your single product pages.
The neat thing is that you can create multiple templates for your products, which is especially useful for a WooCommerce store because it might not be optimal to use the same layout for all your products. For example, you can use:
- Template #1 for products in the t-shirts category
- Template #2 for products in the bags category
For your single product page, you’ll get 13 new widgets to handle all the important areas:

You’ll similarly get new widgets to help you build your product archive pages.
Basically, you can use Elementor WooCommerce Builder to design pretty much everything related to your store’s products.
However, there are two important pages where you cannot currently use Elementor WooCommerce Builder:
- Your shopping cart page.
- Your checkout page.
Because of that, you’ll still want to use a WooCommerce-friendly theme even if you’re using Elementor WooCommerce Builder. That way, you can:
- Use WooCommerce Builder to control your shop, category, and single product designs (along with all of your regular WordPress content.
- Use your WordPress theme to control your cart and checkout pages.
Elementor Pro Popup Builder – Build Custom Popups
After the Elementor team launched Theme Builder with Elementor 2.0, I thought that would be it for the types of content that you could design with Elementor.
I was wrong…
In January 2019, Elementor launched another new tool – Popup Builder.
As the name suggests, Popup Builder lets you create your own custom popups using the same visual, drag-and-drop interface.
You also get access to all the Elementor widgets and design options, which gives you a ton of flexibility. For example, you can create:
- Email opt-in popups that use the Form widget to connect directly to email marketing services.
- Login/registration popups that use the Login and Registration widgets.
- CTA popups that use buttons to drive visitors to action.
You can even use dynamic content in popups, which opens up a whole new range of features, such as automatically inserting a person’s name when you display a popup for logged-in users.
You can target your popups to your entire site or just to specific pieces of content. Then, like other WordPress popup plugins, you get additional targeting and trigger rules.
You get all the popular trigger rules, including exit intent:
- After X seconds (or immediately)
- Scroll depth, either a percentage or when a visitor reaches a specific element
- X number of clicks (you can also trigger a popup when a visitor clicks a button to create a two-step opt-in)
- Inactivity
- Exit intent
You also get more advanced targeting rules that let you:
- Show popups after X page view or sessions
- Limit how many times to show popups
- Show popups for visitors arriving from a certain location (e.g. search engines) or even a specific referring URL
- Hide popups for logged-in visitors (or specific user roles)
- Target popups to specific devices (e.g. only show for desktop visitors)
You also have full control over the canvas for your popups. You can make it any size and place it anywhere on your site. For example, you can create:
- Centered popups
- Full-screen welcome mats
- Notification bars that appear at the top or bottom
- Slide-ins that appear in the corner
- Etc.
Overall, Popup Builder is a powerful tool that can completely replace the need for a third-party popup or opt-in plugin. The only thing it’s missing is a built-in feature for analytics or A/B testing (though you could use Google Analytics to track popups with Events).
Here’s how Elementor Popup Builder works…
Create a New Popup
To get started, you go to Templates → Popups → Add New.
Like other Elementor templates, you can choose between starting from a blank slate or choosing from a ton of pre-built popup templates:

Once you choose your starting point, you can edit it just like you would any other Elementor design:

The only notable difference is that you get some new options to control the canvas for your popup, which you can access by clicking the gear icon in the bottom-left corner.
These settings let you control the size (width/height), position, animation, etc.

For example, this is where you’d choose between a full-screen filler or a notification bar (or the many other options).
Choose Targeting and Trigger Rules
Once you’ve finished designing your popup, you can click the Publish button to choose its targeting and trigger rules.
These are divided into three tabs.
In the Conditions tab, you can display your popup on certain types of WordPress content. You can target your entire site or specific:
- Categories
- Tags
- Post types
- Authors
- Etc.
You can even target individual pieces of content.

In the Triggers tab, you can choose the timing for when to display your popup:

And then in the Advanced Rules tab, you can choose more detailed targeting rules, including an option to show/hide popups for certain devices and hide popups for logged-in users (or specific user roles):

Elementor Review: Four Other Features That I Love About Elementor Pro
Even before the new theme builder functionality in Elementor Pro 2.0, Elementor Pro already had a number of helpful features. Here are some of the best…
1. Lots Of Helpful Widgets (That Can Replace Other Plugins)
Elementor Pro adds a bunch of helpful new elements that you can use in your designs:

These elements can replace a lot of plugins on your site. For example, you get elements to easily create:
- Forms
- Sliders
- Price tables
- Social share buttons
And you also get elements that help you display your latest blog posts (this is what we use to display Recent Blog Posts on the WPLift homepage – check it out), as well as WooCommerce product information.

2. Global Widgets
Global widgets are super helpful if you need to reuse the same content across multiple pages. Basically, you can insert the same global widget anywhere you want.
Then, to update every place where that widget appears, you can just edit the global widget one time.

3. Live Custom CSS
If you know CSS, Elementor Pro lets you add custom CSS directly to widgets, sections, or columns.
While many other page builders let you add a CSS class or ID, Elementor lets you write the actual CSS code without leaving the interface, which is way more convenient:

4. Pro Templates
Finally, you also get access to a bunch more page templates and blocks, which can speed up your design process.
Third-Party Elementor Extensions Make Things Even Cooler
Beyond just plain creating a stellar product, I think another reason that Elementor has been so successful is because the Elementor team embraced the third-party developer community.
If you need even more functionality, you can find lots of free and premium Elementor extensions to give you even more control over your WordPress site. Here are some of our favorite Elementor add-ons.
Elementor Review: How Much Does It Cost?
The core Elementor page builder plugin is 100% free and available at WordPress.org. Even by itself, the free version is already pretty powerful.
But if you want access to theme builder and all the other cool features in Elementor Pro, you have three different options, starting at just $49:

I’m not going to directly compare Elementor to the competition (you can do the math yourself)…but if you look at how other popular page builders are priced, I think Elementor Pro is very competitive, especially when you consider that you now get theme building without any increase in price.
Elementor Review: Free vs Pro – Which One Should You Choose?

In terms of features that you get for free, Elementor has one of the most generous free versions of any WordPress page builder. With just the free version alone, you can already build some pretty awesome designs.
But at the same time, Elementor Pro is packed with new widgets and design options, as well as three incredibly powerful tools in Theme Builder, WooCommerce Builder, and Popup Builder.
So when it comes to Elementor free vs Pro, which one should you choose?
Obviously, there’s no single answer here and this decision largely depends on your unique situations. But let’s go through some scenarios…
If you just want to use Elementor to…
- Add some flair to your blog posts.
- Create better-looking core pages, like styling the “About” page for your blog.
- Build some basic landing pages.
Then I think you’ll probably be fine with the free version of Elementor.
Basically, if you mostly rely on your theme for your site’s styling but just want to add a little pop here and there, the free version can get the job done.
However, if you’re serious about building websites and/or trying to achieve marketing goals, you’ll probably want to upgrade to Elementor Pro.
Here are some situations in which I think Elementor Pro really shines…
You Want More Customization Options Than Your Theme Allows
If you’ve ever felt limited by the design options that come with your theme, you’re going to love Elementor Pro because it basically eliminates the need for a theme.
Instead, you’ll get full control over every single pixel on your site, and you can do it all from Elementor’s visual, drag-and-drop interface.
You’re Building Custom Content Sites
If you’re building custom content sites, Elementor Pro is a no-brainer. By “custom content sites”, I mean sites such as:
- Job boards
- Real estate listing sites
- Business directories
- Etc.
Basically, any type of site where you’re going beyond regular WordPress posts and pages. For example, using custom post types and custom fields to store new types of content.
WPLift is actually a good example of a custom content site using Elementor. Beyond our WordPress blog, we have directories for themes and plugins. The layouts for both of these directories are powered by Elementor Pro.
There are two reasons why Elementor Pro is great for custom content sites.
First, you get access to Theme Builder, which means that you can easily create your own templates for any custom post types that you’re using.
Second, the dynamic feature makes it easy to include content from custom fields, such as those you’ve added with Advanced Custom Fields, Toolset, Pods, etc.
Normally, adding this type of dynamic custom data requires working directly with the PHP in your theme’s template files. However, with Elementor Pro, you can do everything from the visual, drag-and-drop interface.
As a non-developer, I’ve found Elementor Pro’s dynamic feature to be a life-saver as it finally allows me to harness WordPress’ power as a full CMS.
You’re Running a WooCommerce Store
If you’re building a WooCommerce store, Elementor Pro is also a no-brainer.
First off, you get access to WooCommerce Builder, which means that you can create your own templates for your shop and product pages.
Second, even if you plan to rely on your theme for your store’s designs, you still get access to a bunch of dedicated WooCommerce widgets that you can use to include product information in one-off Elementor designs.
You’re a Marketer
If you’re a marketer, Elementor Pro is packed with features to help you convert more visitors.
First off, you get access to the Form widget, which lets you build all kinds of lead-gen forms. It includes built-in integrations with popular email providers, as well as a catch-all Zapier integration that can help you connect to other services or CRMs.
Of course, you could use other form plugins and add those forms to Elementor, but it’s convenient to be able to access all of the Elementor design options for your form, which is why I like the built-in Form widget.
The most powerful feature for marketers, though, is probably Popup Builder. Because Popup Builder gives you access to the full Elementor interface, you can use it for all kinds of popups such as:
- Email opt-in/lead gens
- CTAs
- Two-step opt-ins (by triggering the popup with a click)
You also get tons of targeting and trigger rules to ensure that the right people see your offers. And with the dynamic feature, you can also personalize your popups to users, which is another way to boost your conversion rates.
Beyond the Form widget, you also get access to other marketing widgets such as:
- Countdown timers to add urgency
- Testimonials for social proof
- Dedicated CTAs to drive action
- Pricing tables
Finally, you still get all of Elementor’s general design flexibility, which means you can easily spin up landing pages without needing to work with a developer.
You’re Building Websites for Clients
If you’re building websites for clients, all of the things that I discussed above are doubly true.
Additionally, Elementor Pro offers some nice perks such as:
- Easier pricing – because you get access to so many features for one price, you can streamline project pricing. For example, you don’t need to pay separately for a form plugin, slider plugin, etc. Elementor Pro includes all of that for one price.
- Simpler updates – because everything comes from Elementor Pro (instead of a bunch of separate plugins), there’s less of a chance that your client can break things during updates.
And if you’re really worried about clients breaking things, you can choose not to give them access to Elementor. Instead, you could use dynamic content to insert content from custom fields. Then, you can let clients edit those custom fields from the safety of the WordPress backend.
Elementor Review: Should You Use Elementor On Your Site?
Just looking at functionality, Elementor is already my favorite page builder. While I’m still locked into Thrive Architect on some of my sites for legacy reasons, Elementor is what I’ve personally used on every new website that I’ve launched.
So I feel pretty comfortable recommending it just on functionality alone.
But there’s also another valuable thing that you get when you choose to build your site with Elementor:
The Elementor team doesn’t rest on its laurels.
Despite already achieving a good amount of success, they’re still constantly pushing out new features (like the recent theme builder functionality).
Because choosing a WordPress page builder is a long-term decision, that’s a pretty important consideration. You want to go with a team that’s in it for the long haul and is going to continue to not just maintain the plugin, but also improve it.
While Elementor certainly isn’t the only team that fits that criteria (Divi Builder and Beaver Builder are also pretty active, to name just two), I think the Elementor team has the most impressive resume over the past few years in terms of pushing out helpful new features.
For those two reasons, I think Elementor is the best page builder for both now and in the future.


