Interested in WordPress must-have plugins? No, I’m not talking about the essential plugins that all WordPress sites need, I’m talking about a little-known WordPress core feature called mu-plugins.
In a nutshell, WordPress mu-plugins, or must-have plugins if you enjoy extraneous typing, let you force activate certain features on your site. Neither you nor pesky clients will have the ability to disable mu-plugins from inside your WordPress dashboard – they’re just always on! You can, of course, still disable them. You’ll just need to connect via FTP to do it.
In this post, I’ll dig deeper into what WordPress mu-plugins are and why they’re useful. Then, I’ll show you how you can start using mu-plugins on your site (or your clients’ sites).
What Are WordPress mu-plugins?
As I mentioned in the intro, WordPress mu-plugins let you force a plugin to always be activated. What’s more, it’s impossible to deactivate an mu-plugin from inside the WordPress dashboard.
If you want to deactivate a plugin, you’d need to connect to your server via FTP and do it that way (more on why that is when I get to the tutorial).
If you’re familiar with WordPress multisite, you might be saying, “hey, that sounds a lot like what happens when I network activate a plugin on my multisite network.”
You’d be right – WordPress mu-plugins originally started as a feature that was exclusively for WordPress multisite. In fact, back then, the “mu” in mu-plugins stood for “multi-user”, not “must-have”.
However, WordPress mu-plugins have long-since been a feature that regular WordPress installs can use as well.
Often, developers will use must-use plugins for single-file plugins, like some essential custom code snippets that you don’t want to put in your theme’s functions.php file.
However, with the right setup, you can also turn regular plugins into must-use plugins. For example, if you use something like the WP Fail2Ban Redux plugin for security, you might want to make that a must-use plugin to guarantee that it’s always active on your site.
Key Technical Differences Between Regular Plugins and mu-plugins
Here are some important technical differences to understand between regular WordPress plugins and must-use plugins.
Mu-plugins…
- Use a different folder inside wp-content (more on this in the tutorial)
- Are loaded before regular WordPress plugins, which is important if you need to execute code before regular plugins.
- Do not use activation or deactivation hooks like regular plugins. If you need to use those hooks, you should stick with a regular plugin.
- Do not update automatically (nor will you receive update notifications from WordPress). You would need to manually update them via FTP.
Another important difference is that, beyond using a different folder, mu-plugins also use a slightly different folder structure than regular plugins. By default, the main plugin file must be in the main mu-plugins folder – it can’t be in a subfolder like regular plugins.
However, there are solutions to get around this, which I’ll share in the tutorial section.
Why Use WordPress mu-plugins? What Are the Benefits?
One of the big advantages of must-use plugins is that they’re always on. So if you have a bit of code that’s absolutely integral to the functioning of your site, you probably don’t want it to be possible for someone to disable the plugin that contains that code.
With an mu-plugin, it’s pretty much impossible for that to happen accidentally. The only way to stop the code from loading is to connect to your server directly and delete the file.
If you build client sites and give them full admin access, this also eliminates the chance for them to go in and accidentally break something.
For example, you might’ve written a custom plugin that includes some important snippets that your site absolutely needs – a must-use plugin could be a good decision then to avoid any issues.
There are also some more technical benefits to using mu-plugins. For example, you might want to use a must-use plugin if you want to force a plugin’s code to run before your regular plugins.
Some hosts/server control panels will also use mu-plugins for key helper plugins. For example, I host some sites with SpinupWP and SpinupWP uses an mu-plugin for its helper plugin.
How to Create WordPress mu-plugins
Now that I’ve piqued your interest, let’s get into how to create a WordPress must-have plugin.
1. Connect to Your Server Via FTP
To get started, you’ll need to connect to your server using FTP or something like cPanel File Manager.
If you’re not sure how to do that, check out our guide to WordPress FTP access.
2. Create a New mu-plugins Folder
Once you’ve connected to your server, go to the wp-content folder. Inside that folder, you should see the regular plugins folder. However, you’re not going to use that folder.
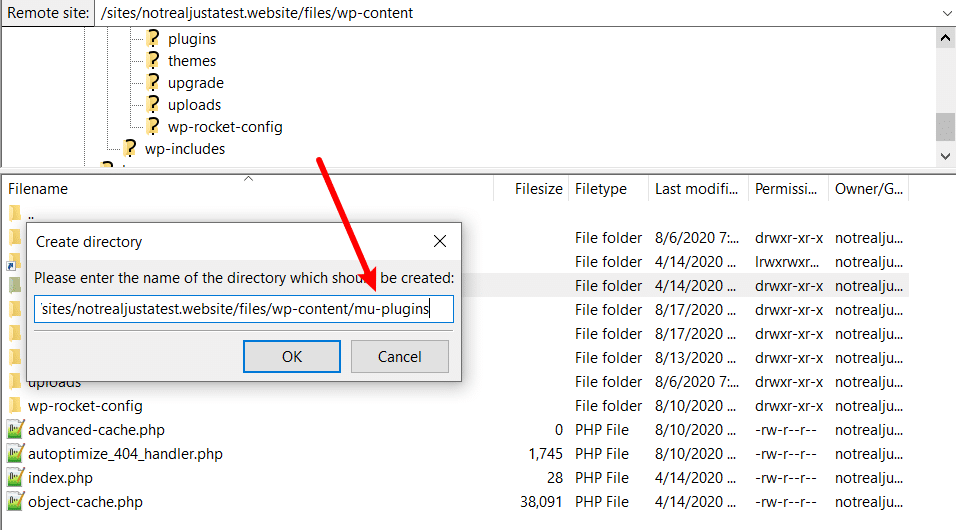
Instead, right-click and create a new folder name mu-plugin:
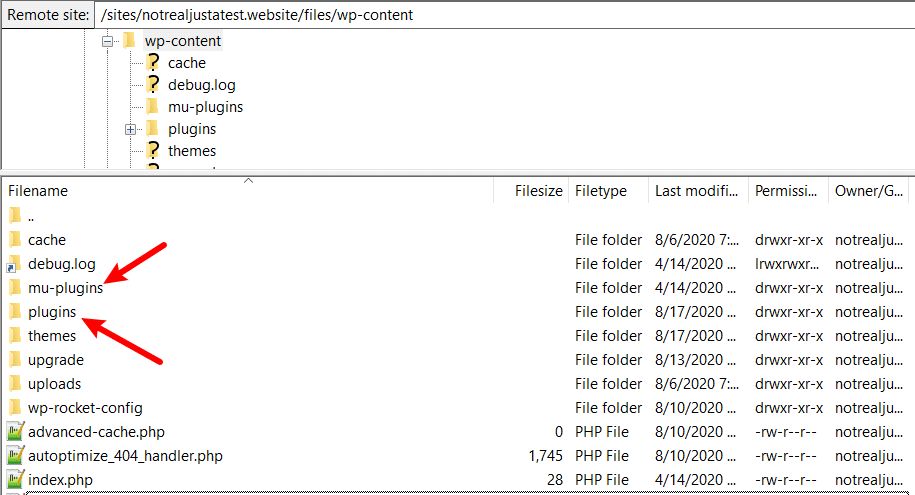
Once you’ve done that, you should see both the plugins folder and the new mu-plugins folder:
3. Add Your Must-Use Plugin
Now, all you need to do is upload the file(s) for your must-use plugin(s) to the mu-plugins folder.
Here, you can see two example plugins:
- A plugin called cool-example-plugin.php that I created for this example.
- A debug plugin added by SpinupWP (again, SpinupWP automatically adds this because I host my sites there).
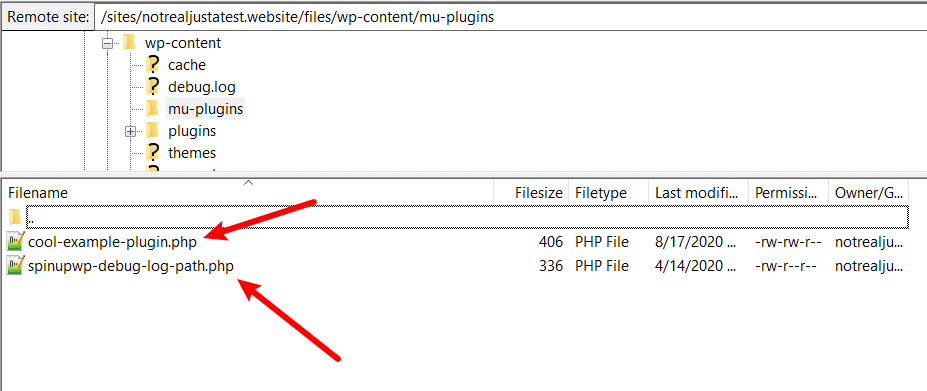
Remember – by default, the main plugin file must be in the mu-plugins folder, which is different from regular WordPress plugins. You cannot just take the folder for a regular plugin and upload it like you can to the regular plugins. folder.
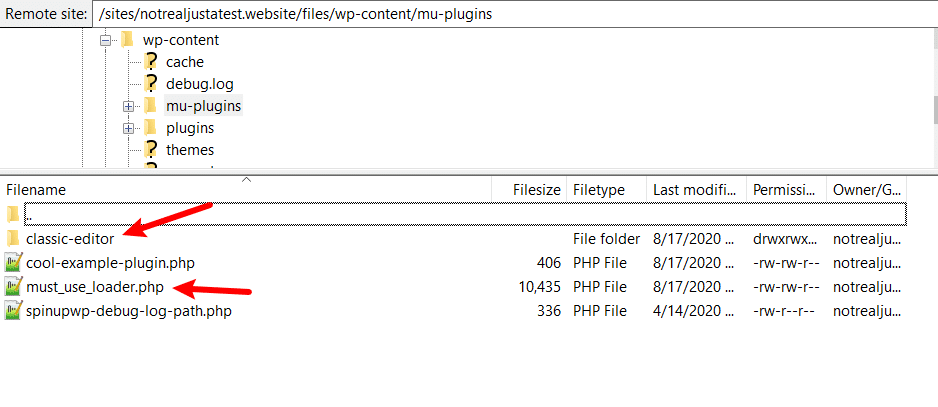
However, that doesn’t mean you can’t use subdirectories – you’ll just need to use your own loader. For the simplest way to do that, check out this GitHub page. This gives you a must-use plugin that lets you include all plugins inside subdirectories in the mu-plugins folder.
Once you upload the must_use_loader.php file to the mu-plugins folder, you’ll be able to upload regular plugins in subdirectories and use them as must-use plugins:
4. View Your Must-Use Plugins
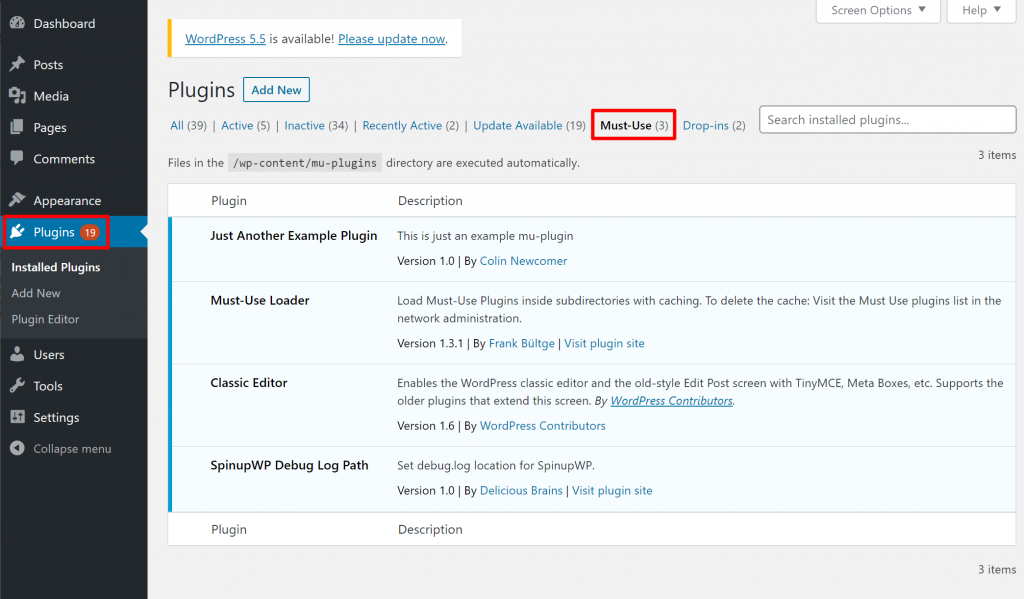
While you cannot disable must-use plugins from your WordPress dashboard, you can view a list of all your mu-plugins from the dashboard.
Once you’ve added your first mu-plugin, you’ll get a new Must-Use tab in the regular WordPress Plugins area:
Get Started With WordPress mu-plugins Today
WordPress mu-plugins are a useful tool for features and plugins that you want to 100% make sure are always activated on your site.
They’re also surprisingly easy to use – all you need to do is create a new mu-plugins folder in wp-content and upload your must-use plugins to that folder. However, if you want to upload regular plugins in subdirectories, make sure to use a loader so that WordPress will recognize them.
Still have any questions about WordPress mu-plugins? Do you use must-use plugins in your projects? Let us know in the comments!


