Interested in creating a static WordPress site? With a WordPress static site generator plugin, you can create a static HTML version of your site and host it absolutely anywhere.

By making your WordPress site static, you’ll have zero moving parts, which means bulletproof security and excellent performance. Of course, there are also drawbacks – more on those below.
In this post, I’ll show you step-by-step how to create a static WordPress site using a free plugin. Once you generate the static copy of your site, you’ll be able to host it absolutely anywhere, even on a free GitHub Pages site.
If you feel overwhelmed by the tutorial, I’ll also share some static WordPress hosting services that can handle everything for you (for a price, of course).
Ready to go static? Let’s dig in…
Should You Use a WordPress Static Site Generator?
Before I get into the tutorial, it’s important to note that creating a static WordPress site is definitely not the best solution for all websites.
If you’re still confused by what this term means, a static site means that you decouple WordPress from the front-end of your site by using WordPress to generate a set of static HTML files. You can then take these HTML files and host them anywhere, even on a completely separate host from your WordPress install.
You can still use the WordPress dashboard to design your site and create content. But those changes won’t appear to visitors right away. Instead, you’ll need to generate a new set of static HTML files each time you want to deploy your changes.
However, there’s a reason why WordPress isn’t static by default – being able to use all of WordPress’s dynamic features is a big part of what makes WordPress so awesome.
By making your site static, you’ll lose a lot of WordPress’s flexibility. It will also be harder to work with core site features like contact forms, comments, and site search (though there are ways to get it done).
However, the benefit of this is that your site will load lighting fast, use very little server power, and be virtually impenetrable to malicious actors.
Overall, using a WordPress static site generator can be a good option if:
- Your site doesn’t change a lot.
- You don’t rely on dynamic content (for example, if you want to use WooCommerce, you can’t create a static site).
Some examples of the types of sites where this might make sense could be a:
- Simple brochure website for a business
- Basic portfolio or online CV
- Simple blog (though most blogs would be better suited to vanilla WordPress)
How to Use a WordPress Static Site Generator
Now, let’s get into the tutorial and I’ll show you how to use a WordPress static site generator to convert your WordPress install to static HTML.
For this tutorial, we’ll use the free WP2Static plugin. The free version should be fine for most uses, but the developer also sells some premium add-ons for just $25. For example, you can find an add-on to help you set up site search powered by Algolia.
The basic process goes like this:
- Create your source WordPress install. You can create it anywhere, even on a local development site (which is what I’ll do for this tutorial).
- Choose where you want to host your static WordPress site. I’ll show you how to export your site to a Zip archive, but WP2Static can also help you automatically deploy to FTP, Amazon S3/CloudFront, GitHub Pages, and more.
- Use the WP2Static plugin to convert your site to static HTML.
1. Create Your Source WordPress Site
In order to generate a static version of your site, you first need to set everything up with a normal WordPress install. That is, you’ll use your regular WordPress install to:
- Add content – you can even use a page builder plugin such as Elementor or Divi
- Choose and customize your theme
- Configure settings, like time zones
You can host your source WordPress installation online using any WordPress host. Or, for a cheaper solution, you can just use a local development tool. Visitors will never interact with your WordPress install, so it doesn’t matter if it’s publicly accessible or not.
Personally, I recommend the free Local development tool from Flywheel/WP Engine.
For the most part, you don’t need to overthink this. Just set up your WordPress site as you normally would. For my example site, I just set up a basic site using one of the demo sites from the Astra theme (our review).

The only thing to consider is that some plugins/features won’t work when you convert your site to the static version. For example:
Basically, if the plugin/feature relies on something “dynamic” and/or accessing your WordPress site’s database, it’s going to stop working when you convert your site to static HTML
If you still want to have these features on your static site, you can consider the following workarounds. You can use…
Basically, you want to use hosted services that deliver their features via scripts. Because these services don’t need to use the WordPress database, they work just fine with static HTML.
You’ll want to set these services up on your WordPress site before you continue.
2. Choose and Configure Your Hosting Destination
Next, you’ll want to choose where you’re going to host the static version of your site. You can use:
- Cloud hosting
- Your favorite hosting service
- GitHub/GitLab/BitBucket Pages
- A CDN (because all you’re delivering is static HTML)
- …anywhere that lets you host and deliver static HTML files
WP2Static includes built-in automatic deployment integrations for:
- GitHub/GitLab/BitBucket Pages
- Amazon S3 and CloudFront
- Netlify
- BunnyCDN
- Rackspace Cloud Files
Basically, this means that you can automatically upload the static version of your site right when you export it from WordPress, which is super convenient. This will also make it easier to update your site in the future.
However, if you want to host somewhere else, WP2Static also lets you export your site to:
- Any FTP server
- A ZIP archive that you can upload anywhere
For this example, I’ll show you how to deploy using the ZIP archive method, because it’s the most accessible and you can use it anywhere.
All you’ll need to do is take the files in the ZIP archive and upload them wherever you want to host your site.
3. Set Up WP2Static Plugin and Deploy
Once you’ve set up WordPress and chosen the destination for your static HTML files, you’re ready to let WP2Static work its magic.
Install the free plugin from WordPress.org. Then, go to the new WP2Static tab in your WordPress dashboard.
WP2Static does include some advanced settings, but most sites should be fine with the defaults.
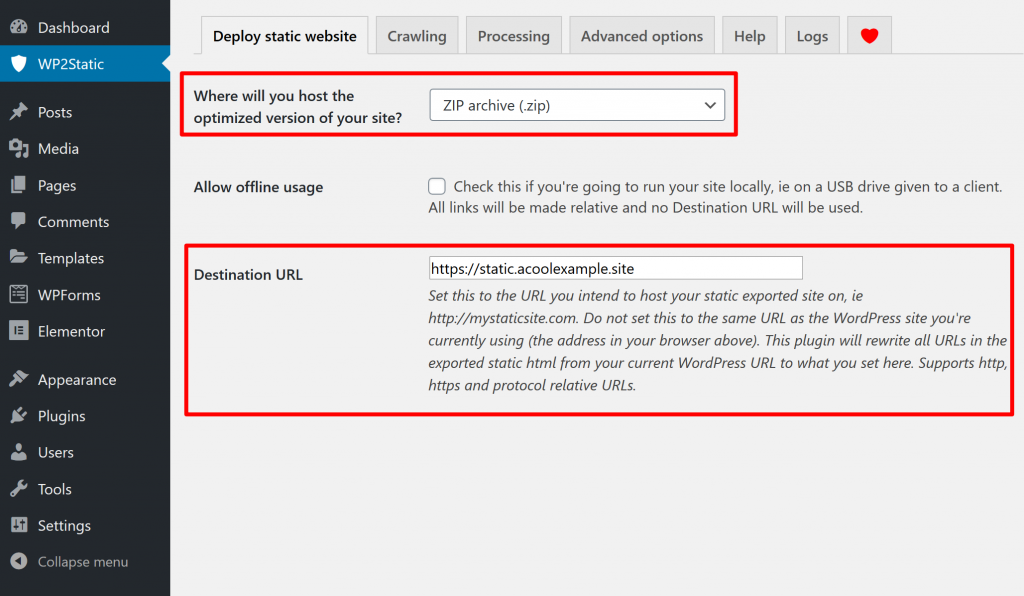
To publish your static WordPress site, make sure that you’re in the Deploy static website tab. Then, select your destination from the drop-down at the top. Again, for this example, we’re using the ZIP archive method.
Once you select your destination, you’ll see a list of settings that apply to that specific destination.
For a ZIP archive, all you need to do is enter the Destination URL for your live website. For example, if you’re hosting your static site at https://staticwebsite.com, enter that in the Destination URL box.
For other deployment methods, you’ll need to also enter details to connect to your destination.
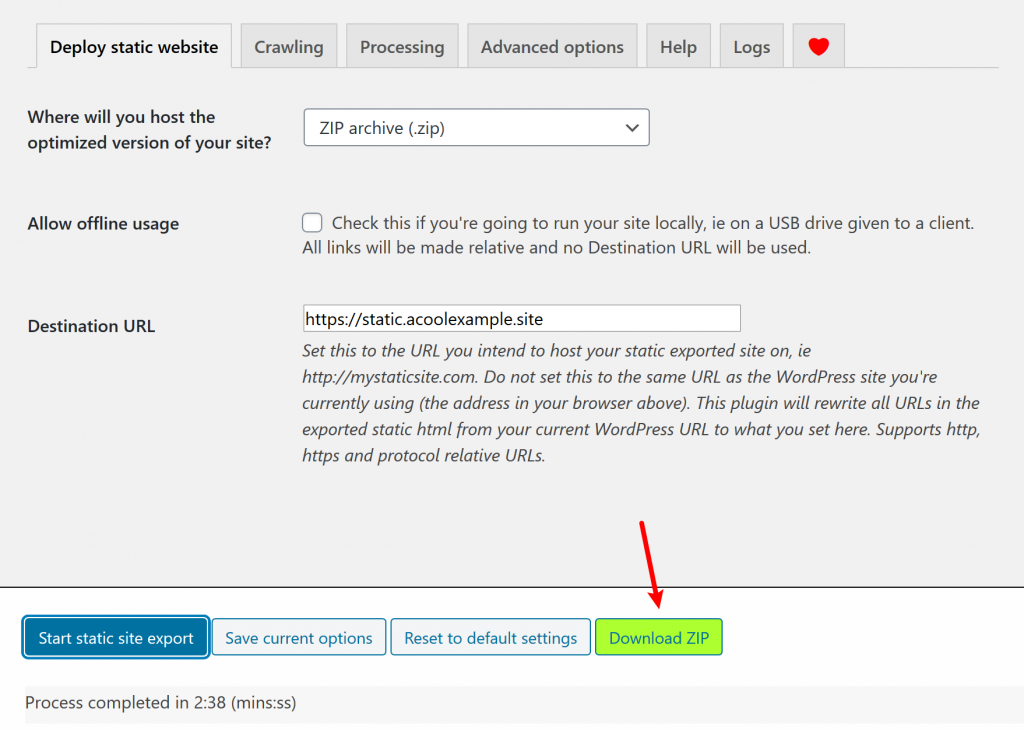
Then, click the Start static site export button.
WP2Static will then convert your WordPress site to static HTML. How long this takes will depend on the size of your site.
Once the process finishes, you should see a success message. For the ZIP archive method, you’ll also see a button to Download ZIP:
If you look inside that ZIP file, you’ll see the static version of your site:
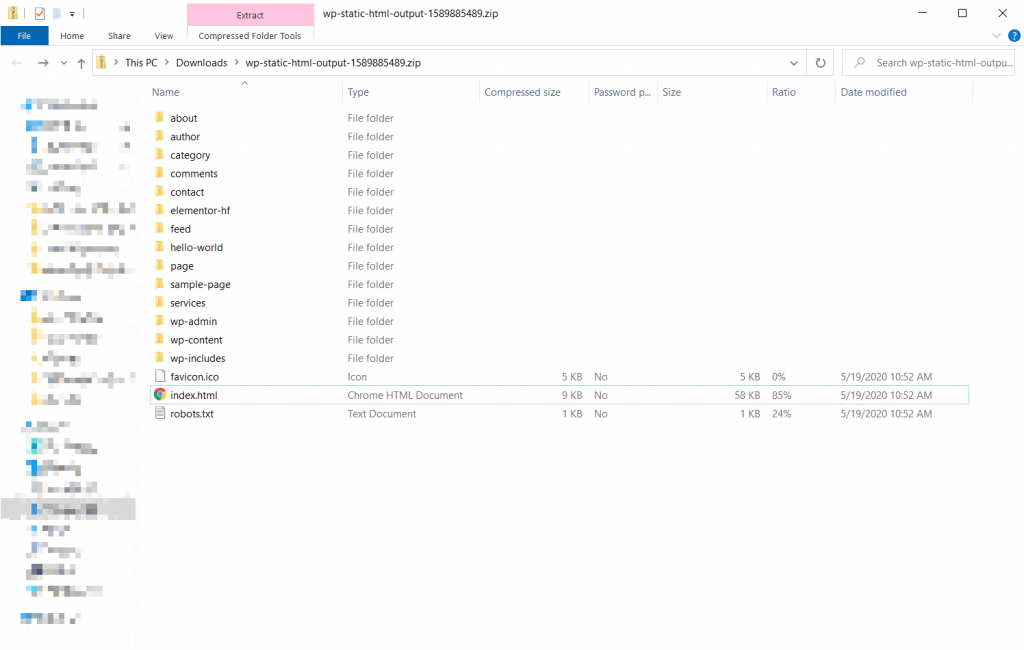
To make your static site live, all you need to do is upload those files to your server using something like FTP or cPanel File Manager. Learn how to use FTP.
Voila! You just created a static WordPress website.
4. Re-Deploy When You Update Your Site
Because your WordPress install is decoupled from the static HTML files that your visitors interact with, your site will not immediately update when you make changes in the WordPress version.
Instead, you’ll need to repeat the actions from Step 3 to re-deploy your site whenever you want to push your changes live.
If needing to manually deploy files each time is too time-consuming, you might want to use one of the automatic deployment methods that WP2Static supports.
Overwhelmed? Use Static WordPress Hosting
If you find the manual method above to be a little too complicated, you can also find dedicated hosting services that handle both converting your site to static HTML and hosting it. As an added bonus, these will also often have integrations so that you can still use certain plugins.
Three of the best options are:
We cover these services in more depth in our post on static WordPress hosting.
Use a WordPress Static Site Generator Today!
Creating a static WordPress site is not the best option for all sites. But there are a lot of WordPress sites that could benefit from the performance and security improvements from going static.
If your site fits the bill, you can use a free WordPress static site generator plugin like WP2Static to easily convert WordPress into static HTML files.
Then, you can host those files pretty much anywhere.
Do you have any questions about how to create a static WordPress site? Ask us in the comments!