
Searching for the best way to create a WordPress multilingual site?
Well – spoiler alert – there’s no “best” WordPress translation plugin for every single situation. But there are some tools that will work in most situations, as well as some questions you can ask yourself to pick the plugin and approach that’s right for you.
In this post, we’ll start by sharing those important considerations to help you figure out the best approach for you.
Then, because we know you probably want a step-by-step solution, we’ll also show you how you can quickly create a WordPress multilingual site with TranslatePress, which is a good all-around solution.
Five questions to consider when creating a WordPress multilingual site (and choosing a plugin)
Beyond giving you an idea of some of the important considerations when creating a WordPress multilingual site, your answers to these questions will also help you pick the right WordPress translation plugin for your needs.
1. “Am I looking to rank content in multiple languages” (multilingual SEO)?
First, consider how important multilingual SEO is to your reasoning for creating a WordPress multilingual site. That is, do you want to be able to rank content for different languages in search engines like Google?
Most dedicated WordPress translation plugins will create a fully indexable version of your site that can rank in Google. This is true for:
Some let you use subdomains, subfolders, or separate domains, while others only let you use subfolders. There’s no real difference from an SEO perspective, and Google lays out the other pros and cons to each approach here.
Beyond creating an indexable site, there are also other multilingual SEO considerations, like the hreflang tag and creating XML sitemaps for the different translations of your site. For example, TranslatePress has a Yoast SEO integration that lets you create multilingual sitemaps.
However, if you don’t care about multilingual SEO, you might be able to use a much simpler solution like Google Language Translator (depending on your answers to the other questions).
This plugin dynamically translates your content into a user’s chosen language using Google Translate. It’s a horrible approach from an SEO perspective, but it’s also the simplest way to create a multilingual site.
2. “How accurate do my translations need to be?”
If translation accuracy is of utmost importance to you, you’ll probably want to stick to a tool where you’ll manually translate all of your content (or get a freelancer to do it for you).
However, you can also save a lot of time by using automatic machine translation, which has become a lot more accurate in recent times.
It’s also not an either/or situation – some of the tools will let you start by using automatic translation and then go back and review/edit those translations.
The absolute simplest way to use machine translation is with the Weglot plugin/service. It’ll have you up and running with a working, SEO-friendly multilingual site within the first 30 seconds of installing the plugin.
However, TranslatePress and WPML both also make it pretty easy to access automatic translation, though Weglot and TranslatePress are the only two that let you apply sitewide machine translation (you’ll go article-by-article with WPML).
Or, the Google Language Translator plugin lets people dynamically translate your site using Google Translate, but you can’t adjust the translations (and remember that it’s not SEO friendly).
3. “How important is it that I’m able to translate every single bit of text?”
There are a lot of little pieces to creating a WordPress multilingual site. Beyond your page’s content, you also need to consider content from:
- Your theme
- Plugins, including page builders
- SEO and social share plugins (like your SEO and Open Graph descriptions)
- Image alt text
- URL slugs (not just the post slug, but also category slugs…all the slugs!)
- WooCommerce products
- Etc.
Most of the major translation plugins let you translate everything, but some charge more for it, and some are more convenient than others.
Overall, the most convenient options for full translations are probably TranslatePress or Weglot because of the way their translation interfaces are structured.
Speaking of…
4. “How do I want to manage my translations?”
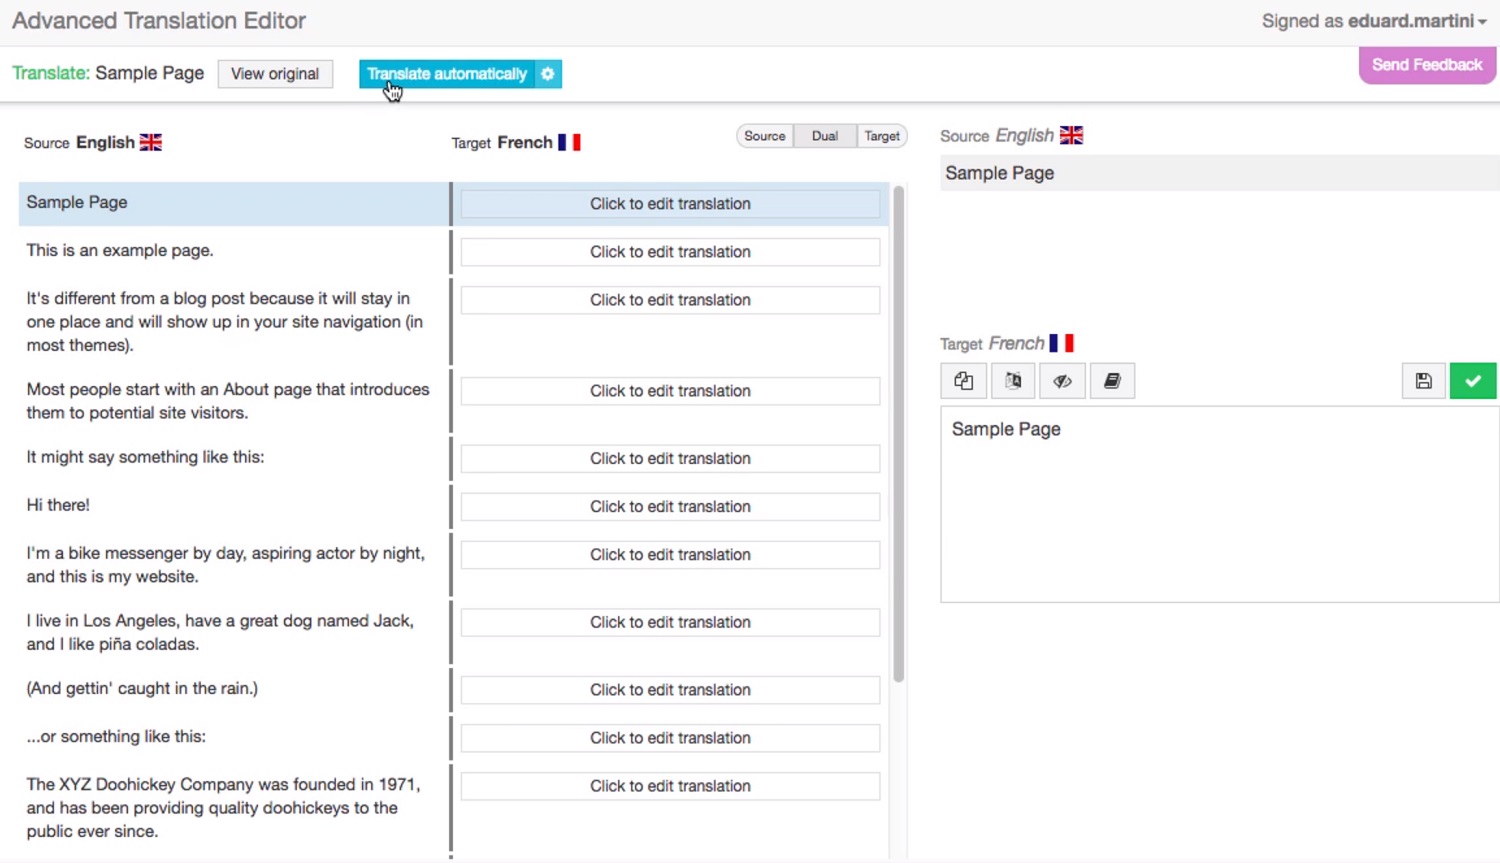
Some WordPress multilingual plugins give you a side-by-side interface like WPML does:

Others basically duplicate the WordPress editor for each translation, with no side-by-side look – that’s how Polylang works.
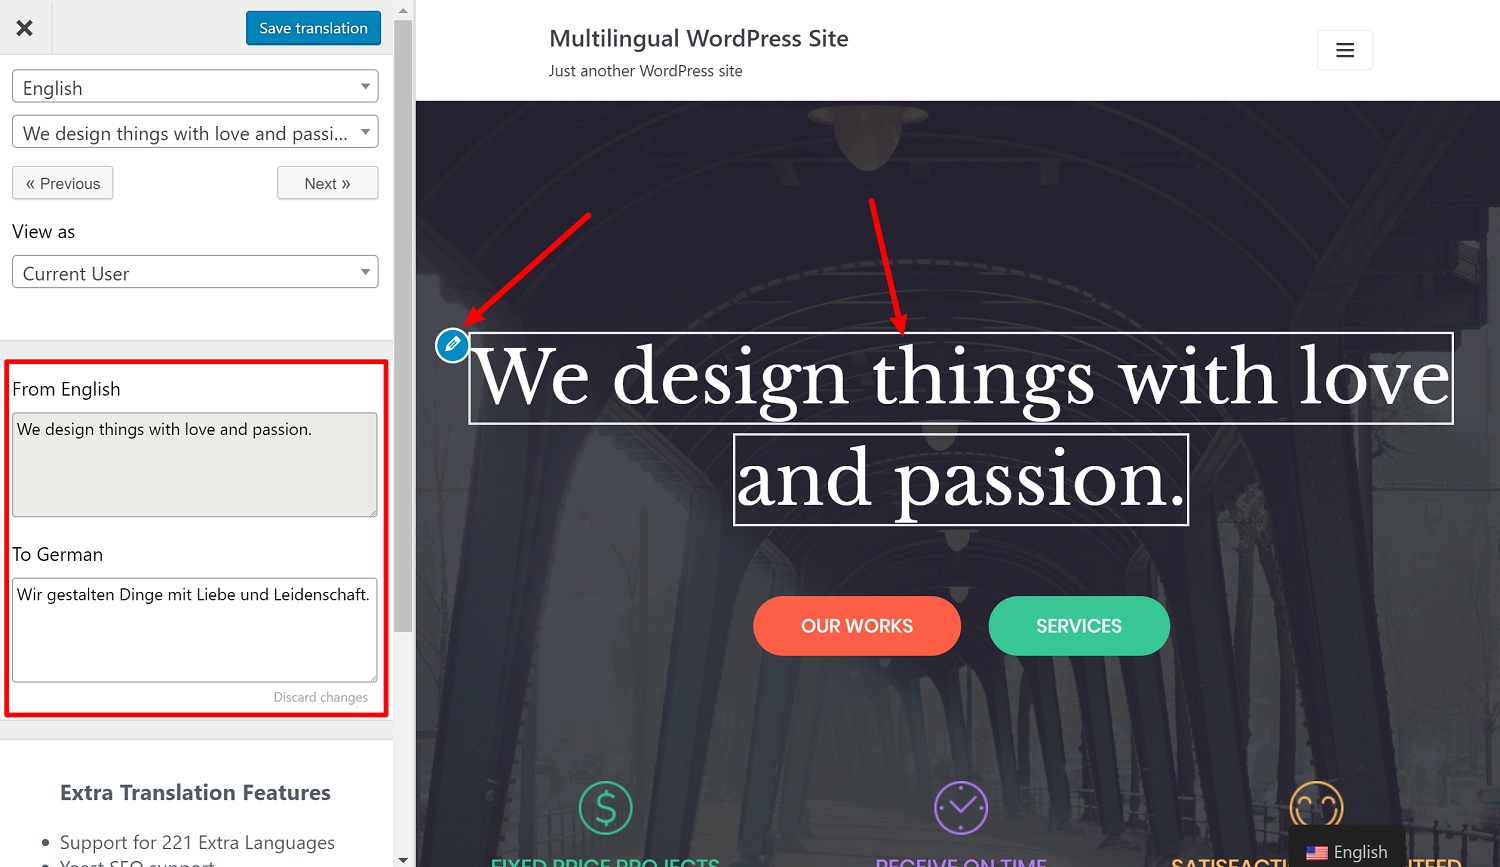
And still others give you a live preview of your website where you can just click on the text that you want to translate. An example from TranslatePress:

Some – like Weglot – even give you access to multiple different interfaces (both a side-by-side one and a visual one like TranslatePress).
You’ll want to choose the interface that feels most productive for you.
Beyond the interface itself, ask yourself if you need other people to be able to access translations (e.g. freelancers)? Some plugins are better at this than others. For example, WPML and TranslatePress give you dedicated Translator accounts, and Weglot lets you add contributors to its cloud dashboard.
5. “What’s my budget?”
Finally, there’s the price. Some translation plugins offer workable free versions, while others are exclusively paid.
Of the popular options, TranslatePress and Polylang probably have the most generous free versions, while Weglot is viable for very small sites (its free plan allows for up to 2,000 words).
If you’re willing to pay, here are how the prices compare for the premium versions:
- WPML – starts at $79
- TranslatePress – starts at €79
- Polylang – starts at €99
- Weglot – starts at €9.90 per month (Weglot uses SaaS-style subscription billing)
With those questions out of the way, let’s get into how to create a WordPress multilingual website.
Step-by-step: How to create a WordPress multilingual site
For this tutorial, we’ll use TranslatePress, as it’s a good versatile option that will work for a lot of situations.
However, depending on how you answered the questions above, a different tool might be better for your situation. If you’d like a more nitty-gritty look at the most popular tools, check out our TranslatePress vs WPML vs Weglot vs Polylang comparison.
To get started, we’ll assume that you already have a WordPress site that you want to translate. If you don’t, you can follow our guides on how to install WordPress and how to set up your domain name, hosting, and WordPress.
Beyond that, we’ll assume you have the free version of the TranslatePress plugin installed and activated at your site. If you don’t, you can go to Plugins → Add New and search for “TranslatePress” to install it.
Now, let’s get to translating…
1. Choose default and translation languages
To get started, you need to choose the language that your site is currently in, as well as the languages that you want to translate your content into.
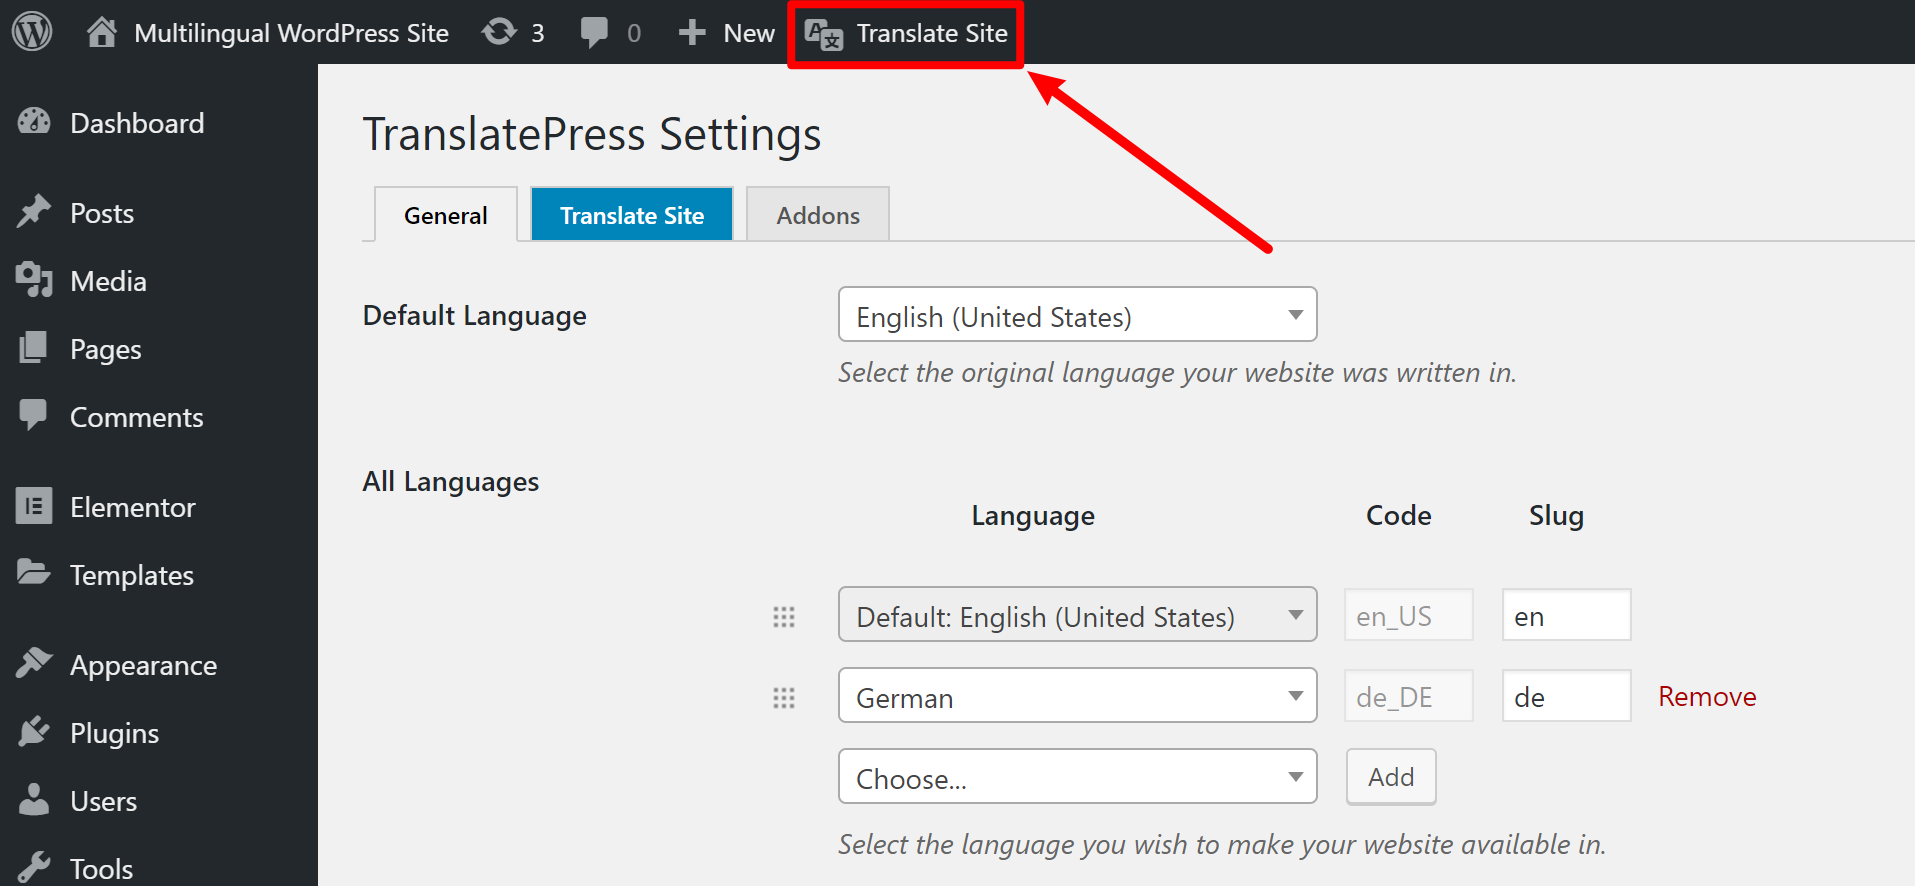
To do this, go to Settings → TranslatePress:
- Add your site’s current language as the Default Language
- Add the language(s) that you want to translate your site’s content into in the All Languages list


2. Choose whether to use automatic translation (optional)
TranslatePress lets you choose between:
- Manually translating your content from scratch
- Using Google Translate to automatically translate your site’s content (you can still go back and manually edit the machine translations later, of course)
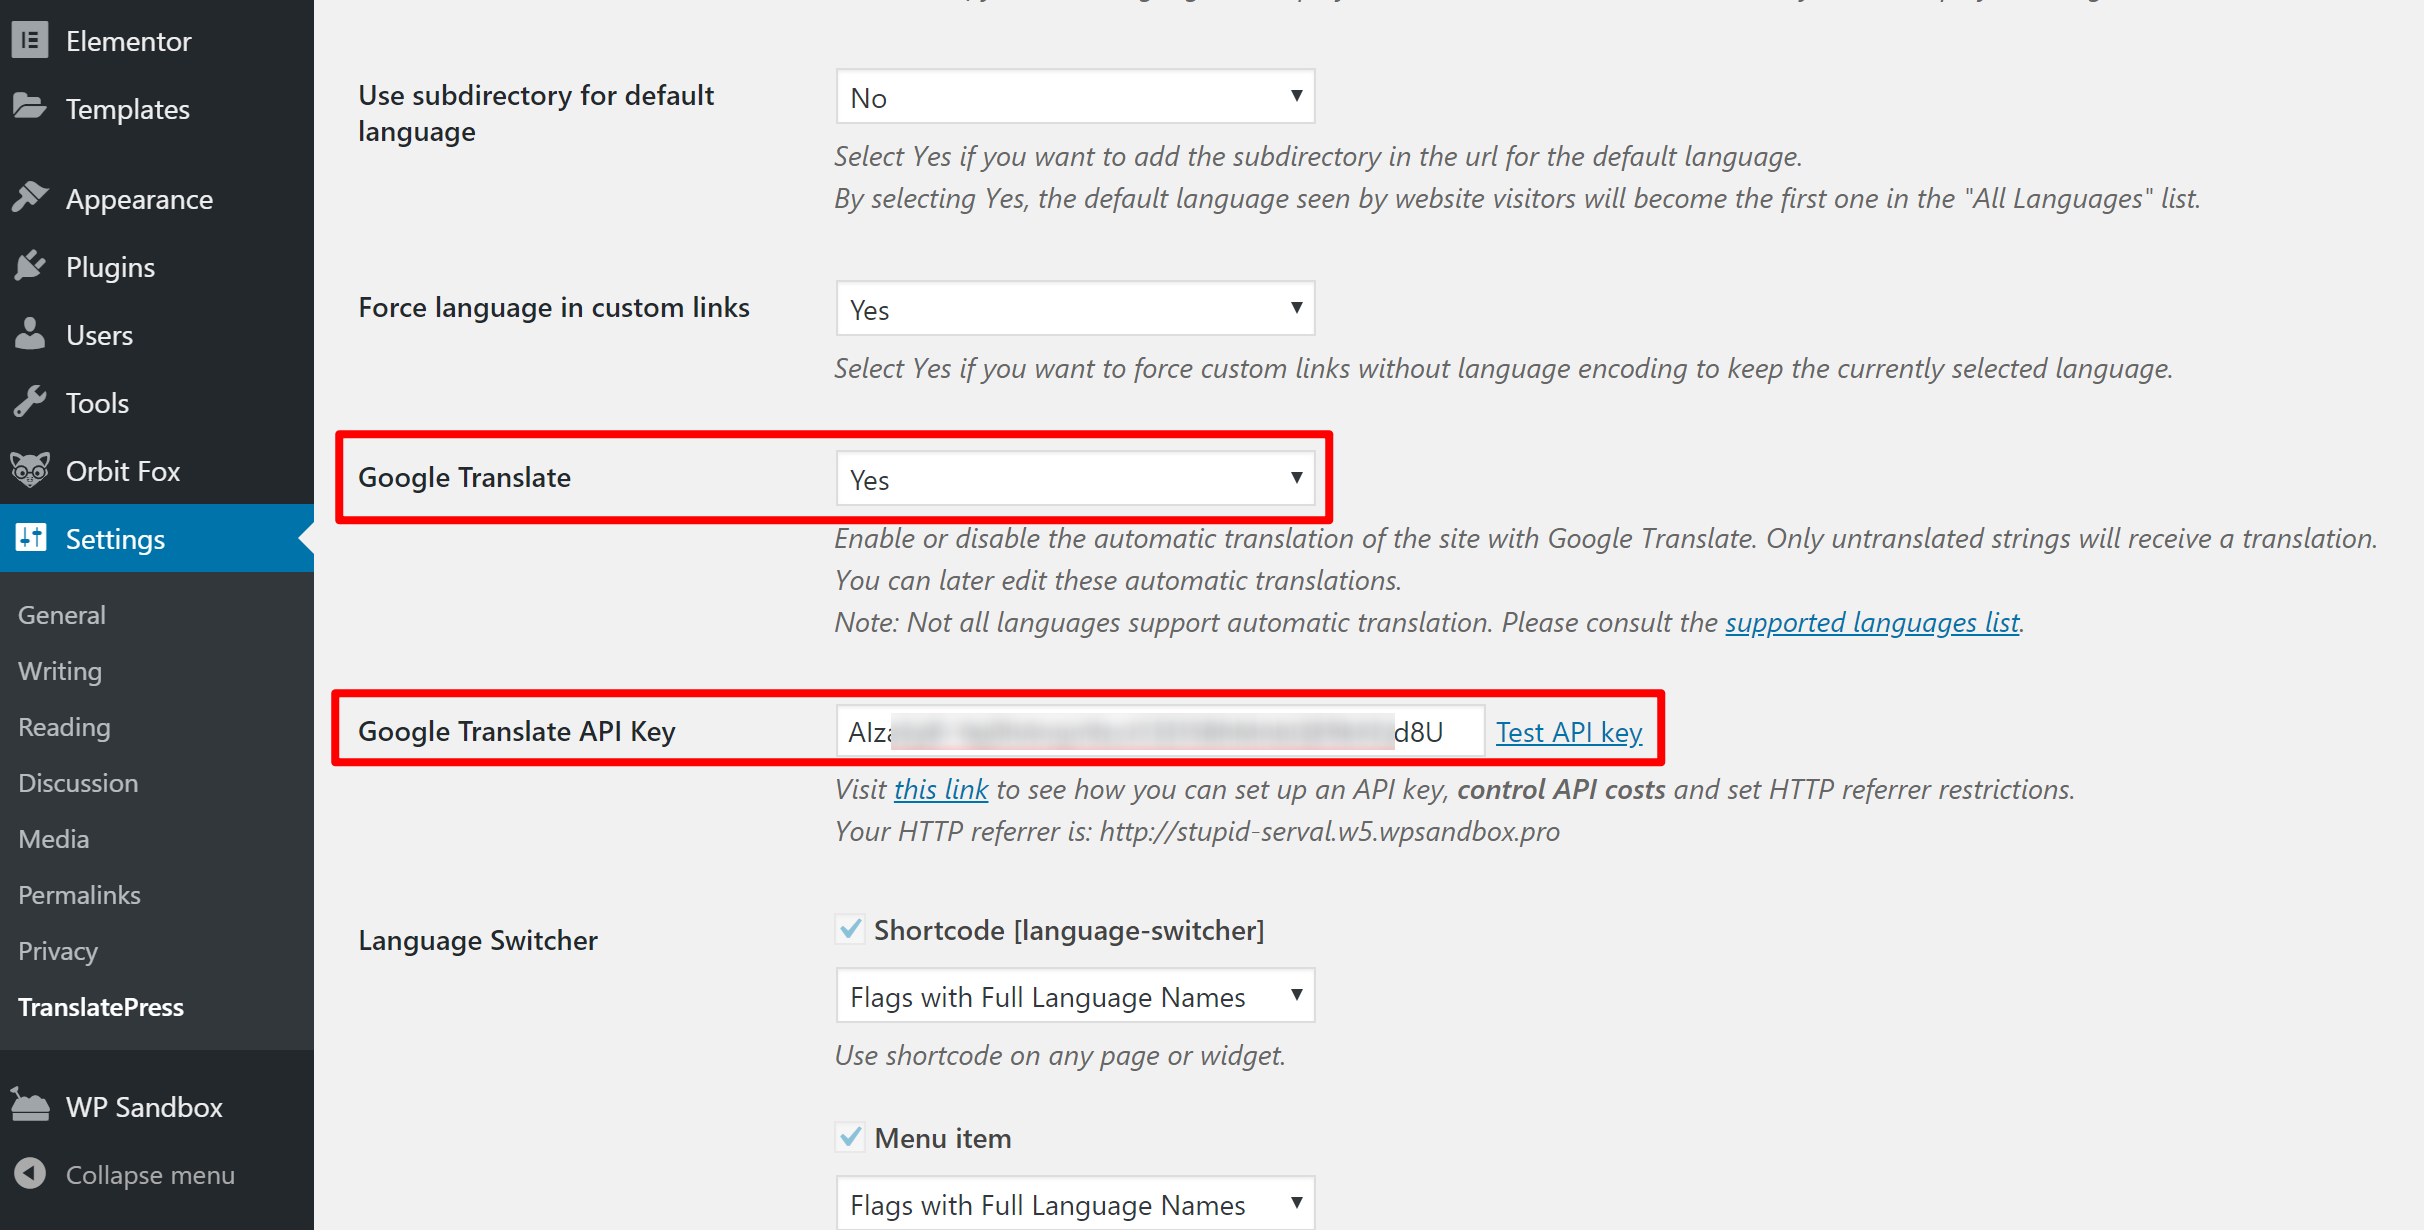
If you want to use automatic machine translation, set the Google Translate drop-down to Yes. If you choose Yes, you’ll also need to generate and enter an API key for Google Translate.
You can follow these detailed instructions to generate your API key. The Google Cloud Translation API is free for up to 500,000 characters (not words). After that, you’ll pay $20 per million characters. You’re paying this to Google – not TranslatePress.
I opted to enable machine translation – here’s what it looks like:

3. Configure language switcher
By default, TranslatePress adds a sticky language switcher button in the bottom-right corner of your site. If you want to change its placement or functionality, you can use the Language Switcher section.
For example, you could disable the floating sticky language switcher and instead opt to add your language switcher as a menu item by going to Appearance → Menus:
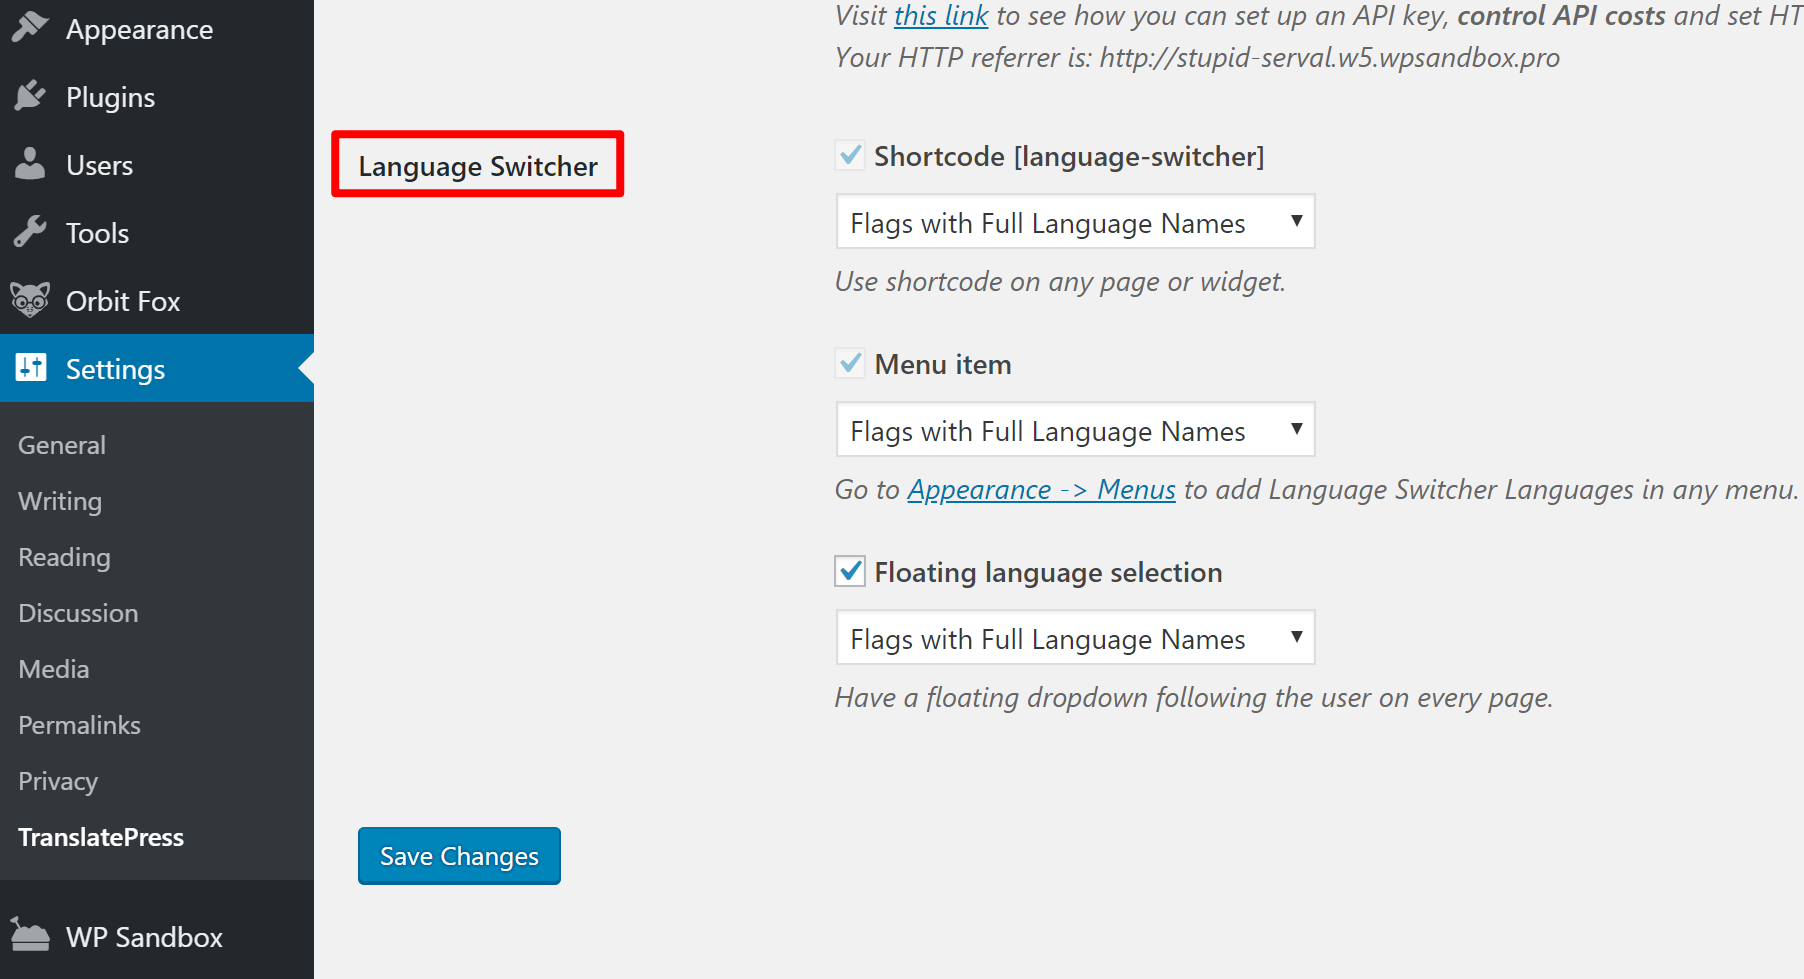

Once you’ve made your choices, make sure to click Save Changes.
4. Translate your content
Now that you’ve configured the basic settings, you’re ready to start translating your site’s content (or editing the machine translations from Google Translate).
To do that, click the Translate Site option in the WordPress toolbar:

This will launch a live preview of your site in what is basically the WordPress Customizer.
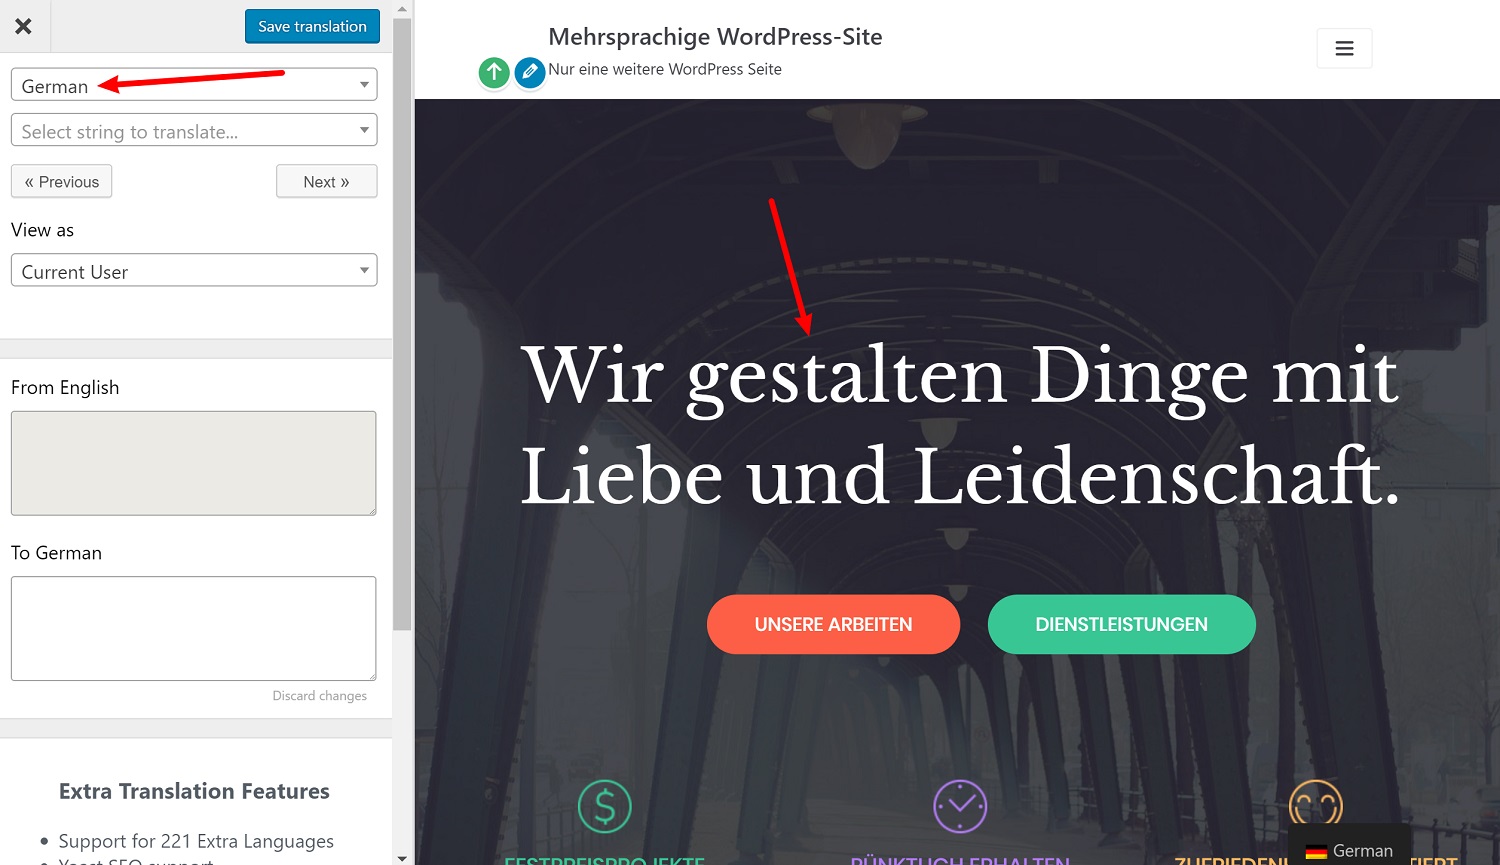
To translate any content, all you do is hover over it and click the blue pencil icon:
You can then make your changes in the sidebar. You can see how there’s already information there from Google Translate.
If you want, you can also change the language to see the live preview in a different language:

And another convenient tool is the ability to preview your content as a logged-in user vs a logged-out user. This is helpful if you show different content to people based on whether or not they’re logged into WordPress:
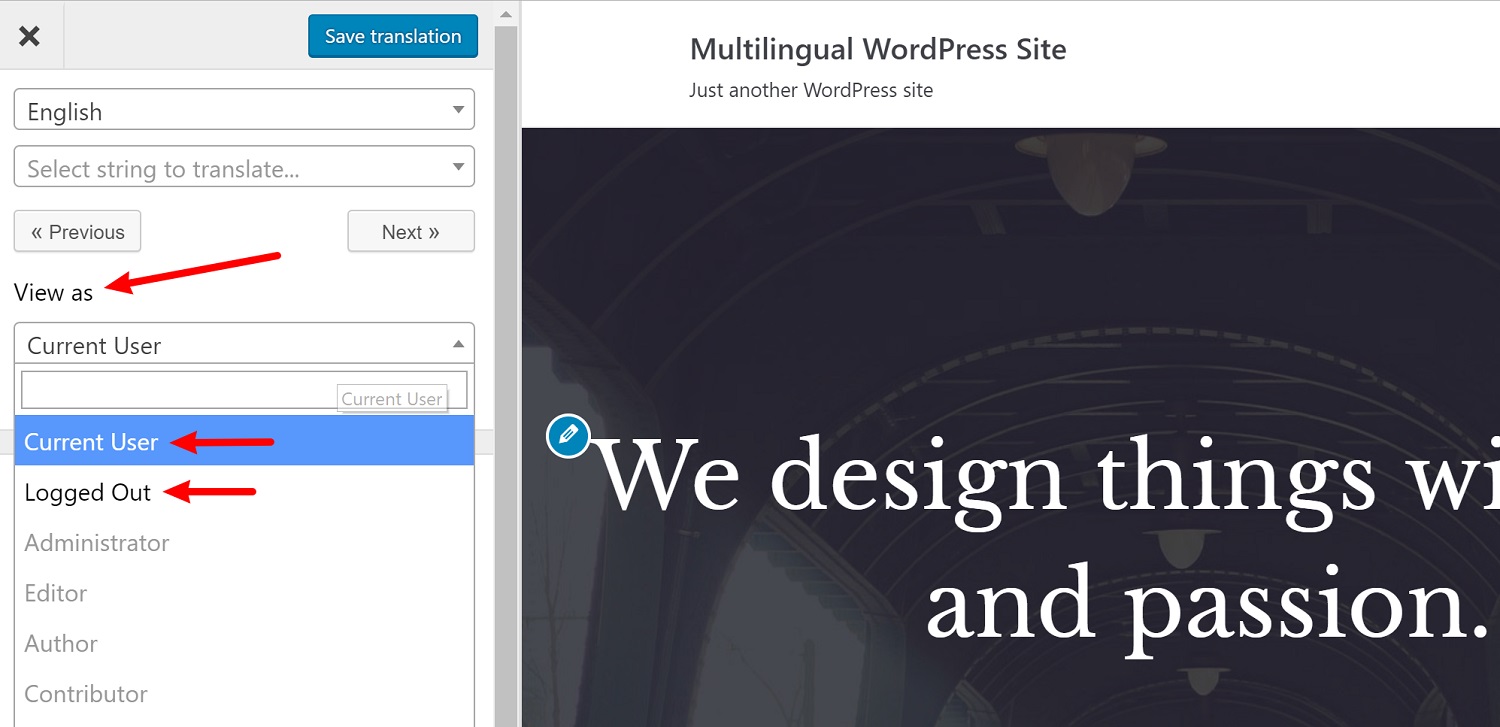

Side note – the premium version lets you apply this same principle to different user roles, which is great for WordPress membership sites.
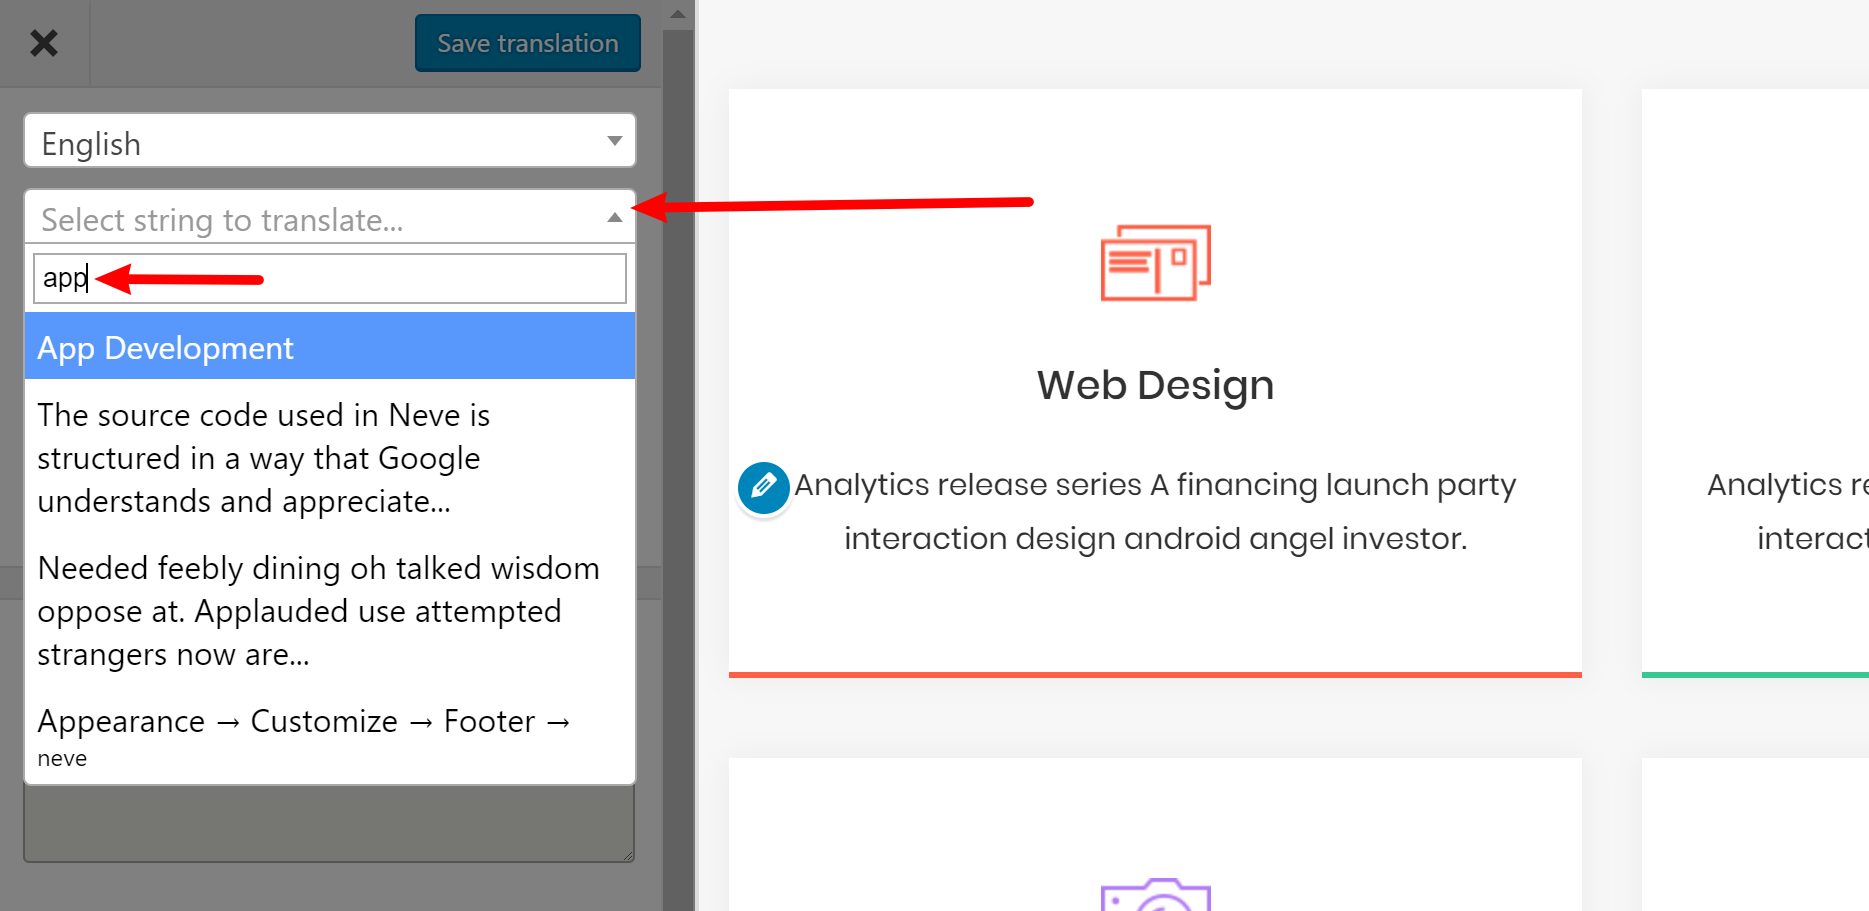
Beyond clicking on strings to translate them, you can also use the string drop-down/search box to select certain strings. This can sometimes make it easier to find text and, with the premium version, this is also where you can translate behind-the-scenes text, like the SEO titles and descriptions you add with Yoast SEO:

To translate other content, you can either click on site links in the live preview to navigate to those pages. Or, you can browse to that content on the frontend of your site and click the Translate Site button in the toolbar.
5. Consider going Pro for better SEO and more functionality
Everything that I showed you above is 100% free. If you’d like more functionality, the Pro version starts at €79 and adds:
- More control over SEO and social media settings, with options to translate URL slugs, SEO titles/descriptions, image alt text, social graph tags, and more
- Dedicated translator accounts (e.g. if you want to hire a freelancer to manage your translations)
- Option to preview content based on user role (rather than just logged-in status)
- Ability to create different navigation menu items based on a user’s language
- Functionality to automatically redirect users to different languages based on their location
Wrapping up
Creating a WordPress multilingual site is a big (and fairly locked-in) endeavor, so you’ll want to spend some time asking yourself important questions before you choose which plugin you want to use.
Consider a WordPress multilingual plugin’s functionality when it comes to things like:
- SEO-friendliness
- Accuracy (e.g. automatic vs manual translations)
- Translation completeness
- Interface
- Price
And if you want a good free option that should work for most situations, TranslatePress is easy to get started with, as you saw with the tutorial.
Any other questions about how to create a WordPress multilingual site? Ask away in the comments section!
Don’t forget to join our crash course on speeding up your WordPress site. With some simple fixes, you can reduce your loading time by even 50-80%: