
Do you want to learn how to create a forum website to foster community, share knowledge, and encourage discussion? If yes, then here we go!
No doubt, a forum website enables people to connect and engage around common interests. This makes it a powerful tool for a school, a hobby group, or a support network.
However, creating a forum website may seem daunting. Yet, with the right platform and guidance, you can create a forum website in a straightforward and rewarding way.
In this article, we’ll guide you step-by-step, so you can build a forum website that is professional and user-friendly. Ultimately, helping you build a dynamic space for community discussions.
Having said that, let’s dive into it.
What is a Forum Website?
Before we move forward, let’s understand exactly what forum website is in a close angle.
A forum website is a type of website or dedicated online space where people discuss specific topics in organized, threaded conversations.
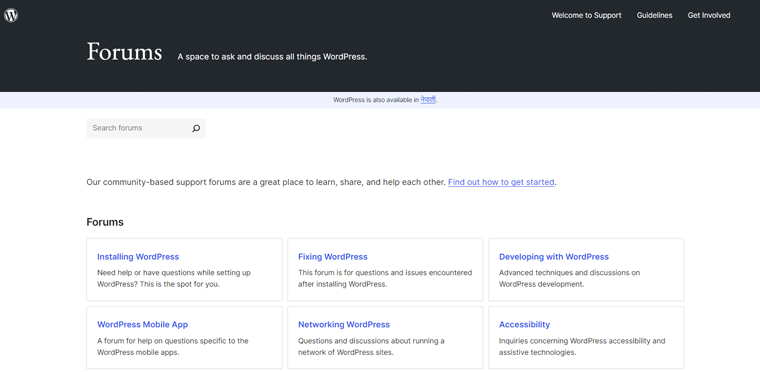
Think of it as a virtual bulletin board, like Reddit or WordPress.org Support Forum. Where users post questions and replies in distinct categories.
Unlike social media, where discussions can get lost in feeds, forums keep topics neatly organized. This makes it easy to find and follow ongoing conversations.
For example, a school forum might have sections for each grade or subject, where students and teachers can discuss assignments and share resources.

Indeed, forums provide a space for focused, long-term discussions and are ideal for building a community around shared interests. This helps users connect, share knowledge, and support each other in a structured, easily navigable environment.
With the right setup, a forum website can become a thriving hub for your community.
Should You Really Start a Forum Website? (5 Top Reasons)
Are you in a dilemma and having thoughts like should you really start a forum website?
Well, here are 5 top reasons you should go for it without a second thought.
i) Foster Community Engagement
A forum website creates a central place for your community to gather and interact. It encourages users to share their experiences and knowledge. By starting a forum, you build a sense of belonging and support among members.
ii) Encourage Knowledge Sharing
Forums are ideal for collecting and sharing valuable information on specific topics. Members can post questions, provide answers, and contribute to discussions. Over time, your forum becomes a rich resource of collective wisdom.
iii) Improve SEO and Website Traffic
Active forums generate user-generated content that can boost your site’s SEO (Search Engine Optimization). This helps your website rank higher in search results, attracting more visitors. More traffic means more opportunities for engagement and growth.
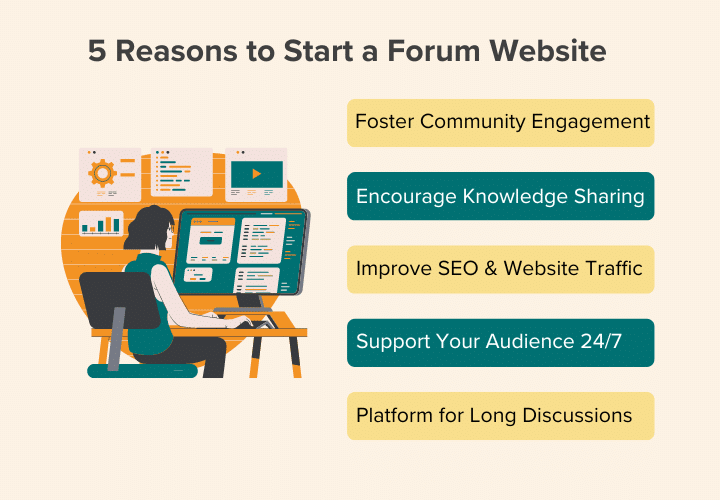
iv) Support Your Audience Around the Clock
Forums allow users to get help and share ideas anytime, day or night. Unlike live chats, forums keep discussions accessible for later reference. This 24/7 availability ensures ongoing support for your audience.
v) Platform for Long-Form Discussions
Social media often limits how deeply you can discuss a topic. Forums, however, provide space for detailed conversations and thoughtful exchanges. They enable users to explore subjects in depth and revisit discussions over time.
Hence, starting a forum website can greatly enhance your online presence. With these benefits, a forum can be a valuable addition to your website and community strategy.
How to Create a Forum Website? (Step-by-Step)
Now, follow us as we guide you through to create a forum website step-by-step.
Step 1: Prepare Your Forum Requirements
Before diving into the technical setup of your forum website, it’s essential to clearly define your requirements and goals.
This preparation will guide your decisions throughout the creation process, ensuring your forum meets the needs of your community.

Here’s how you can prepare:
- Identify Your Target Audience: Find out who will be using your forum. Understanding your audience helps in designing a forum that appeals to their needs and interests.
- Define Your Forum’s Purpose: Clarify what you want to achieve with your forum. Having a clear purpose helps keep your forum focused and valuable to its users.
- Choose Your Forum Categories and Structure: Plan the structure of your forum by deciding on the main categories and sub-forums. Organizing your forum clearly makes it easier for users to find and engage with content.
- Determine Essential Features and Functionalities: List the features that are crucial for your forum. Consider the needs of your users and the type of interactions you want to support.
- Plan for Future Growth and Scalability: Consider how your forum might grow and what future needs you might have. Planning for scalability ensures your forum can handle increased activity and membership over time.
It’s okay to take time to outline these aspects. As it’ll help you build a forum that is effective, user-friendly, and adaptable to your community’s needs. With these requirements in place, you’re ready to move on to the next step.
Step 2: Choose the Right Platform for Your Forum Website
Selecting the right platform is crucial for building a successful forum website. The platform you choose will affect the functionality, flexibility, and user experience of your forum.
Here, we’ve listed out 3 popular ones:
1. WordPress.org
WordPress.org is a powerful, self-hosted open-source platform known for its flexibility and extensive plugin choices. It’s a great choice for building a forum because it allows you to customize your site extensively and integrate various functionalities.
It provides you with plugins like bbPress and BuddyPress to turn WordPress into a fully functional forum and social network. As a result, it’s suitable for both small forums and large communities with thousands of users.
However, you need to set up and manage your own hosting, which might be challenging for beginners. Also, regular updates and backups are your responsibility, requiring some technical know-how.
Pricing:
WordPress is a completely free website builder. So, you can start building your forum website once you install WordPress.
However, the cost may apply if you’re using a premium plugin or theme for advanced features.
In addition, you need to pick a host yourself so that your forum website is available for everyone. Generally, if you go for hosting like Bluehost, then you can get it as low as $2.45/month.
Learn more about it from our article on what is WordPress. Also, check the comparison article between WordPress.org vs WordPress.com to know more about the differences.
2. Wix
Wix is a user-friendly website builder that offers drag-and-drop functionality. This makes it easy for beginners to create and manage websites without any coding knowledge.
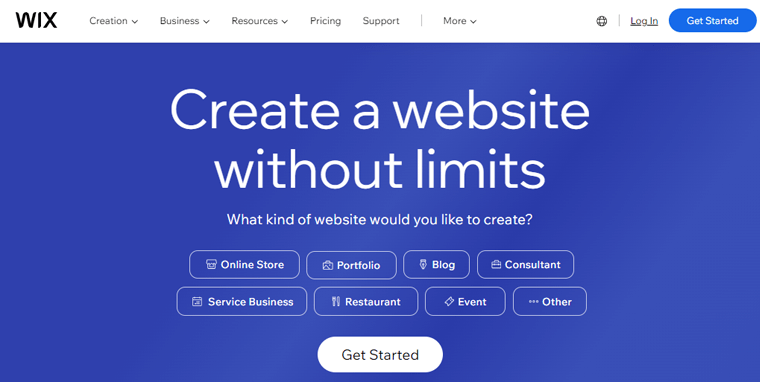
On top of that, the variety of templates helps you quickly set up your forum with minimal effort. What’s more, Wix handles hosting, security, and updates, reducing technical overhead.
Yet, compared to WordPress, Wix offers fewer customization options and plugins. Also, it’s less suitable for large-scale forums or those needing advanced functionalities.
Pricing:
Wix is a freemium website building platform having its hosting service. So, you must pay to build and launch your forum website. The starting cost of Wix is $17 per month having basic requirements for a forum website.
You might explore another comparison article on the WordPress vs Wix to know about their differences.
3. Discourse
Discourse is a modern, open-source platform specifically designed for online discussions and forums. It’s known for its sleek interface and advanced features tailored to community building.
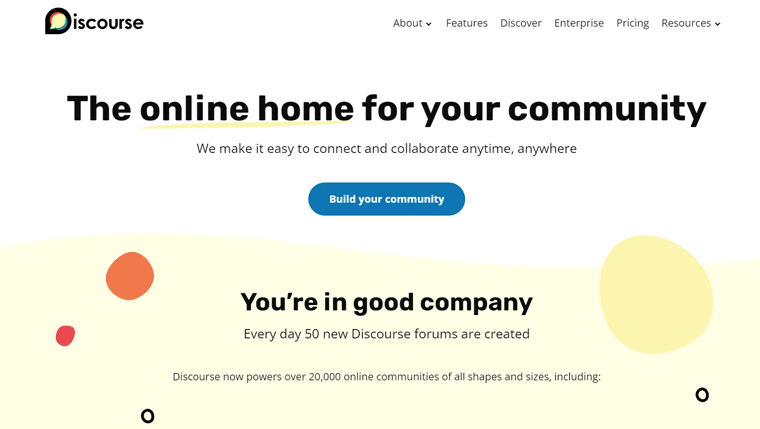
Moreover, it’s built with forums in mind, hence it offers features like real-time updates and rich text formatting. Also, you get access to tools for badges, likes, and gamification to keep users active and engaged.
However, it’s more challenging to set up and manage compared to other platforms, requiring server and technical knowledge.
Pricing:
Discourse is a premium forum website-building platform where its Basic plan starts from $50 per month. It allows for 100 members, 5 staffs, 50K monthly pageviews, and more.
Our Recommendation: WordPress.org
Struggling to choose the right platform? Well, we recommend WordPress.org.
For most users, WordPress.org is the best platform for creating a forum website. Here’s why we recommend it:
- Versatility: WordPress can handle various types of forums, from small discussion groups to large, multi-faceted communities.
- Customization: The platform’s vast array of plugins and themes means you can tailor your forum to match your exact vision.
- Growth Potential: As your community grows, WordPress can scale with it, providing tools and plugins to expand functionality.
- Comprehensive Control: You have full control over your hosting, data, and site configuration, allowing for a truly personalized forum experience.
By choosing WordPress.org, you get a proven platform that balances ease of use with powerful features and endless customization.
In the next step, we’ll guide you through setting up your WordPress environment and getting your forum up and running.
Step 3: Purchase Domain, Hosting, and Set Up WordPress
With your forum requirements in hand and your platform chosen, it’s time to get started with the practical steps. Setting up your forum website begins with securing a domain name, selecting a reliable hosting provider, and installing WordPress.
Here’s how to do it:
I) Purchase a Domain Name
Your domain name is your website’s address on the internet (e.g., www.sitesaga.com).

Choosing a memorable and relevant domain name is crucial for your forum’s identity and accessibility.
- Keep It Simple and Relevant: Choose a name that is easy to remember and reflects the purpose of your forum. For example, for a school forum, you might use the school’s name plus “forum” or “community”.
- Check Availability: Use domain search tools like Namecheap, GoDaddy, etc to check if your desired domain name is available.
- Register Your Domain: Once you find an available domain name, register it through a domain registrar.
You might check our article on how to purchase a website domain name for more guidance. Also, browse different types of domains to know more.
In fact, did you know many hosting providers also offer domain registration as part of their packages?
II) Choose a Hosting Provider
Your hosting provider stores your website’s files and makes them accessible on the internet. For WordPress.org, it’s essential to choose a hosting service that supports WordPress and provides reliable performance.

- Consider WordPress-Specific Hosting: Providers like Bluehost, Kinsta, and WP Engine specialize in WordPress hosting. They offer features optimized for WordPress performance and security.
- Look for Reliability and Support: Ensure the hosting provider has a good track record for uptime and offers responsive customer support.
- Evaluate Pricing and Plans: Compare pricing tiers to find a plan that fits your budget and anticipated traffic needs. Many providers offer introductory discounts for new customers.
For more guidance, check out our article on what to look for in a web hosting company to know more.
III) Set Up Your Hosting Account
Once you’ve chosen a desired hosting provider, follow the below steps to set up your hosting account:
- Sign Up for a Plan: Visit the hosting provider’s website, choose your plan, and sign up.
- Register or Transfer Your Domain: During the sign-up process, you can register a new domain or transfer an existing one to your hosting account.
- Complete Payment and Setup: Follow the prompts to complete your purchase and set up your account.
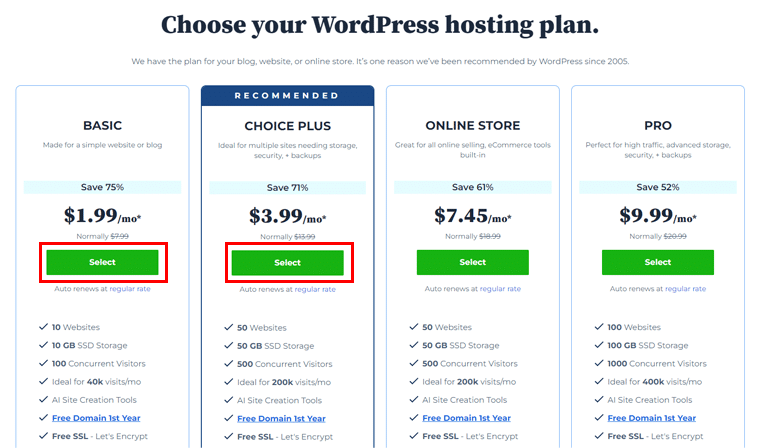
For instance, let’s have a quick tour of web hosting setup with Bluehost.
Start your journey at the Bluehost home page by clicking the ‘Get Started Now’ button.

Next, choose the best plan for your forum website. We recommend the Basic or Choice Plus plans.
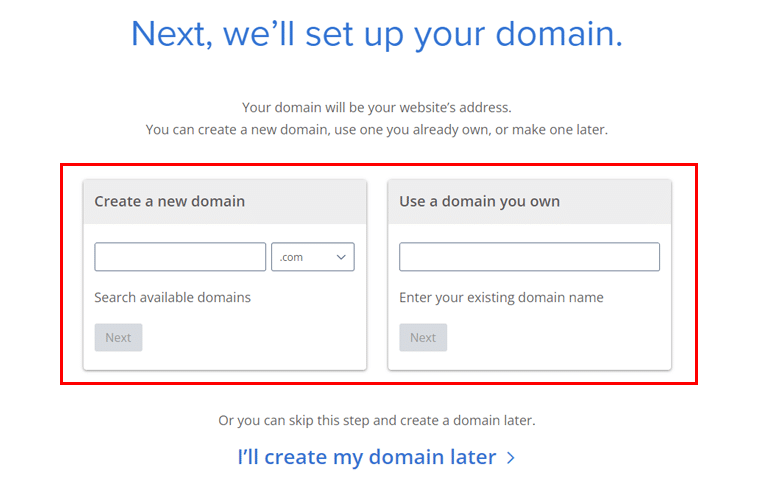
Afterward, create or use an existing domain name using the options provided.
Click the ‘Next’ button to proceed.
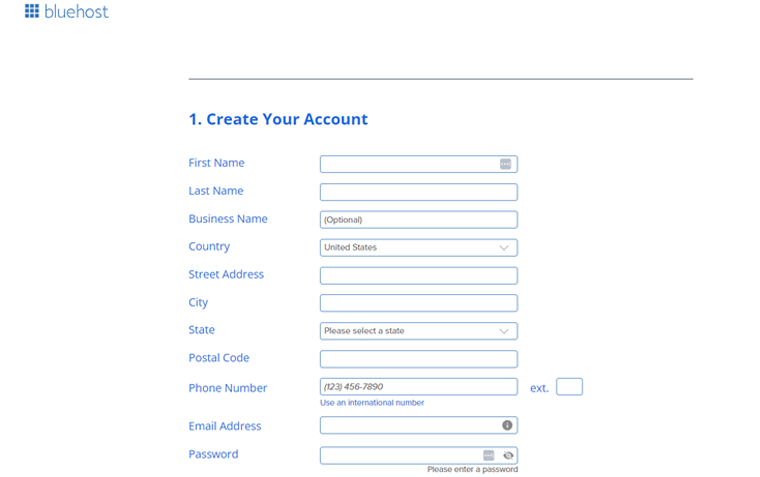
Following that, you need to create a Bluehost account by entering your details, package info, and payment information.
Finally, hit the ‘Submit’ to finalize your setup.
Congratulations! Your hosting plan for the WordPress forum website is now ready.
IV) Install WordPress
With your hosting account ready, the next step is to install WordPress. Most hosting providers and Bluehost offer easy, one-click installations for WordPress.
So, log into your Bluehost account and go to the ‘My Sites’ menu and click ‘Create site’ to start setting up your new website. You will then be directed to the WordPress login page.
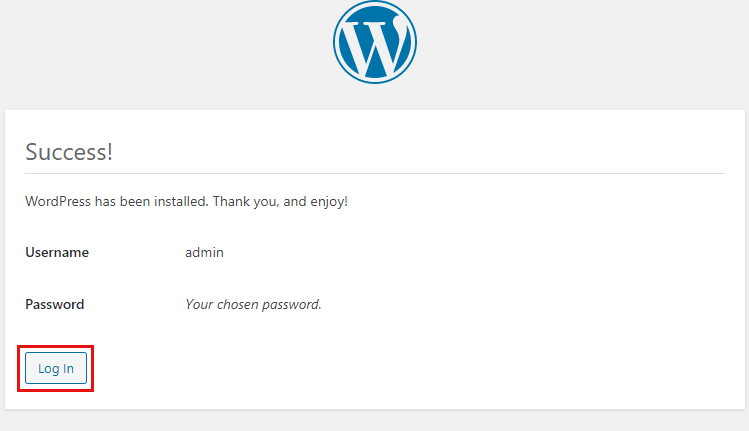
During installation, you’ll need to enter basic details like your site name, username, and password for the WordPress admin account.
Next, access your WordPress admin dashboard by going to www.yourdomain.com/wp-admin and logging in with your credentials.
Step 4: Choose an Elegant Forum Website Theme
Now, your next job is to choose an elegant WordPress theme suitable for your forum website.
As selecting the right theme is crucial for the success of your forum website. A well-designed theme not only makes your site look appealing but also enhances usability and engagement.
For more guidance, you can check out our article on how to choose a WordPress theme.
Meanwhile, for this tutorial, we’ve chosen the Astra theme. It’s highly recommended for forum websites due to its flexibility, performance, and ease of use.

Here are a few reasons why we’ve chosen the Astra theme:
- Lightweight and Fast: Astra is known for its speed, which is crucial for keeping users engaged and reducing bounce rates.
- Highly Customizable: Customize almost every aspect of your site without touching a line of code. It offers extensive options for headers, footers, typography, colors, and layouts.
- Seamless Integration: Integrates seamlessly with popular plugins like bbPress, BuddyPress, etc. This makes it perfect for forums and community sites.
- Pre-built Demo Sites: Provides a wide range of starter templates that you can import and customize. This saves time and helps you get a professional-looking site up and running quickly.
- Responsive Design: All Astra templates are mobile-friendly and look great on all devices.
If you want to know more, then check out our detailed article on the Astra theme review.
Using Astra WordPress Theme
Now, let’s see how we can install and use the Astra theme for the forum website.
Installing and Activating Astra WordPress Theme
So, go to your WordPress dashboard, navigate to the ‘Appearance’ > ‘Themes’ page.
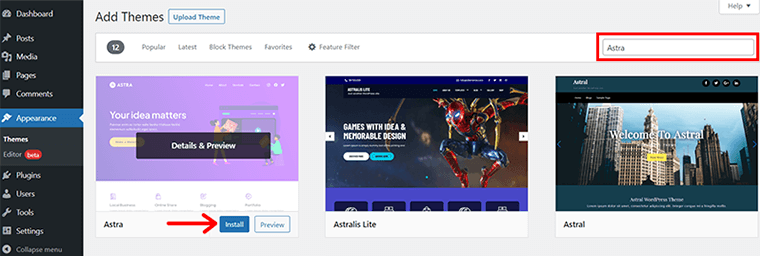
Following that, click the ‘Add New’ button and type ‘Astra’ in the search bar.
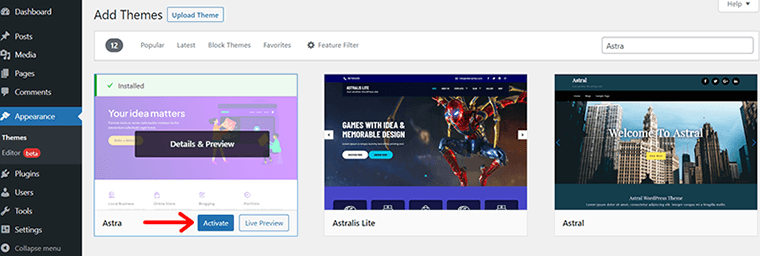
Once you find the Astra theme, click on the ‘Install’ button, shortly followed by the ‘Activate’ button.
For more detailed guidance, you can check out our article on how to install a WordPress theme.
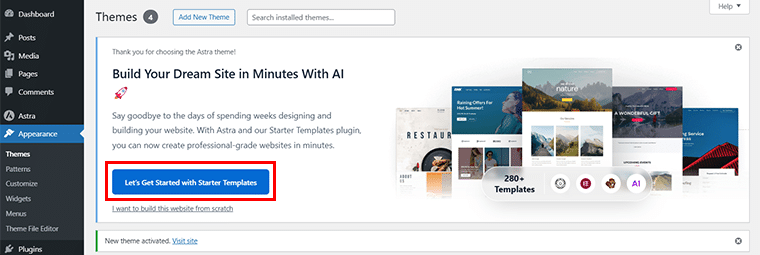
Import Your Chosen Template For Your Forum Website
After your theme is successfully activated, you’ll see the Thank You notification. Also, you can see the ‘Let’s Get Started with Starter Templates’ button on the same popup. Click on it.
Next, you’re provided 2 options whether to choose ‘AI Website Builder’ or pick ‘Classic Starter Templates’.
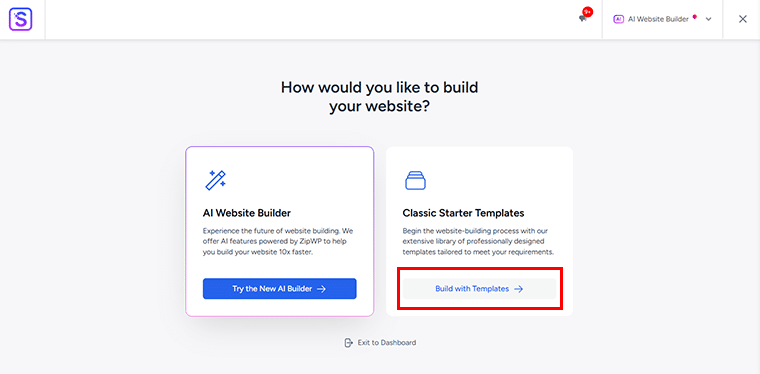
For now, we choose classic starter templates and click on the ‘Build with Templates’ option.
Next, you need to search for what kind of website you want to build a forum for. For instance, let’s suppose we’re building a school forum website. Now, type ‘School’ in the search bar.
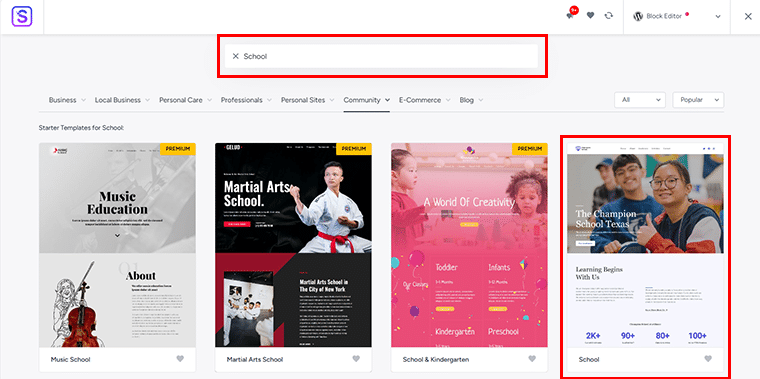
Now, once you locate the demo template, click on it to proceed forward.
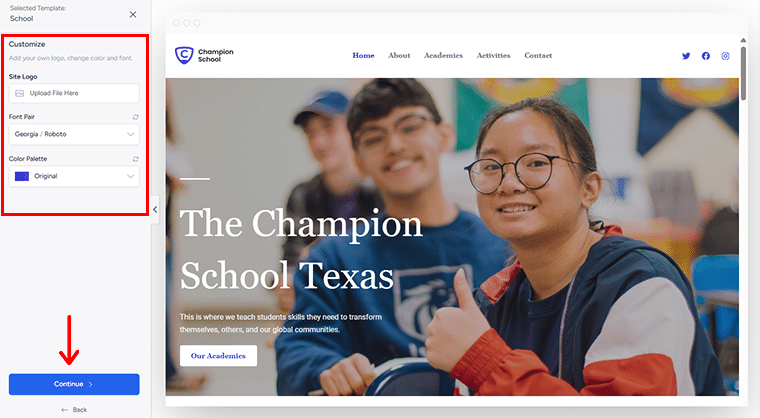
Further, you can do the necessary customization here such as choosing the Site Logo, Font Pair, Color Palette, etc. And click on the ‘Continue’ option.
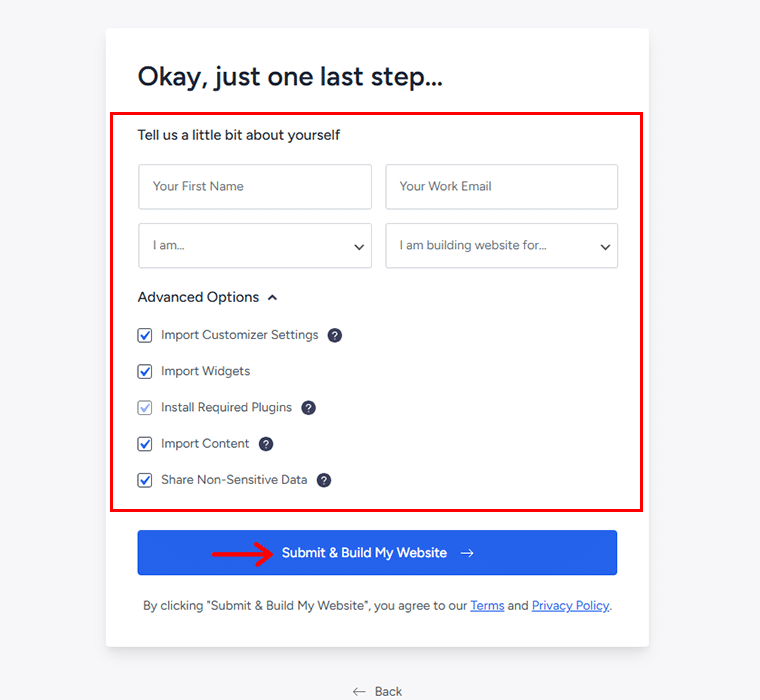
Further, Astra requests certain details. You can quickly finish them out and click on the ‘Submit & Build My Website’ option.
Once you’re done with adding details, you’ll see the Congratulations page for successfully importing the website.

Next, you can click on the ‘View Your Website’ option to preview your imported website or click on the ‘Visit Dashboard’ option to do further customization.

Step 5: Choose a Suitable Forum Plugin
Now, to transform your WordPress website into a fully functional forum, you’ll need the right plugin. A forum plugin provides the essential tools and features to facilitate discussions, manage topics, and engage users.
Here’s how you can choose the right suitable forum plugin for your website. They are:
- User Registration and Profiles: Allowing users to sign up, create profiles, and participate in discussions.
- Topic and Reply Management: Enabling the creation of discussion topics, threads, and replies.
- Moderation Tools: Providing tools for administrators and moderators to manage content and enforce rules.
- Search and Navigation: Offering search functionality and easy navigation through different forum categories and topics.
- Notifications and Subscriptions: Keeping users informed about new posts and replies through notifications or email subscriptions.
Considering the above factors, we recommend going for the bbPress WordPress plugin.

It’s a popular and lightweight forum plugin created by the WordPress community. Also, it’s designed to integrate seamlessly with WordPress, ensuring simplicity and speed.
Installing & Setting Up Your Forum Plugin
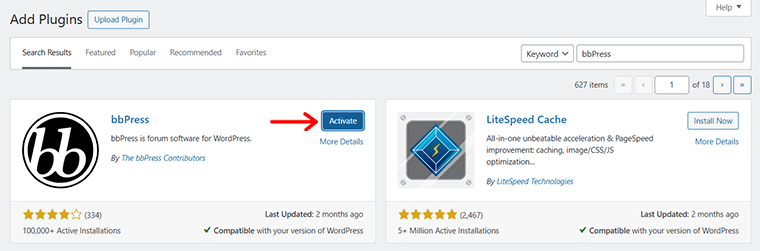
From your WordPress dashboard, you can quickly install the bbPress WordPress plugin. For that, go to ‘Plugins’ > ‘Add New’. Next, enter ‘bbPress’ in the search box.
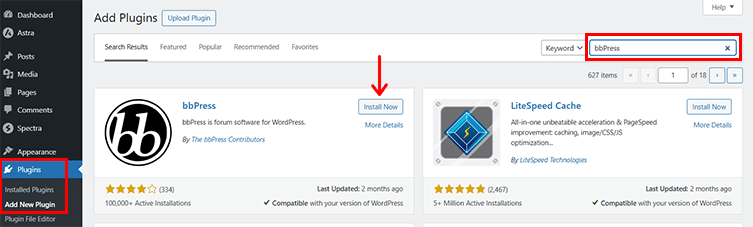
When you find the plugin, click ‘Install Now’, followed by the ‘Activate’ button.
For more detailed guidance, you can check out our article on how to install a WordPress plugin.
Step 6: Configure Forum Settings
On successful activation, you’ll see the 3 new menu items are added in the navigation. They are: ‘Forums’, ‘Topics’, and ‘Replies’.
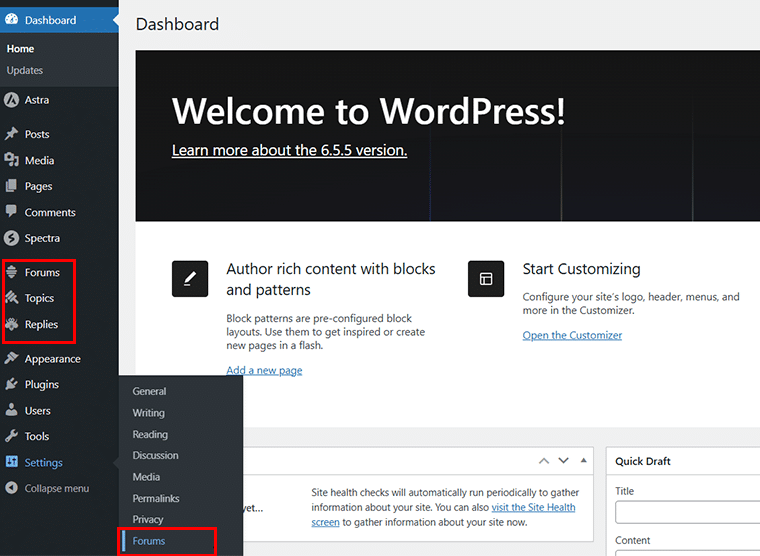
Also, you can see the new ‘Forums’ has been added to the ‘Settings’ menu, click on it. We’ll come to that in a while.
So, our next step is to create the structure of your forum. You can create multiple forums, each serving a category or topic area.
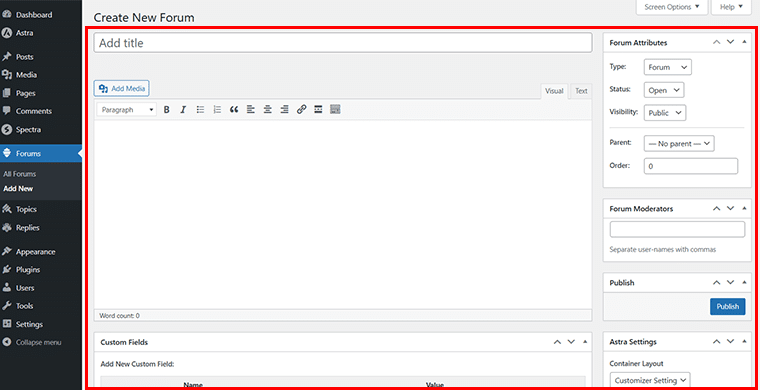
For that, go to the ‘Forums’ section on the left navigation, and click on ‘Add New’ button.
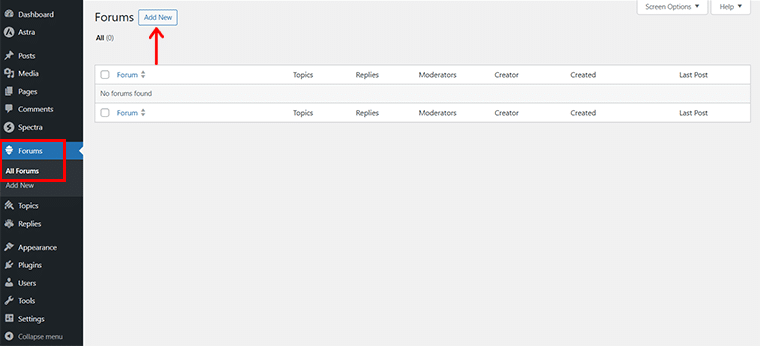
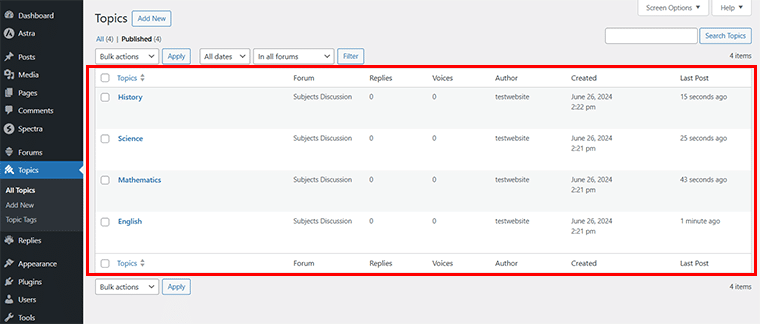
With that, you’ll land up to the editor panel. Here, start by naming your forum, for instance, let’s suppose we’re creating a forum for subjects.
So, let’s add ‘Subjects Discussion’ to the title of the new forum. You can add a description, for example, ‘Discuss topics, homework, and projects related to several subjects.’
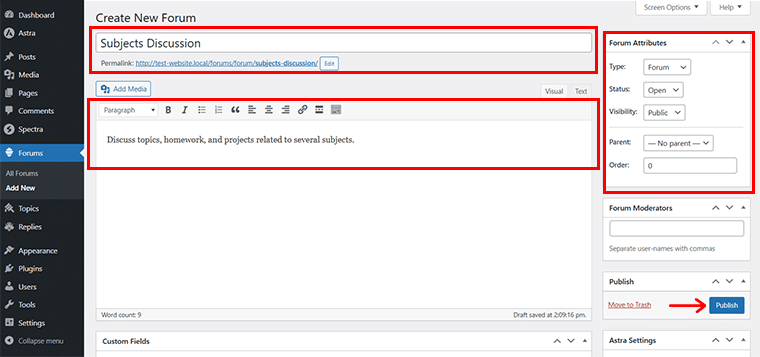
Also, you can edit the Forum Attributes in terms of type, status, visibility, and so on, or keep it as default.
Once done, click on the ‘Publish’ button.
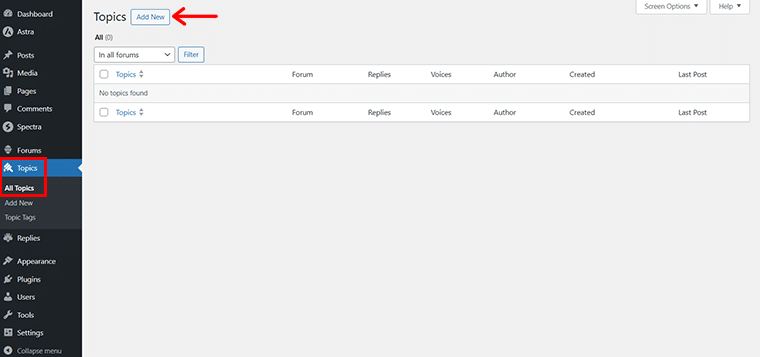
Next, you need to add several topics for a given forum. For that, go to ‘Topics > All Topics’, and click on the ‘Add New’.
Now, like before, add the title, for instance, let’s say ‘English’ and the required description on the related subject.
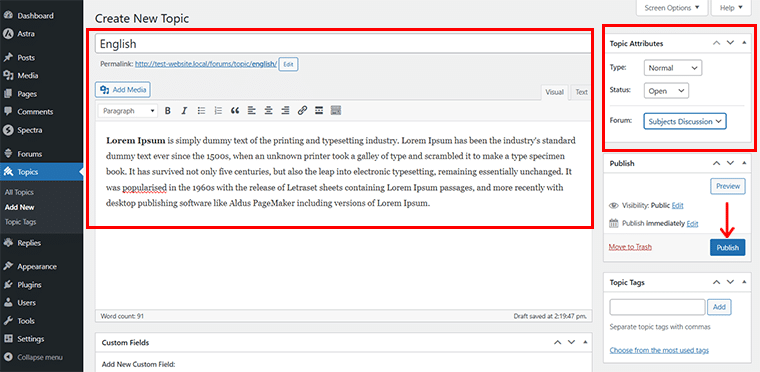
Also, edit the Topic Attributes as you wish, you can choose the ‘Subjects Discussion’ on the Forum section on the right-hand side.
After you’re done, hit the ‘Publish’ button. In the same way, add other subjects like Mathematics, Science, History, etc.
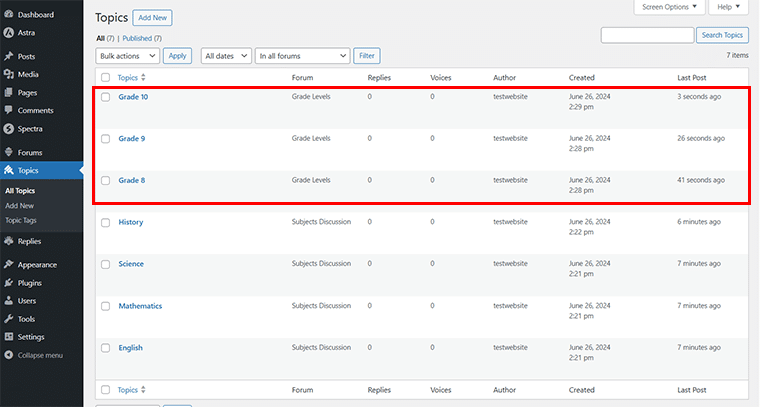
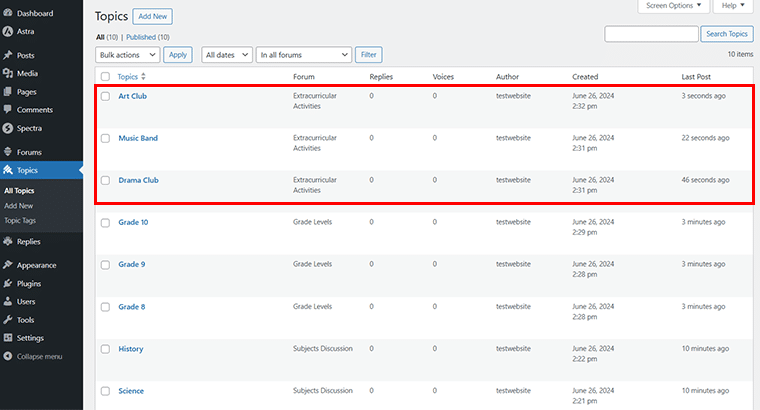
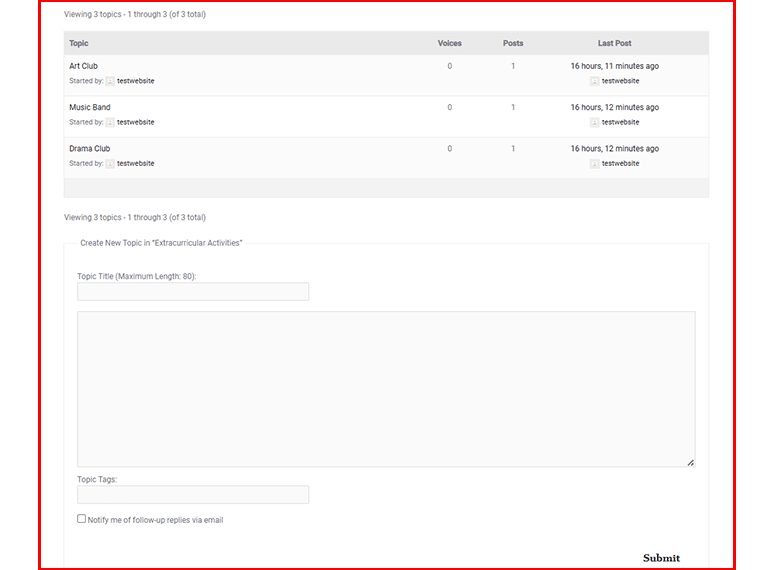
In the same way, we’ve added other 2 forums, i.e. ‘Grade Levels’ and ‘Extracurricular Activities’.
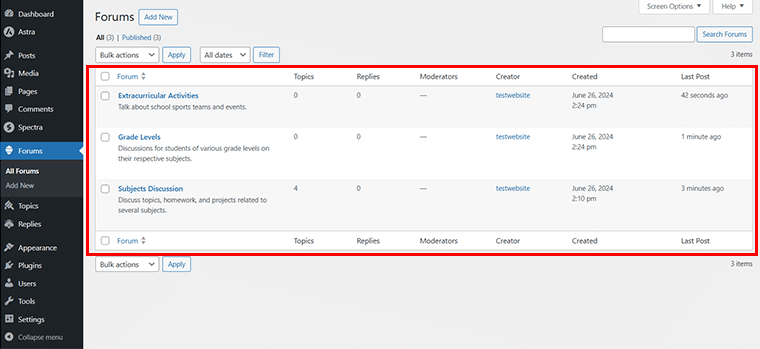
Now, as done before, you can add respective topics on the respective forums.
For example, here we’ve added ‘Grade 8’, ‘Grade 9’, and ‘Grade 10’ for the Grade Levels forum.
Likewise, we’ve added ‘Drama Club’, ‘Music Band’, and ‘Art Club’ for the Extracurricular Activities forum.
Once you’re done with adding these details for your forum, you can go to ‘Settings > Forums’.
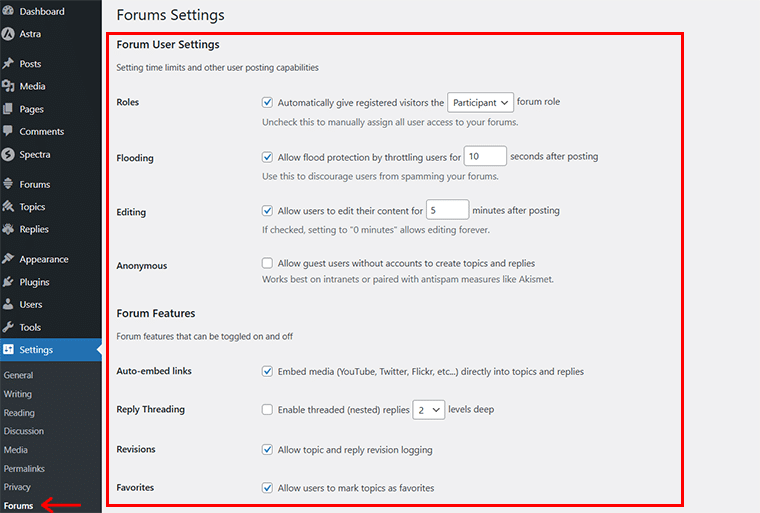
Here, you can add the necessary configurations of the forum as you wish. To be precise, you’ll find settings for:
- User Settings
- Forum Features
- Forum Theme Packages
- Topics and Replies Per Page
- Topics and Replies Per RSS Page, and so much more.
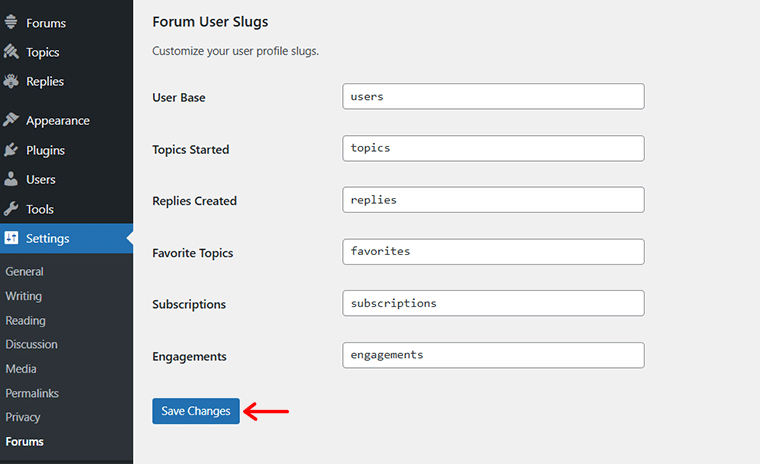
Once done, hit the ‘Save Changes’ at the bottom to save the updates.
Step 7: Customize Your Forum
Now, if you’ve dedicated a Forum page on your website, then you can directly go to that page. Meanwhile, if you don’t, then you need to go to the ‘Pages > Add New’ and create a new Forum Page.
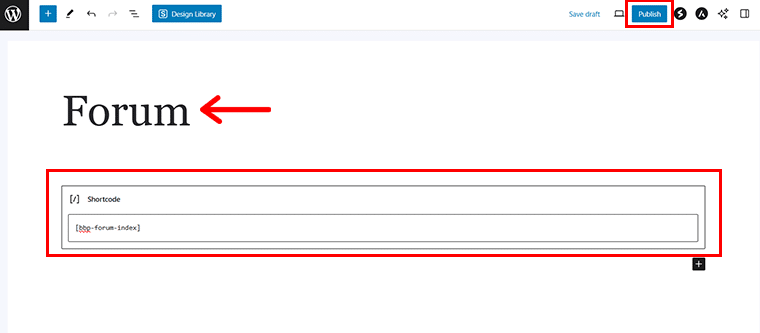
Next, add the [bbp-forum-index] shortcode to display the forum index. Then, click on the ‘Publish’ button to publish the forum page.
Now, you need to add the forum page to your menu bar so that your website visitors can easily see it and have discussions.
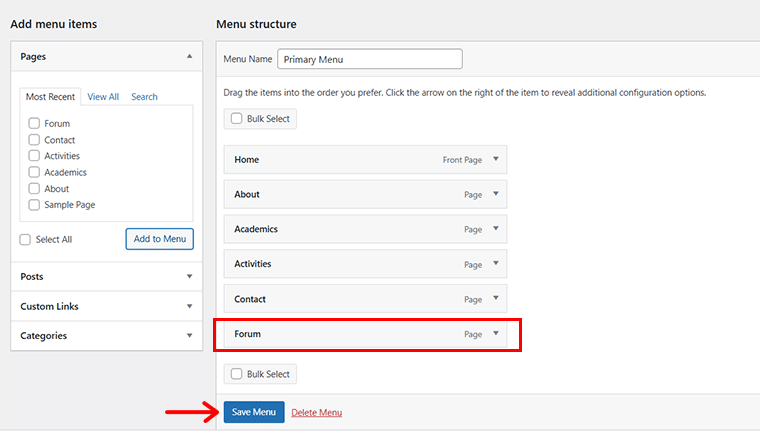
For that, go to ‘Appearance > Menus’, and select the ‘Forum’ in the Pages section.
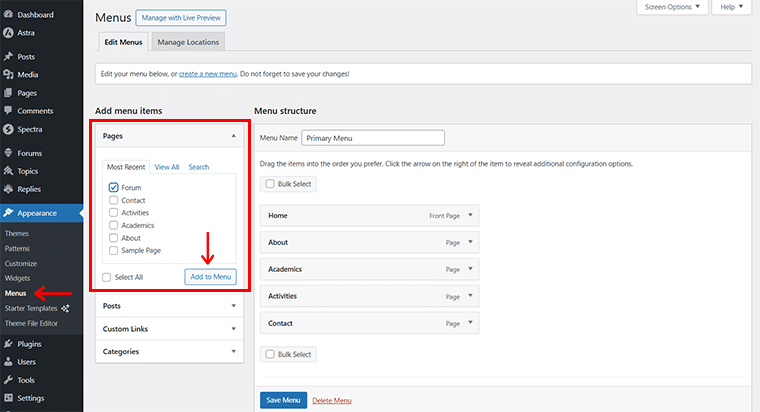
Then, click on the ‘Add to Menu’ button as shown in the above image. With that done, you’ll see the ‘Forum’ added in the menu structure bar. Click on the ‘Save Menu’ option.
Now, if you preview your website, you’ll see that a new ‘Forum’ menu has been added to the menu bar.

But hold on!
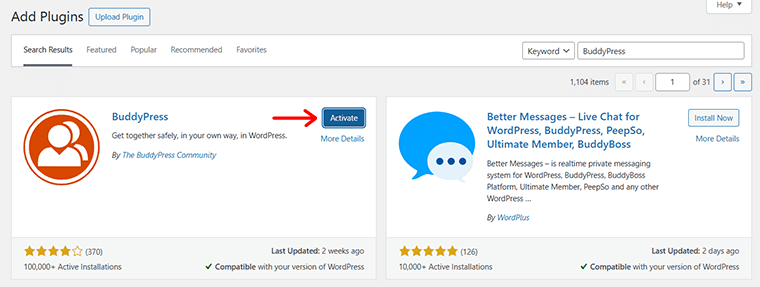
We need to use another plugin called BuddyPress. As it compliments bbPress by adding login features as well as social networking features to your forum. This transforms your site into a more interactive community platform.
So, now to install the BuddyPress plugin, go to the ‘Plugins > Add New’ plugin section.

And search for ‘BuddyPress’ in the search bar, once you locate the plugin, click on the ‘Install Now’ button, followed by the ‘Activate’ button.
Upon successful activation, you’ll see that 2 new menus has been added in the left-side navigation i.e. ‘Activity’ and ‘Emails’. Also, you’ll find the new ‘BuddyPress’ section has been added in the Settings menu.
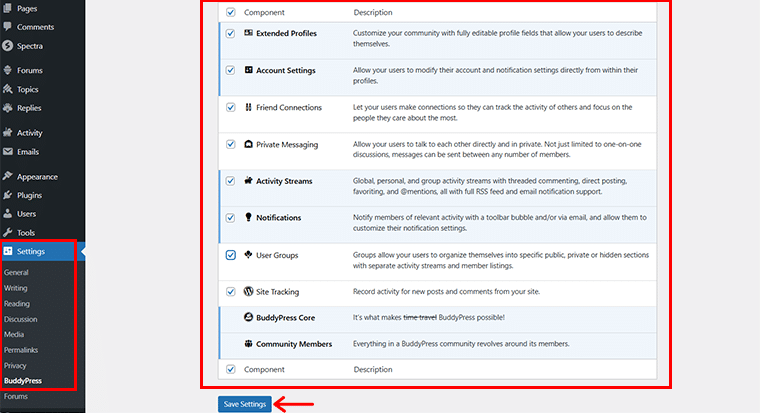
Here, you can enable or disable the necessary components as you wish for your forum and click on the ‘Save Settings’ option.
Once again, go to the ‘Pages > Forum’ and click on the ‘Plus’ icon and search for ‘Login Form’.
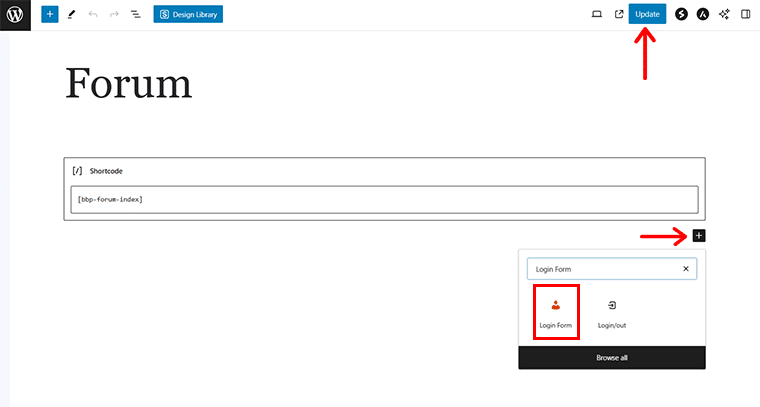
After you locate it, click on it, and hit the ‘Update’ button on the top right corner.
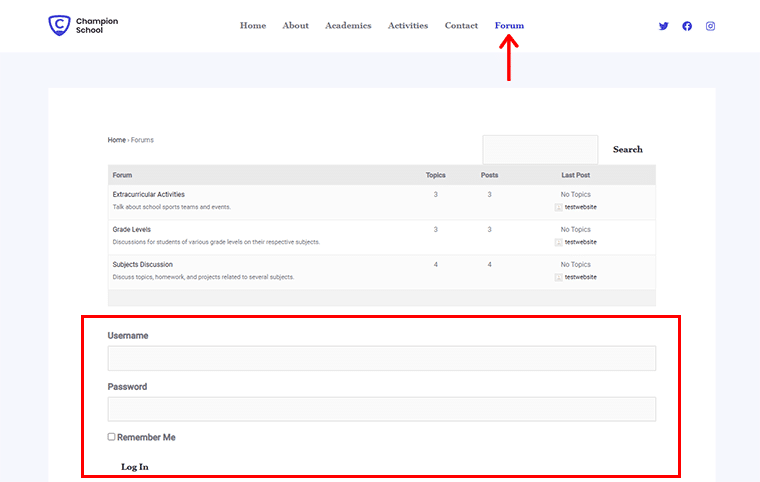
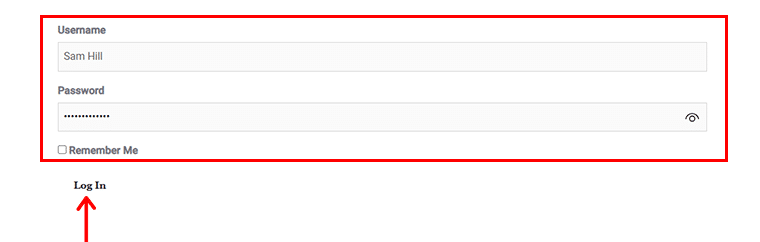
Now if you preview the ‘Forum’ page you’ll see that a new Login section has been added where people or your members can participate in your forum.
Again, are you wondering, how do you assign the username and password for your forum?
Well, for that comeback to your WordPress dashboard, navigate to the ‘Users > Add New User’.
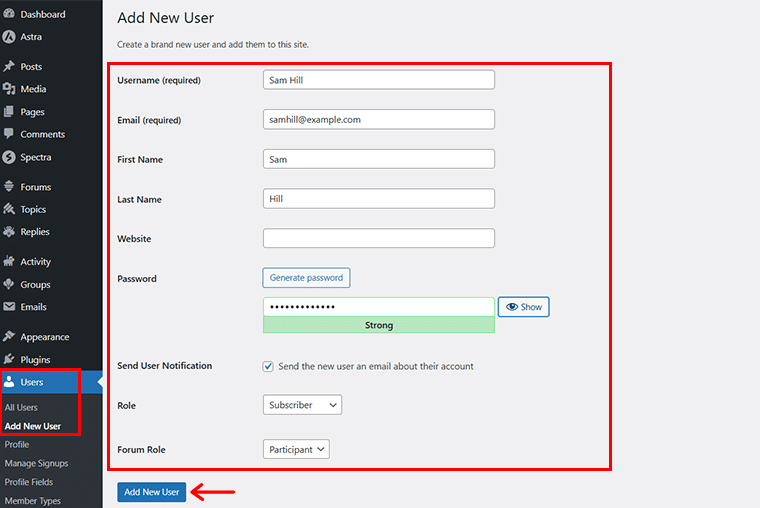
Next, fill in the required details, and click on the ‘Add New User’ option. Once done, users can easily log in to the forum with the given credentials.
And finally, get involved in various discussions and community engagement on the respective forums.
Step 8: Add Essential Plugins for Enhanced Functionality
With your WordPress forum site set up, it’s time to enhance its functionality using other several powerful plugins. Plugins are add-ons that extend the capabilities of your WordPress site, allowing you to add features without needing to code.
For a forum website, specific plugins can help improve user experience, security, and site management.
Here are a few essential plugins that you can add to your forum:
| Plugin | Description |
| WPForms | It streamlines the registration process as it offers customizable forms and user management features. |
| SolidWP | This plugin offers website monitoring and protection features. Install and activate it to safeguard your forum against threats. |
| Rank Math | Improve your forum’s visibility in search engines and ensure it runs smoothly. |
| WP Super Cache | Generate static HTML files from your dynamic WordPress content, reducing server load and improving load times. |
| UpdraftPlus | Schedule automatic backups of your site and store them in secure locations like Dropbox or Google Drive. |
| LightStart (Previously WP Maintenance Mode) | Display a maintenance message while you work on site updates, keeping users informed. |
| myCred | Boost user engagement and participation in your forum by creating a points system that rewards users for participating in discussions. |
By carefully selecting and installing these plugins, you can create a robust, engaging, and secure forum website that meets the needs of your community.
With your plugins in place, your forum is well-equipped to handle discussions, interactions, and growth.
Step 9: Launch Your Forum Website
You’ve set up your forum, customized it, and added essential plugins. Now, it’s time for the exciting part— launching your forum website!
This step involves final checks, promoting your site, and opening it up to users. Here’s how to ensure a smooth and successful launch:

- Disable Maintenance Mode: If you used a maintenance mode plugin, deactivate it so users can access your site.
- Test All Links and Navigation: Click through your site’s menus, categories, and links to ensure they all work and lead to the correct pages.
- Verify Plugin Functionality: Check that all installed plugins are functioning as expected and do not conflict with each other.
- Ensure Responsive Design: Test your site on different devices (desktop, tablet, mobile) to make sure it looks good and functions well on all screen sizes.
- Proofread Content: Review all written content for typos, grammar errors, and clarity. Ensure your forum descriptions and guidelines are clear and concise.
- Check User Registration and Login: Make sure new users can register, log in, and access the forum without issues.
- Test Security Features: Ensure your security plugins and settings are active and properly configured to protect your site from threats.
- Backup Your Site: Create a full backup of your site as a precaution before launch.
Launching your forum website is a critical milestone. With your forum now live, you’re ready to focus on managing and growing your community, keeping it active and engaging for all members.
Step 10: Manage and Grow Your Forum
After launching your forum, the next step is to manage it effectively and foster its growth. Sustaining an active, thriving community requires ongoing attention and strategic planning.
Here’s how you can do it:
i) Maintain Active Moderation
Effective moderation is key to creating a positive and engaging forum environment. Set clear guidelines and enforce them consistently to keep discussions respectful and on-topic.
ii) Engage Your Community
Keeping your forum vibrant and engaging is essential for its long-term success. Regularly interacting with your community and encouraging participation can help start discussions, highlight user contributions, run events and contests, etc.
iii) Analyze and Optimize Performance
Monitoring your forum’s performance and user activity helps you understand what works and where improvements are needed. Use analytics tools and user feedback to optimize your forum in terms of tracking user engagement, identifying popular topics, etc.
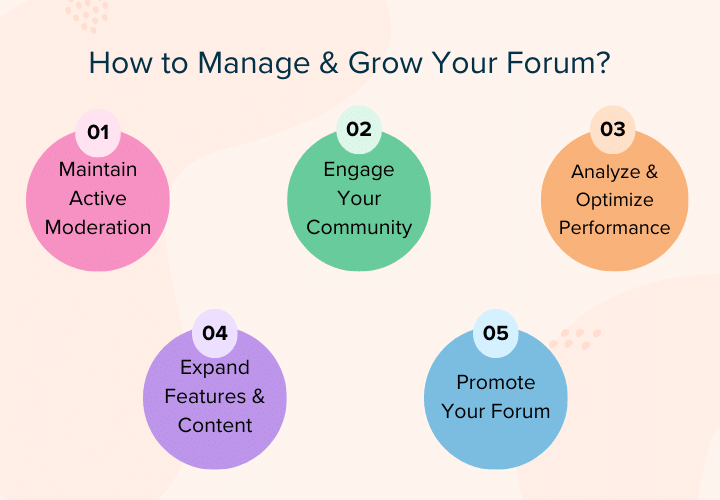
iv) Expand Features and Content
As your forum grows, continually adding new features and content can keep it fresh and appealing to users. For instance, you can introduce new categories, publish regular updates, collaborate with experts, and so forth.
v) Promote Your Forum
Growing your forum involves attracting new members and retaining existing ones. Promote your forum through various channels to increase visibility and participation. For instance, you can use social media, network with related communities, etc.
Hence, building and managing a forum website is a rewarding journey that brings communities together and fosters meaningful interactions.
By following these steps from preparing your forum requirements to launching and growing your site. You can now create a dynamic and engaging online space that serves your community’s needs.
Frequently Asked Questions on Creating a Forum Website
Creating a forum website can be an exciting journey, but it also brings up many questions. Here are answers to some of the most frequently asked questions to help you on your journey:
Q.1. Why should I use WordPress.org to create my forum?
A: WordPress.org is a powerful platform that offers extensive customization options and a wide range of plugins and themes. It’s ideal for creating a forum as you have complete control over your site and can easily add functionality with plugins like bbPress.
Q.2 Do I need to have technical skills to create a forum website on WordPress?
A: No, you don’t need advanced technical skills to create a forum website with WordPress. As there are plugins like bbPress and BuddyPress that help you create a forum website with ease. Yet, some basic knowledge of website management can be helpful.
Q.3 How much does it cost to start a forum website?
A: Well, it depends on your choice of hosting provider, domain registration, and any premium plugins or themes you choose to use. Generally, you can start a basic forum website for as little as $50 to $100 per year, which covers domain registration and shared hosting fees.
Q.4 How do I keep my forum secure?
You can use strong passwords, install security plugins, backup regularly, monitor activity, and so forth to keep your forum secure.
Q.5 How can I encourage user engagement on my forum?
A: Encouraging user engagement involves creating a welcoming and interactive environment. You can start interesting discussions, recognize contributions, host events and contests, and do so much more.
Conclusion
And that’s all, folks! We’ve come to the end of our article on how to create a forum website.
Whether it’s a school forum, a hobby group, or a professional community, your forum can become a vibrant hub for sharing knowledge and connecting people. Now, it’s time to take these steps and watch your forum thrive!
If you’ve any questions or confusion, do let us know in the comment section below. We’re happy to help you out.
Also, check out our other reads such as how to start a blog and make money and how to create and event website.
Remember to follow us on our social media handles Facebook and Twitter to stay updated with our content.
Some of the links on this article/page are affiliate links. If you click on such an affiliate link and purchase the product, we’ll earn a specific percent commission from the seller. But it won’t at all affect the price you’ll pay.