WordPress Interactivity API is designed to bridge the gap between the backend and the frontend, providing a standard way to create interactive content on your WordPress site. With this API, developers can easily add dynamic features to their blocks without relying on multiple external libraries or complex setups.
In this guide, I will cover the Interactivity API, its benefits, and how to use it. I will also provide some code examples. By the end of this guide, you will have a solid understanding of leveraging the Interactivity API to make your WordPress site more dynamic and user-friendly.
What is WordPress Interactivity API?
The Interactivity API allows developers to create interactive behaviors within their blocks or even between different sets of blocks without relying on third-party libraries or using frameworks like React or Vue on the frontend. This means that even with Block Themes, users can achieve an interactive user experience without sacrificing the PHP server-side rendering that WordPress is known for. Instead of needing a JavaScript runtime, developers can maintain the performance and reliability of their sites while adding dynamic, engaging features.
The Interactivity API uses directives, which are special HTML attributes, to add frontend interactivity to blocks. These directives tell the API to attach specific behaviors to DOM elements or transform them, similar to Alpine.js but specifically designed for WordPress. This approach integrates seamlessly with WordPress hooks and PHP server-side rendering, ensuring that interactive features are consistent and efficient without duplicating logic or introducing bugs related to server-client discrepancies. This makes the Interactivity API a powerful tool for creating dynamic and interactive WordPress blocks.
Of course, you can create interactive experiences without the Interactivity API, but the API aims to provide a standard way to support such interactions. When using JavaScript or a framework of your choice, managing interactions can become increasingly difficult as they grow in complexity. The Interactivity API simplifies this process, offering a consistent and straightforward approach to building dynamic features, making it easier to handle complex interactions seamlessly.
Do you need to learn another language?
No, you do not need to learn another language to use the Interactivity API. The API is designed to be user-friendly and integrate seamlessly with the existing WordPress development environment. It uses familiar web technologies like HTML and JavaScript, making it accessible to developers already comfortable with these languages.
What about the editor-side experience of blocks?
This API is only for the frontend, but that is really not a limitation, as your blocks in the editor already have access to React through the Block Editor.
Does it work with server-side rendering?
Yes, it works with server-side rendering blocks and static blocks, all thanks to the genius use of directives.
What are directives?
Directives are special HTML attributes that add specific behaviors or transformations to elements on a web page. For example:
div
  data-wp-interactive='{ "namespace": "wpmovies" }'
  data-wp-context='{ "isOpen": false }'
  data-wp-watch="callbacks.logIsOpen"
>
  button
    data-wp-on--click="actions.toggle"
    data-wp-bind--aria-expanded="context.isOpen"
    aria-controls="p-1"
  >
    Toggle
  button>

  p id="p-1" data-wp-show="context.isOpen">
    This element is now visible!
  p>
div>Code language: HTML, XML (xml)
In this example, directives like data-wp-interactive, data-wp-context, data-wp-on--click, and data-wp-show manage data and behaviors, making the content interactive without writing extensive JavaScript.
Is there an example of how a website built with Interactivity API looks?
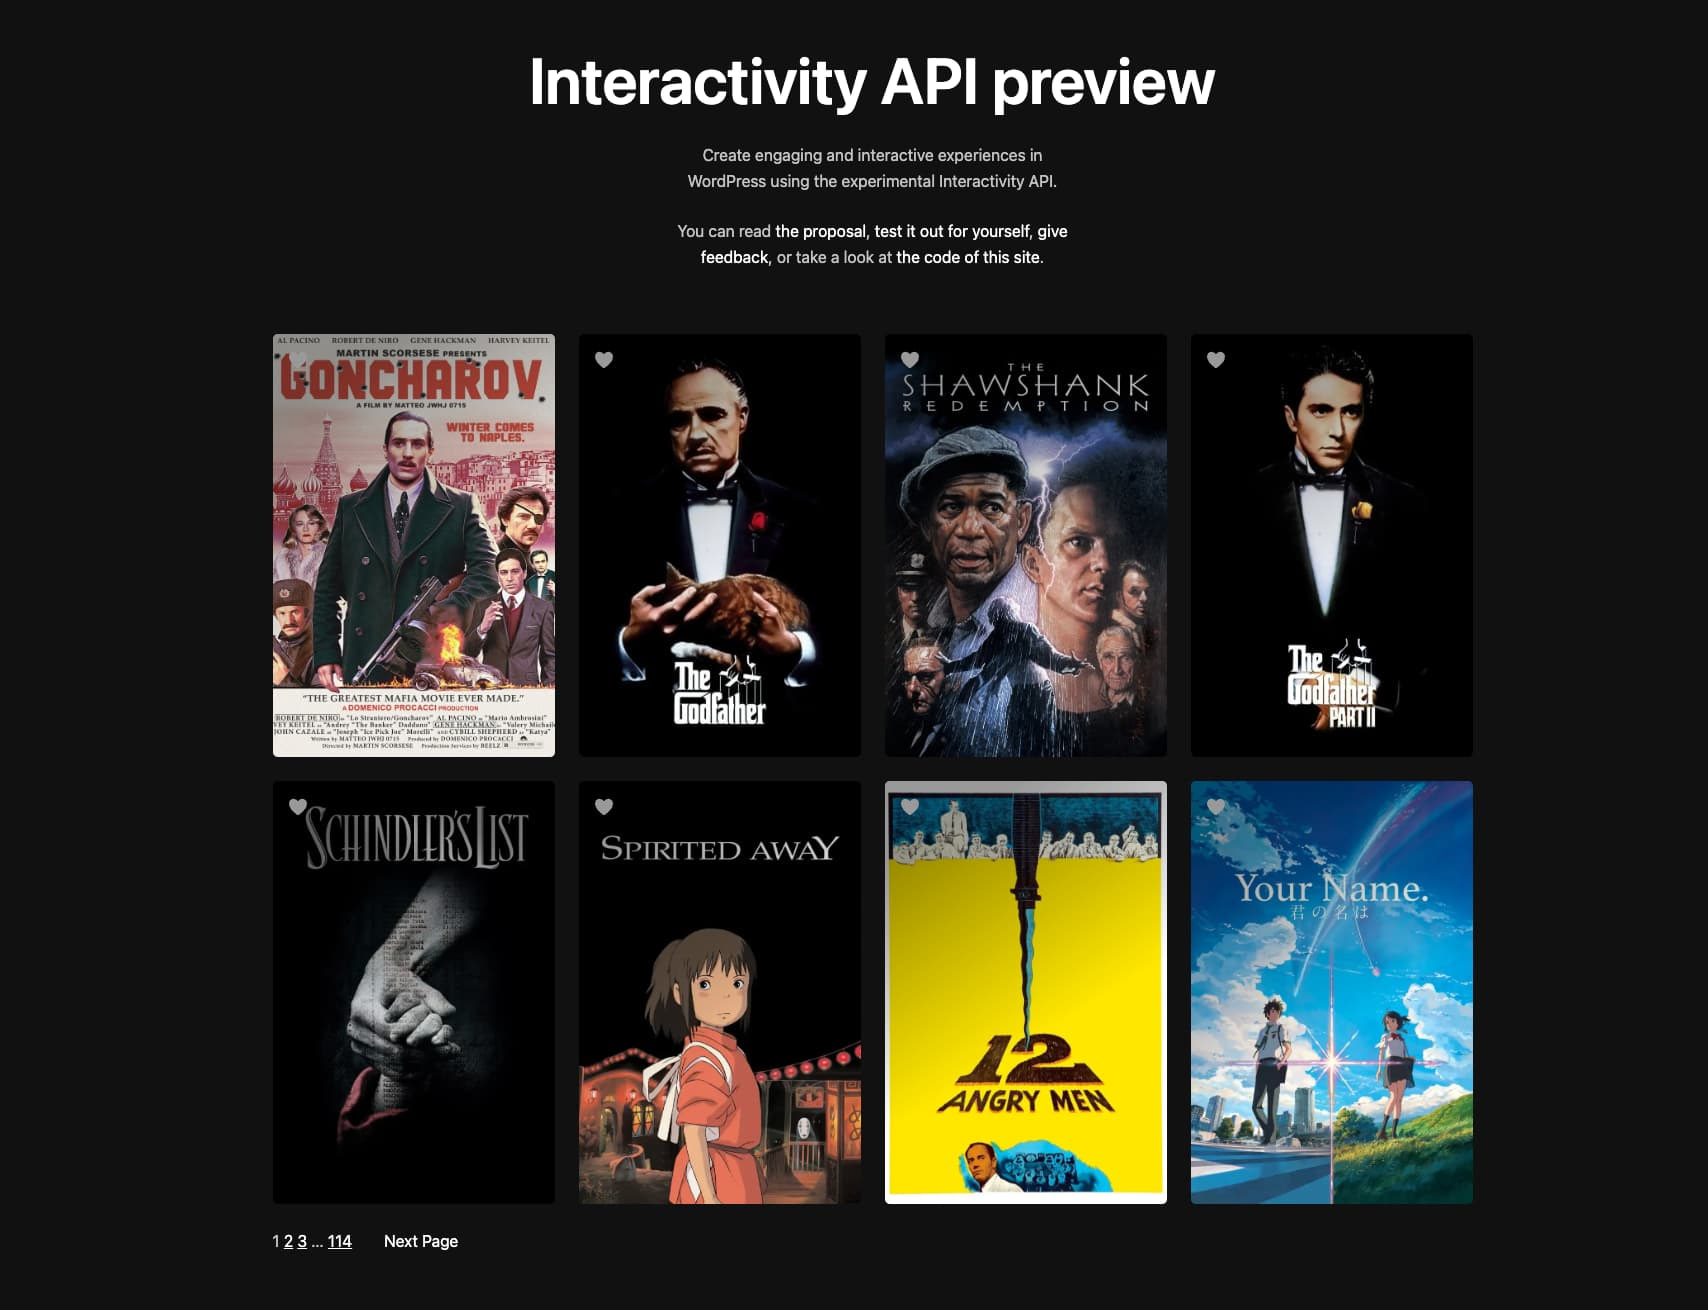
Yes, and a very fancy one. To showcase the API, the WordPress Core Team created the wpmovies.dev website. If you were not excited until now, you would be excited after checking the wpmovies demo. Developing something like this with a Block Theme would have been very complicated with traditional JS libraries.
Creating an Interactive Block
Creating an Interactive Block is not different than making any other block for the Block Editor. You can add Interactivity API support to any blocks.
One thing to note is that Interactivity API is only available if you use WordPress 6.5 or above. If not, you must use the latest version of the Gutenberg plugin.
Setting up the build process
In this article, I assume you use wp-scripts for block development (if you do not, then why not?). You can declare that your block supports Interactivity API by modifying the supports parameter of your block.json file:
"supports": {
    "interactivity": true
},Code language: JavaScript (javascript)
If your block also uses JavaScript for interactivity, then you need to define the module viewScriptModule in your block.json file:
{
   ...
   "viewScriptModule": "file:./view.js"
}Code language: JavaScript (javascript)
Lastly, you must also use the experimental-module flag in your build script to make use of the latest features:
{
    "scripts": {
        ...
        "build": "wp-scripts build --experimental-modules",
        "start": "wp-scripts start --experimental-modules"
    }Code language: JavaScript (javascript)
That is it for setting up your build process. But if you are creating a new block, you can use the scaffolding method to create a starting point for further development quickly.
Scaffolding using create-block
Another quick way to create an interactive block is to use the create-block script to scaffold one. You can use the following command in your terminal for that:
npx @wordpress/create-block@latest block-name --template @wordpress/create-block-interactive-templateCode language: CSS (css)It is a great way to create a new block or experiment.
Directives and store
Interactive blocks in WordPress have two main parts. The first part involves defining directives in the save.js file (or render.php if using server-side rendering). These directives make the code declarative by specifying behaviors directly in the HTML.
The second part is the view.js file, where the store is defined. This store manages the state, actions, and callbacks, ensuring the interactive behaviors function as intended.
For an easy example, here’s our render.php file:
The first thing you will notice in the above example is the data-wp-interactive directive defining this block’s store. This directive is required for any block that wants to use interactive functionality.
If you were to use a save.js file, the same code would be written like:
const save = () => {
  return `
    div
      {...useBlockProps()}
      data-wp-interactive='{ "namespace": "myblock" }'
      data-wp-context='{ "isOpen": true }'
      data-wp-watch="callbacks.logIsOpen"
    >
      button
        data-wp-on--click="actions.toggle"
        data-wp-bind--aria-expanded="context.isOpen"
        aria-controls="p-1"
      >
          Toggle
      button>

      p id="p-1" data-wp-show="context.isOpen">
          This element is now visible!
      p>
    div>
  `;
};Code language: HTML, XML (xml)
And finally, you can define the store for this block in the view.js file like:
import { store, getContext } from "@wordpress/interactivity";

store( 'myblock', {
  actions: {
    toggle: () => {
      const context = getContext();
      context.isOpen = !context.isOpen;
    },
  },
  callbacks: {
    logIsOpen: () => {
      const context = getContext();

      console.log(`Is open: ${context.isOpen}`);
    },
  },
});Code language: JavaScript (javascript)
In the render.php file, directives like data-wp-interactive, data-wp-context, and data-wp-on--click are used to define interactive behaviors declaratively. The data-wp-interactive initializes the block’s store, data-wp-context sets the initial state, and data-wp-on--click specifies an action to be triggered on click.
In the view.js file, the store is defined, managing the state (isOpen), actions (toggle), and callbacks (logIsOpen). When the button is clicked, the toggle action changes the isOpen state, and the logIsOpen callback logs the state change. This setup ensures the block’s interactive behavior is maintained seamlessly.
In this example, the wp-context directive defines a local state that is available only to the added HTML node and its children. If you were to create a setup where multiple blocks affect each other, as we will see in a later example, we could use a state that is available to any block using that specific store.
Similarly, here is a list of available directives and their uses. An updated list with examples is available in the Interactivity API docs.
- wp-interactive: Activates interactivity for the element and its children, referencing a specific store.
- wp-context: Provides a local state available to a specific HTML node and its children, defined with a stringified JSON.
- wp-bind: Sets HTML attributes on elements based on a state or context variable.
- wp-class: Adds or removes a class from an element based on a boolean value.
- wp-style: Adds or removes inline styles to an element based on a value.
- wp-text: Sets the inner text of an element based on a state or context variable.
- wp-on: Attaches event listeners to an element for events like clicks or keypresses.
- wp-on-window: Attaches global window event listeners and executes a defined callback when the event occurs.
- wp-on-document: Attaches global document event listeners and executes a defined callback when the event occurs.
- wp-watch: Runs a callback when the state or context changes.
- wp-init: Runs a callback when the element is created.
- wp-run: Executes a callback during the node’s render execution, allowing the use of hooks.
- wp-key: Assigns a unique key to an element, useful for tracking elements in arrays.
- wp-each: Renders a list of elements from a template, iterating over an array stored in the state or context.
- wp-each-child: Ensures hydration works as expected for server-side rendered lists.
Similarly, the store of block (or blocks) can contain:
- State: Defines data accessible to HTML nodes.
- Global State: Defined using the store() function, making data available to all HTML nodes on the page.
- Local State: Defined with the data-wp-context directive, making data available only to the specific HTML node and its children.
- Actions: Triggered by the data-wp-on directive or other actions.
- Callbacks: Automatically respond to state changes; typically triggered by data-wp-callback or data-wp-init directives.
The store() function can be called multiple times, and all the store parts will be merged to create one store. If you want to avoid that, you can also mark your store as private.
Another nice touch added to Interactivity API is to define a store state in your PHP render file like this:
wp_interactivity_state( 'myblock', array(
     post => get_the_ID(),
) );Code language: JavaScript (javascript)
This allows you to define some state dynamically in your store that other parts of your code can use.
With these tools, you can recreate pretty much any experience you have in the block’s backend.
Example #1: Live search block
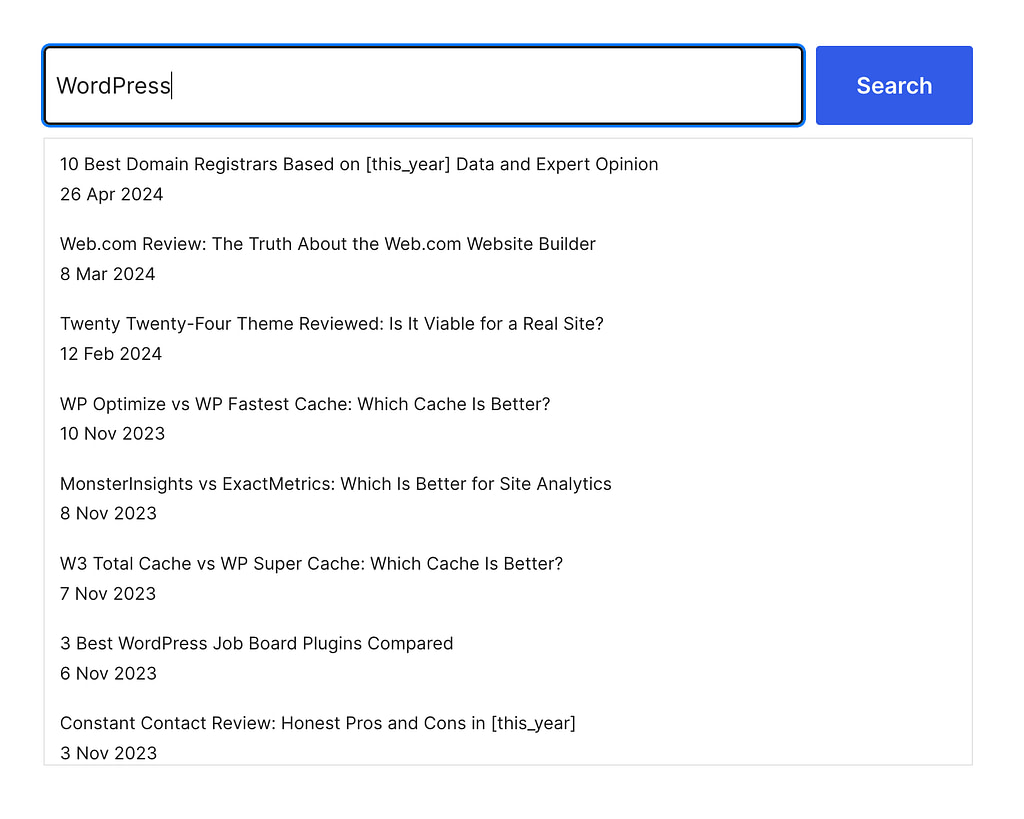
When the Interactivity API first came out, we wanted to see how we could build something we had already built using the Interactivity API to see how it improved our experience. There were many candidates for experimentation, but ultimately, we decided to test it out with the Live Search block.
We already have some experience building a Live Search as it is part of our Otter Pro offering. So why not recreate a simplified version of Live Search with the new API? This also made us see how much simpler and more readable it becomes.
The block was set like a regular block with the create-block scaffolding without the edit.js file containing a plain search bar like this:
import { __ } from '@wordpress/i18n';

import { useBlockProps } from '@wordpress/block-editor';

const Edit = ()  =>{
  const blockProps = useBlockProps();

  return (
    div { ...blockProps }>
      div
        className="wp-block-search__inside-wrapper"
      >
        input
          className="wp-block-search__input"
          type="search"
          name="s"
          autocomplete="off"
        />

        button
          aria-label={ __( 'Search' ) }
          className="wp-block-search__button wp-element-button"
          type="submit"
        >
          { __( 'Search' ) }
        button>
      div>
    div>
  );
};

export default Edit;
Code language: JavaScript (javascript)
You might notice that we are using the same classes as Core’s Search Block, which is done just for styling. In this article, we will not focus too much on CSS styling.
Once we had this in place, we created the render.php file for the front-end part:
/**
 * PHP file to use when rendering the block type on the server to show on the frontend.
 */
?>

div
  php echo get_block_wrapper_attributes(); ?>
  data-wp-interactive="live-search"
   echo wp_interactivity_data_wp_context(
    array(
      'isOpen' => false,
      'results' => array()
    )
  ); ?>
>
  div class="wp-block-search__inside-wrapper">
    input
      class="wp-block-search__input"
      type="search"
      name="s"
      required
      autocomplete="off"
      data-wp-on--keyup="actions.keyup"
      data-wp-on--focus="actions.focus"
      data-wp-on--blur="actions.blur"
    />
  div>

  div
    class="wp-block-search__results-wrapper"
    data-wp-bind--hidden="!state.isOpen"
  >
    template data-wp-each="context.results">
      a data-wp-bind--href="context.item.link">
        div data-wp-text="context.item.title.rendered">div>
        span data-wp-text="state.getDate">span>
      a>
    template>
  div>
div>
Code language: JavaScript (javascript)
This PHP file renders a WordPress block on the server for the frontend. It initializes the block with get_block_wrapper_attributes(), sets up interactivity using data-wp-interactive="create-block" and defines an initial context where isOpen is false. The result is an empty array.
Inside the block, a search input listens for keyup, focus, and blur events to trigger actions. A results wrapper, hidden by default, shows search results when isOpen is true. Each result item is displayed with a title and date.
For looping around, we use the tag that passes the item to the context for its children. By default, the name of the prop that holds the children is an item, but that can be changed by adding a suffix to the wp-each directive, like this:
template data-wp-each--post="context.results">
  a data-wp-bind--href="context.post.link">
    div data-wp-text="context.post.title.rendered">div>
    span data-wp-text="state.getDate">span>
  a>
template>Code language: HTML, XML (xml)
And for the functionality part, we have our view.js file that contains the store:
import { store, getContext } from '@wordpress/interactivity';

const debounce = ( func, timeout = 300 ) => {
  let timer;
  return ( ...args ) => {
    clearTimeout( timer );
    timer = setTimeout( () => { func.apply( this, args ); }, timeout );
  };
};

let lastSearchedValue = '';

const debouncedSearch = debounce( async ( value, context ) => {
  if ( value.length 3 || value === lastSearchedValue ) {
    return;
  }

  lastSearchedValue = value;

  const posts = await wp.apiFetch({ path: `/wp/v2/posts?search=${ value }` });

  if ( posts.length ) {
    context.results = posts;
  } else {
    context.results = [];
  }
}, 1000 );

store( 'live-search', {
  state: {
    get isOpen() {
      const context = getContext();
      return context.isOpen && context.results.length > 0;
    },
    get getDate() {
      const context = getContext();

      return new Date( context.item.date ).toLocaleDateString( 'en-GB', {
        day: 'numeric', month: 'short', year: 'numeric'
      });
    }
  },
  actions: {
    keyup: async( event ) => {
      const context = getContext();

      const value = event.target.value;
      debouncedSearch( value, context );
    },
    focus: () => {
      const context = getContext();
      context.isOpen = true;
    },
    blur: () => {
      const context = getContext();
      context.isOpen = false;
    },
  }
} );Code language: JavaScript (javascript)
The store’s state includes isOpen, which checks if the search results are open and not empty, and getDate, which formats the date for each search result item.
The store’s actions handle keyup, focus, and blur events. The keyup action triggers a debounced search function that fetches posts based on the input value and updates the search results. The focus and blur actions toggle the isOpen state. Then getContext is used to access and manipulate the local context within these actions and state getters. We use the apiFetch that is being enqueued from PHP.
Using the Interactivity API for this search block simplifies the development process compared to vanilla JavaScript. With vanilla JS, you’d need to write extensive code to create and manage elements and mix the view and functionality. The Interactivity API, on the other hand, provides a clean separation between the two, making the code more maintainable and readable. Additionally, the powerful templating engine available through the API allows for creating complex layouts more easily without needing to navigate the web of createElement methods.
Example #2: Communicating between two blocks
The goal of the Interactivity API is to make it easier to create interactive blocks and to allow you to create an interactive website with Block Themes.
Perhaps the most exciting feature of Interactivity API is that you can communicate between multiple blocks by using the store.
Imagine how this could work on eCommerce platforms, where you have an “Add to Cart” button on product pages and a cart summary in the navigation menu. When you click the “Add to Cart” button, the cart summary instantly updates to show the new item count.
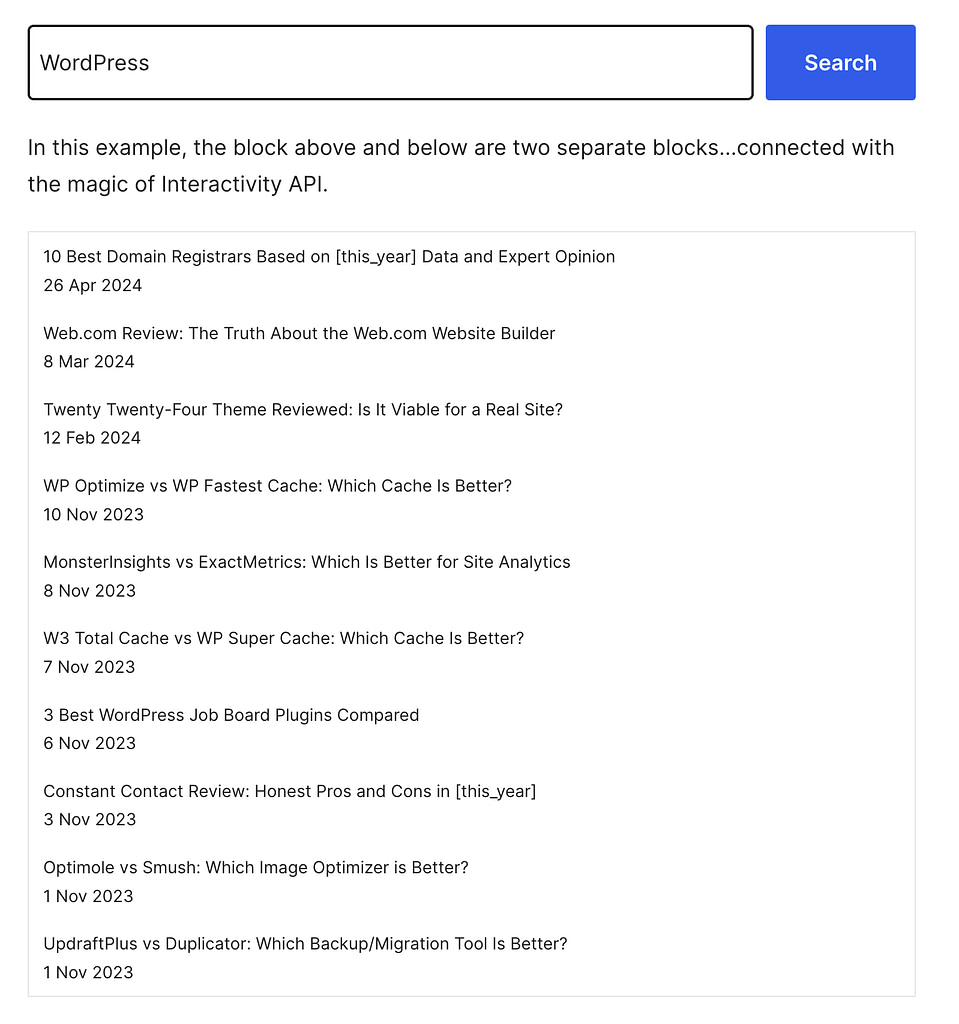
We can turn our Live Search block into two separate blocks to show you how code for a similar experience might look without overcomplicating things.
The first block will be a Search Bar block that allows you to make search queries. The other one will be a Search Results block that shows the results from that query.
Additionally, the Search Results block shows the website’s latest posts when initially loaded. This example is fairly easy and shows how different blocks can communicate together.
For the Search Bar block, things will be mostly similar, with your render.php file looking like this:
/**
 * PHP file to use when rendering the block type on the server to show on the frontend.
 */
?>

div
  php echo get_block_wrapper_attributes(); ?>
  data-wp-interactive="live-search"
>
  div class="wp-block-search__inside-wrapper">
    input
      class="wp-block-search__input"
      type="search"
      name="s"
      required autocomplete="off"
      data-wp-on--keyup="actions.keyup"
    />
  div>
div>Code language: JavaScript (javascript)
And instead of getting more complicated, your view.js file becomes simpler:
import { store, getContext } from '@wordpress/interactivity';

const debounce = ( func, timeout = 300 ) => {
  let timer;
  return ( ...args ) => {
    clearTimeout( timer );
    timer = setTimeout( () => { func.apply( this, args ); }, timeout );
  };
};

let lastSearchedValue = '';

const { state } = store( 'live-search', {
  state: {
    get getDate() {
      const context = getContext();

      return new Date( context.item.date ).toLocaleDateString( 'en-GB', {
        day: 'numeric', month: 'short', year: 'numeric'
      });
    }
  },
  actions: {
    keyup: async( event ) => {
      const value = event.target.value;
      debouncedSearch( value );
    }
  }
} );

const debouncedSearch = debounce( async ( value ) => {
  if ( value.length 3 || value === lastSearchedValue ) {
    return;
  }

  lastSearchedValue = value;

  const posts = await wp.apiFetch({ path: `/wp/v2/posts?search=${ value }` });

  if ( posts.length ) {
    state.results = posts;
  } else {
    state.results = [];
  }
}, 1000 );Code language: JavaScript (javascript)
This time, we omitted the methods needed to make the results visible, as they will be part of a different block and always visible. We also use state instead of context, as we want the data to be communicated between multiple blocks.
And for the Search Results block, we only need the render.php file as the previous block is already managing store:
/**
 * PHP file to use when rendering the block type on the server to show on the frontend.
 */
$latest_posts = get_posts( array(
  'numberposts' => 10
) );

$posts = array();

foreach ( $latest_posts as $post ) {
  $posts[] = array(
    'title' => array(
      'rendered' => $post->post_title,
    ),
    'link'  => get_permalink( $post->ID ),
    'date'  => strtotime( $post->post_date )
  );
}

wp_interactivity_state(
  'live-search',
  array(
    'results' => $posts,
  ),
);
?>

div
  php echo get_block_wrapper_attributes(); ?>
  data-wp-interactive="live-search"
>
  div class="wp-block-search-results-wrapper">
    template data-wp-each="state.results">
      div>
        a data-wp-bind--href="context.item.link">
          div data-wp-text="context.item.title.rendered">div>
          span data-wp-text="state.getDate">span>
        a>
      div>
    template>
  div>
div>Code language: JavaScript (javascript)
Similarly, here, there are only two changes:
- We use state.results instead of context.results to loop over, as we get it from the live-search store defined in the
wp-interactivedirective. - We use the
wp_interactivity_statefunction to define the default state for the results.
Now, imagine doing the same thing over Vanilla JavaScript or your favorite framework. Can it be done? Yes. Would it be just as easy to read, write, and maintain? Perhaps not.
The Interactivity API is bringing a new fundamental change to how we create websites with WordPress. There have always been many concerns about how complex systems that we have always built with Classic Themes will be replicated on Block Themes, which seem much more static. With Interactivity API, all of that will be possible and much easier to maintain with a standard in place.
Not only will all of that be possible, but it will also be much more performative, as different blocks share the same resources instead of each using their own frameworks, and the UI is always server-side and not created on the fly with JavaScript.
Resources
If you want to learn more about Interactivity API, here are some of the resources I recommend:
Have you tried using Interactivity API so far? If so, then let us know in the comments!