Reaching a worldwide audience is one thing, but connecting with them is another. To do that means your content has to be understood in more languages besides English, which is why taking the time to translate your Elementor site with WPML can prove invaluable.
Today, we’ll show you exactly how to do that with clear, step-by-step instructions, explaining everything you need to know to turn your Elementor site into a powerful multilingual platform that helps you connect with potential visitors from around the world.
Why Use WPML to Translate Your Elementor Site
There once was a time that offering your website content in multiple languages meant that unless you were a particularly skilled polyglot, you had to hire professional translators to rewrite that content before serving it up on a different version of your website for each language.
As you can imagine, that was pretty expensive, not to mention a time-consuming hassle when it came to managing the whole thing.
These days, things are much easier.
As any long-time WordPress user will you, there’s a plugin to handle just about every task you can think of, including translating your web pages.
There’s probably as many translation tools out there as there are languages to translate into, and we previously covered some of them in our multilingual WordPress plugins guide. Out of all those, however, WordPress Multilingual –WPML, as it’s better known- is hands down the best option for working with page builders like Elementor.
With over 800,000 active installs, WPML offers both manual and automatic translation options for over 40 languages, along with a helpful feature that allows you to add your language variants such as Canadian French.
Most importantly, the premium WPML CMS version of the plugin comes with built-in support not just for Elementor, but similar tools like WPBakery Page Builder and Divi Builder. This is a feature that even the best alternatives either lack altogether or simply don’t do as well as WPML, making this the best tool for the job.
Let’s prove it by showing you just how easy it is to translate your WordPress website with this powerful yet easy-to-use plugin.
Using WPML – What You’ll Need to Get Started
This guide assumes that you’re already familiar with Elementor and have used it to create the website you want to translate. If that’s not the case, you might find our Elementor review a good place to start.
With your Elementor-created page ready to be translated, you’ll need the following plugins:
WPML Multilingual CMS
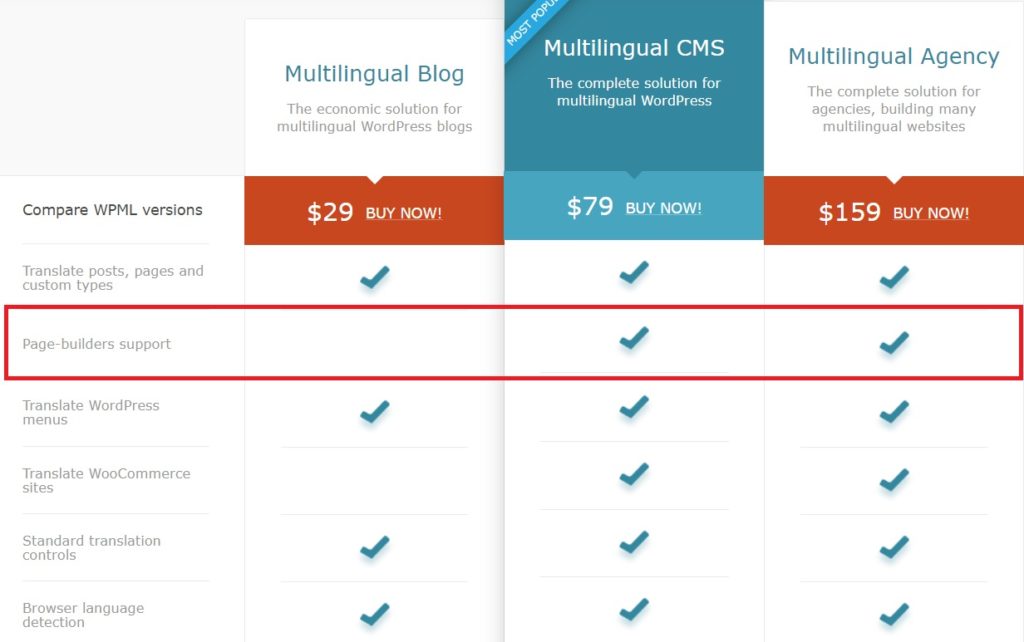
A premium plugin, WPML, comes in three price plans, including $29, $79, and $159 options.
The $79 WPML Multilingual CMS is the one we need today, as this is the one that supports Elementor.
For this to work, you’ll also need two additional plugins:
WPML String Translation
String translation is a tool that enables WPML to translate the parts of your website that aren’t in your posts and pages, such as your site tagline and backend CMS text. It also has the added benefit of significantly reducing the load time of your translated pages.
WPML Translation Management
Another simple add-on that allows you to manage a team of translators as well as providing compatibility with the WordPress Gutenberg editor.
Though you may never use either of these tools directly, they are important for ensuring your mail WPML CMS plugin works correctly, so it’s worth taking the time to download and install them.
1. Installing and Activating Your WPML Plugins
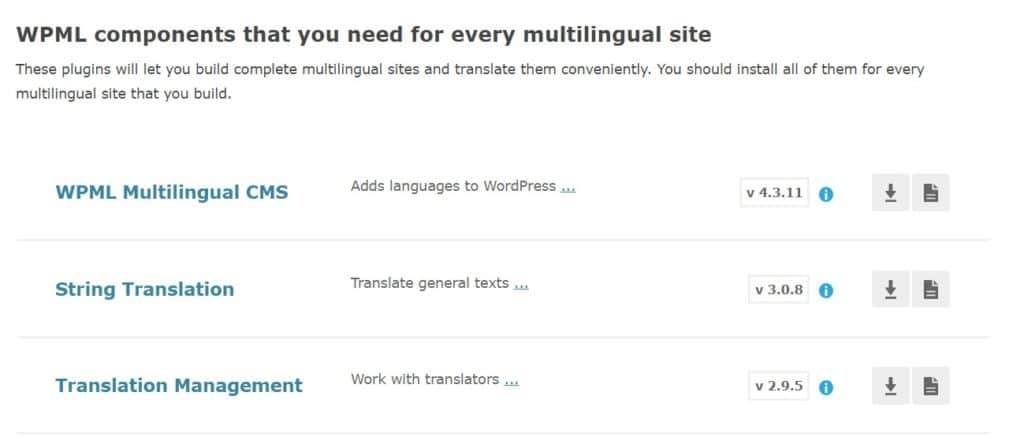
All three plugins can be downloaded from the main WPLM website. After purchasing your plan, you’ll find the available plugins by going to My Account – Downloads.
From there, download all three, then add them to your website by going to Plugins – Add New and uploading them as you would with any other file.

When each plugin is installed, be sure to activate it, then move on to the setup phase.
2. Configuring Your Language Settings and Setting up the Plugin

The activated WPML plugin will bring up a notification on your main WordPress dashboard, which encourages you to configure the settings.
Having clicked that notification, you’ll first be directed to select the language your existing content is written in.
Naturally, English is selected as the default, but there is the option to change it to anyone of 40+ languages from Albanian to Zulu.
Select Translation Languages
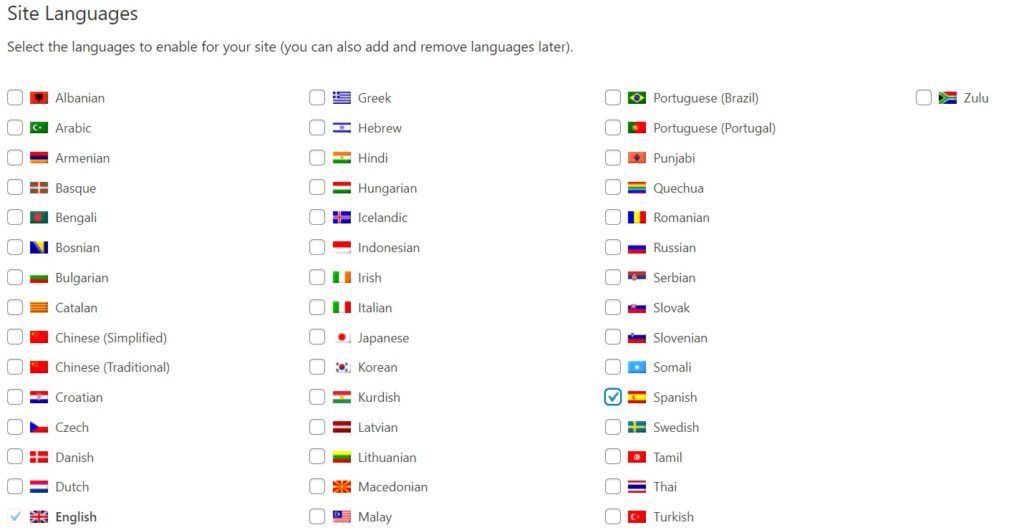
After choosing your default content language, you’ll next be asked to select the languages you want to translate your content into.
For this guide, we’ll be translating our Elementor site into Spanish, but you can choose whichever languages suit you best.
Language Switcher

The Language Switcher is the main user-facing tool that your visitors will use to swap between the multilingual versions of your site.
In this section, you can configure how that will look.
Compatibility and Registration
There are two other configuration options, which, though they may not be as important, can prove helpful in the long-run.
The first allows you to have WPML identify all the plugins currently operating on your site and send that information back to their servers. Then, if there’s a compatibility issue (as there can be between some plugins), WPML will alert you of this so that you can make changes before those issues cause your site to malfunction.
The second simply allows you to link your website to your WPML.org account to receive automatic updates.
With all of that done, be sure to click ‘FINISH’ so that the plugin can finish installing.
In the final part of the configuration process, you’ll be instructed to enable the WPML Translation Editor. This takes no more effort than clicking a single button, and when that’s done, you’re ready to start translating your content.
3. Open Your Elementor Page

To begin, find the Elementor-created page that you want to translate and open it up in the standard WordPress editor. At this stage, you don’t click the ‘Edit With Elementor’ button as you’ll be doing the translation work from the main editor.
For this guide, we’ve chosen to translate our friend’s freelance photography website. The image above shows how it looks in English, so now, let’s create the Spanish version.
4. Create a New Translation
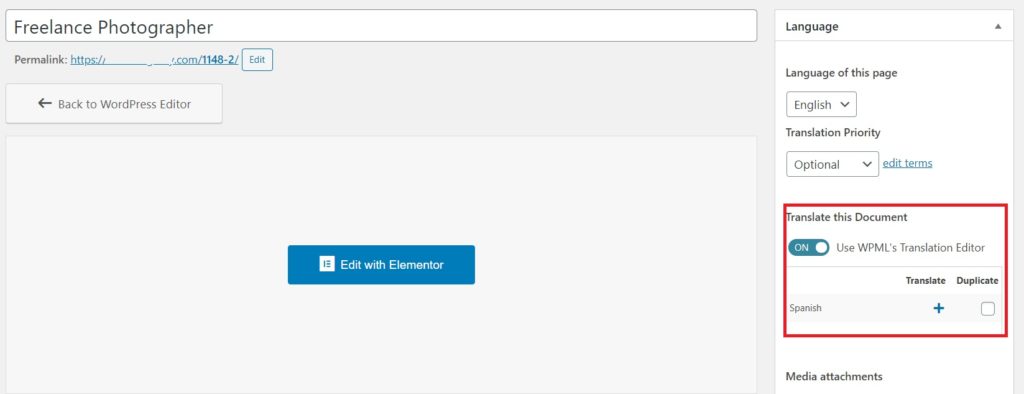
On the left-hand side of your editor where the publishing options usually are, you’ll find a new box labeled ‘Language.’
Half-way down this box is a ‘Translate This Document’ option, which lists all of the languages you chose earlier.
In that box, click the plus (+) icon next to a language. In our example, we’ll click Spanish.
Add Your Translations
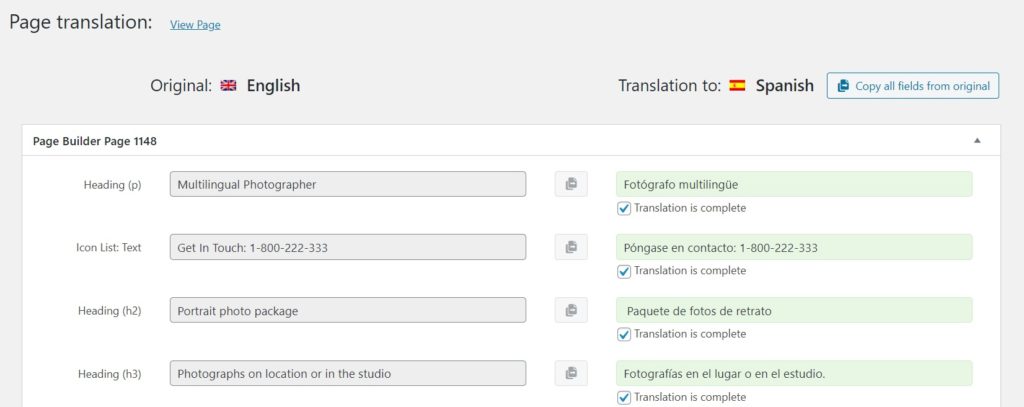
Clicking this icon brings up a new page with an easy-to-follow, side-by-side editing tool.
On the left-hand side, you’ll see each text element, such as H2 headings and buttons. On the right-hand side of the editor, you’ll see that each element has a corresponding box where you can enter your translations.
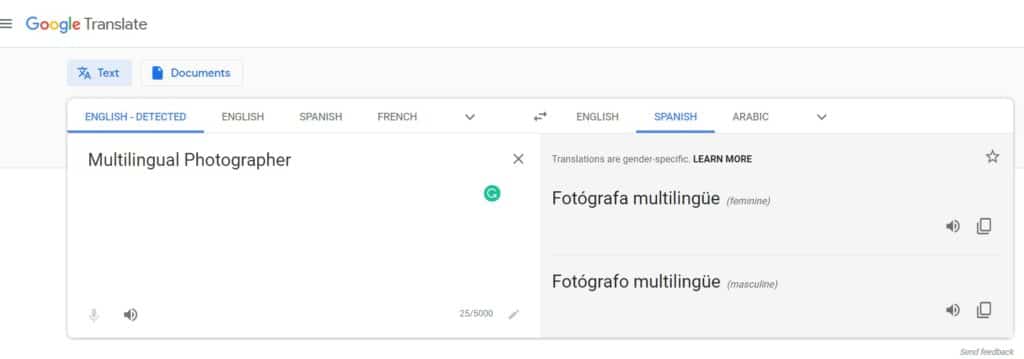
To do this, we just pasted our English text into Google Translate then pasted the resulting Spanish text back into our WPML editor. Still, you could use any good translation tool such as Yandex Translate iTranslate, or Pairaphrase.
Once you’ve translated each element, be sure to check the box underneath it, which is labeled ‘Translation is Complete.’
This serves two functions:
- It helps you keep track of how much progress you’ve made thanks to the handy status bar at the bottom of the screen.
- It tells WPML that your translated content is ready to be displayed, as translations aren’t visible until every element has been marked as complete.
Once you’ve finished going through the translations, all you have to do is save them, and you’re good to go.
Now, whenever you want to edit or add a new translation, all you have to do is select it from the main page editor.
To add translations for other languages, all you have to do is repeat this simple process.
5. Check Out Your Newly Translated Website
Remember the Language Switcher we looked at earlier? When you go to the live version of your page, you’ll spot that switcher and can use it to view the translated version of your content. Our example looks like this:

It is as simple as that. With just a bit of time and a handy plugin, you can turn your existing site into a true multilingual WordPress website that will prove invaluable in helping you connect with audiences no matter what language they speak.
Getting Feedback on Your Translations
So far, so good, but let’s be honest:
Language is a complex thing. There are all kinds of subtleties and nuances which don’t always translate well from one language to the next. So, while that online tool you used to come up with your translations was technically accurate in a literal sense, there may be something not quite right about your multilingual content that only a native speaker would be able to pick up on.
You may have noticed this yourself if you’ve ever read something translated into English from another language. Maybe the words were technically correct but used in the wrong context, or that there was something about the way the content had been translated that didn’t quite set the right tone.
Though it may not be the most important thing in the world, it can be pretty off-putting to a native speaker.
Fortunately, WPML is aware of this and has a useful feature which enables you to solicit visitor feedback on your multilingual content.
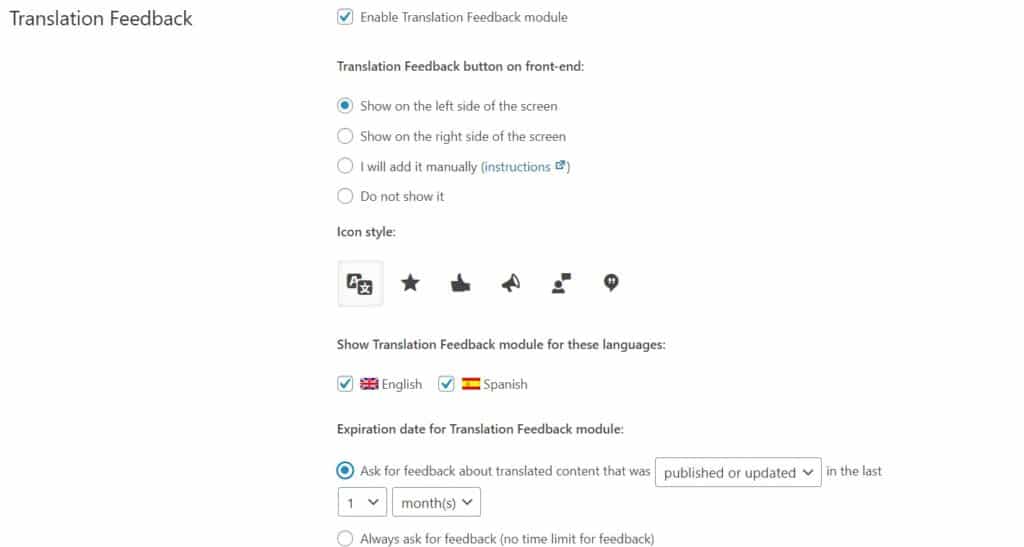
To enable this feature, go back to your WPML settings and scroll down to the box labeled ‘Translation Feedback’ and click in the checkbox to enable the module. You can then configure exactly how you’d like this feature to look on your live site.
With that done, the next time you accidentally use a masculine noun where you should have used a feminine or overlook some other language subtlety, your readers can spare your blushes and let you know.
Final Thought: Taking the Hard Work Out of Translating Your Website
By now, you’ve seen how truly easy it is to translate your Elementor site with WPML. Install the plugin, choose your language, paste your translated content into the relevant boxes, and you’re up and running.
As straightforward as that is, it can still prove to be a chore if you’re translating multiple pages into multiple languages, especially if those pages happen to include blog posts or other long-form content.
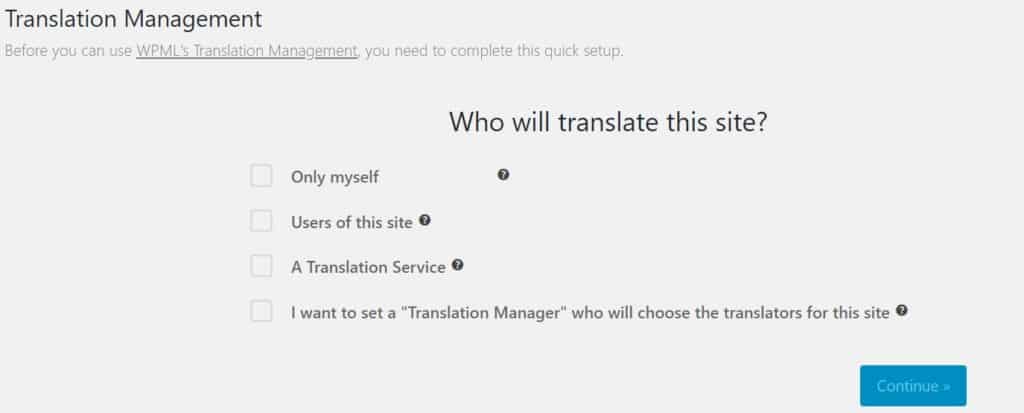
So we’d be doing you a disservice if we ended this WPML guide without paying closer attention to Translation Management. This incredibly useful tool helps you to delegate all that hard work to others.
Selected from the WPML sub-menu of your WordPress dashboard, this gives you three options for getting other people to help you out:
1: Get your website users to translate your content for you
2: Connect with WPML’s network of approved professional translators
3: Designate somebody else to handle the whole process for you.
With the first option, your content writers, editors, and other members of your team can be assigned pages to translate. Alternatively, community-based websites can give translating capabilities to their subscribers, or even create a new user and set them as a translator from within WPML itself.
With the second option, you can avoid those subtle mistakes we mentioned earlier by outsourcing all of the work to a professional translator, or even a whole team of them. By connecting to WPML’s approved network, you’ll be able to browse the profiles of thousands of translators, hire the ones you’re interested in working with, and manage their workload via the Translation Management Plugin.
Finally, if even that sounds too much like hard work, you can simply offload all of the above to another member of your team by making them your officially designated Translation Manager.
That way, you get the quality translations you need with none of the hassles, leaving you free to focus on growing your site and connecting with your audience.


