A surefire way to increase sales on your website is by creating a limited availability offer. This can include one of your services or one of your products available at a special price during a short period of time.
A different approach would be to have a product or a service which are available only during a certain time of year â this is usually related to holiday sales.
This is known as scarcity technique and the reason it works is because we seem to want more of what isn’t so readily available.
In this post, we will focus on Thrive Ultimatum and show you how to use it to create your first scarcity campaign. AKA; the conversion-boosting timed offer.
(Note: We chose this plugin simply because there’s nothing else that combines scarcity & lead generation in the same way. The potential this plugin has is ground breaking and it integrates with Thrive’s other popular email list building plugins; Thrive Leads and Thrive Landing Pages.)
What you will learn in this tutorial
- How use Thrive Ultimatum to create a scarcity campaign
- Ways to refine and enhance your scarcity campaign using the advanced features Thrive Ultimatum has to offer
Tutorial information
Difficulty: Beginner
Time Required:Â 30 minutes
Content Management System:Â WordPress (self-hosted)
Tools Required: Thrive Ultimatum ($)
Alternatives: None
Other Requirements: An offer or limited time deal
Summary of steps:
- Step 1 – Install and activate Thrive Ultimatum
- Step 2 – Create your Thrive Ultimatum campaign
- Step 3 – Run campaign
How to use scarcity marketing with Thrive Ultimatum
Step 1 – Install and activate Thrive Ultimatum
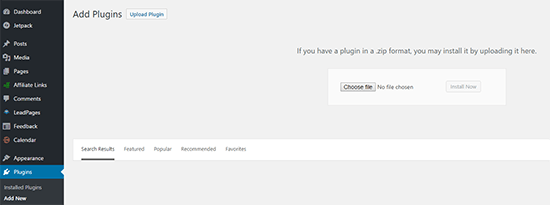
The first thing you need to do is to install and activate Thrive Ultimatum plugin on your WordPress website. You can buy it separately at $127 for a single site, or you can get it by signing up for a membership account which includes all the themes, plugins and tools that Thrive Themes has to offer, from $19/month (paid annually).
Whichever option you choose, you will get a zip file of the plugin which you need to upload in the Plugins section of your WordPress dashboard.
Once the plugin is activated, you will need to activate your license by entering your email and your license key.
If you’re already a Thrive Themes member, you only need to activate the plugin after the installation.
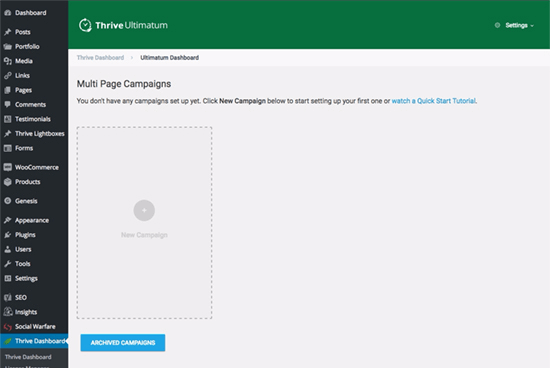
Once you’re done with the setup, you can access the plugin by navigating to the Thrive Dashboard which will appear on your left sidebar.
Step 2 – Create your Thrive Ultimatum campaign
Click the “Ultimatum Dashboard” button to open the plugin’s dashboard. This is where you can create your first Thrive Ultimatum campaign.
Step 2.1 – Select a campaign type
Click the “New Campaign” box. As you can see from the screenshot below, you can choose between 4 different campaign types:
- 7-day offer
- Christmas special
- End of month specials
- Build from scratch
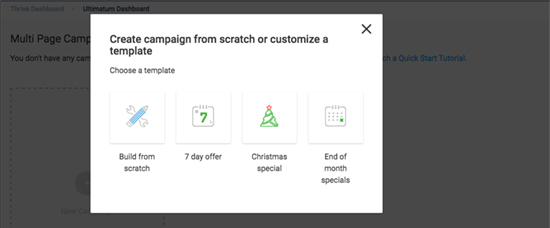
For this tutorial, we’ll build a campaign from scratch so that’s the option we’ll choose. Click on the Continue button and you will have to enter a name for your campaign. The name is not displayed publicly and it’s used for internal purposes only.
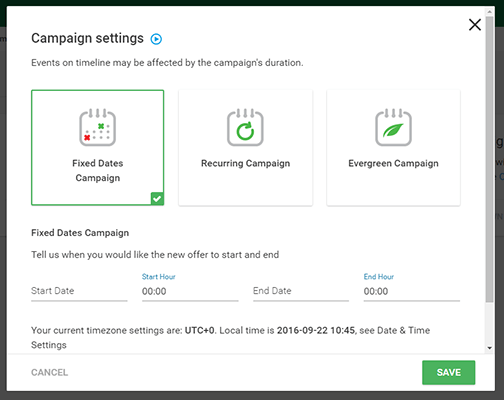
You will now see a new dashboard display for your campaign, with all the options to edit, such as the campaign type, design and display.

Next, you need to set a campaign type. You can either click the black pop-up or the “EDIT” button. In the lightbox that opens, you can choose between an evergreen campaign, a fixed-date campaign or a recurring campaign. You can hover over the options and read additional information on each campaign type.
I’ve chosen a fixed date campaign for the purposes of the tutorial. After you have chosen the campaign type and finished its setup, click Save and the campaign type will be set.
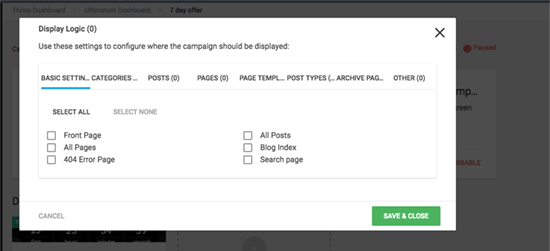
Step 2.2 – Select a display mode
The next step is to select a display mode. You can enable the campaign on all your posts and pages, choose only certain posts/pages/categories and you can also exclude certain posts and pages from showing the campaign.
Step 2.3 – Select a countdown timer design
The last step to create a campaign is to create a countdown timer design. By clicking on New Design, you can see that there are four options to choose from:
- Top ribbon – Shows at the top of the screen
- Bottom ribbon – Shows at the bottom of the screen
- Widget – Display in any widget area on your site
- Shortcode â Display shortcode design in your content
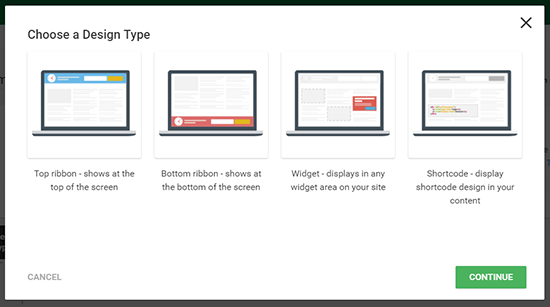
Here, I’ve chosen the top ribbon which will show at the top of the screen. Once you’ve selected the design, click continue and now a bar will appear on your Design box.
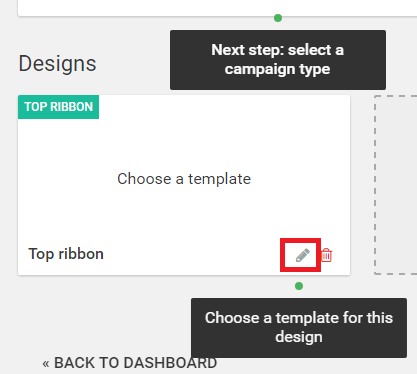
Now you need to choose a template for your design. You can do this by clicking on the pencil icon, which will open up a new tab with a range of countdown templates.
Currently, there are 16 templates to choose from:
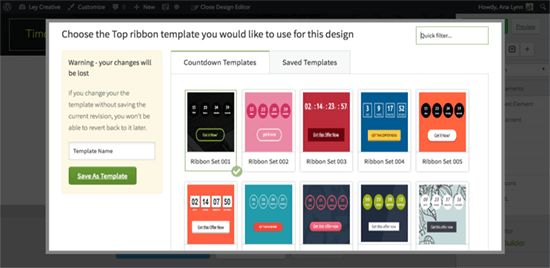
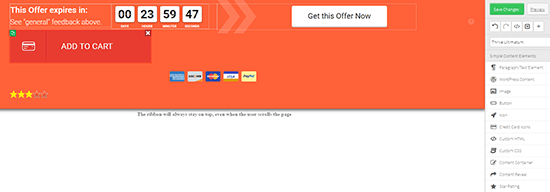
Once you have selected a template it will now appear in Thrive Ultimatum’s visual editor. This is where you can customize your countdown timer, including elements such as text, images and colors.
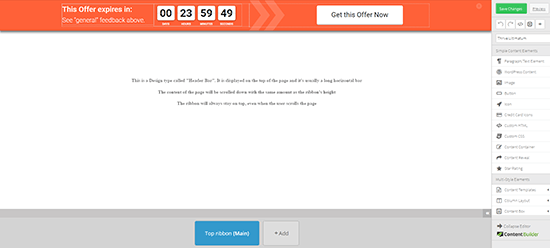
By going through the sidebar to the right, if you click on an element it will add it to your timer design. This means you can add elements such as buttons, credit card icons and star ratings. Hover over the element on the visual editor and you can duplicate it or delete it.
Despite how many elements you can add – keeping things simple is the best way to go.
Don’t forget to save using the green Save Changes button.
Summary of step 2
- Select a campaign type
- Select a display mode
- Select a countdown timer design
Step 3 – Run campaign
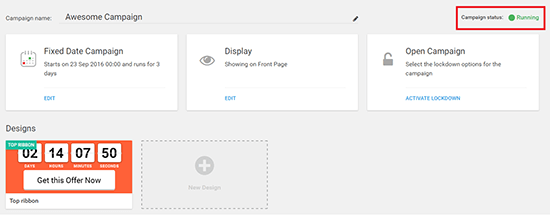
After you have made all the desired modifications, the only thing left to do is to start the campaign. You can do so by scrolling to the top of the campaign dashboard and changing the status of the campaign from Paused to Running.
Advanced features
Thrive Ultimatum offers a few advanced features which you can use to improve and further refine your campaign.
Lockdown
The campaign we created is currently open, however, we can change this by clicking the Activate Lockdown button. This feature enables you to add an extra layer of security to your campaigns.
Another example is to forward visitors that wind up on your campaign page before or after your campaign has started or ended to other pages on your website which have more information on your campaign or other offers.
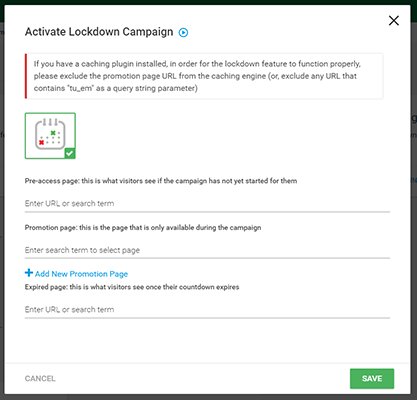
Once you have configured and set the individual pages, click on Save and the lockdown feature will be enabled.
Timeline
In the campaign timeline, you can see what events are set throughout the duration of your campaign and you can add new events by clicking on the + button.
This feature allows you to display different designs or different states based on how much time is left in your campaign.
Your first design will automatically show up in the timeline when you create it and it’s perfectly fine for a simple campaign. However, if you want to refine your campaign, you can for example, set a different message or a different design to show if this is the last day of the campaign.
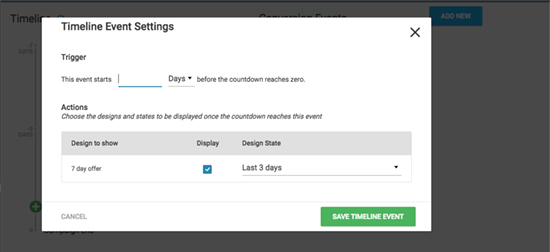
Adding a new event is simple: clicking the + button will open a new window where you can choose when this event should happen and then check the display box and select the state that should be displayed. Clicking Save Timeline Event will add your new event to the timeline.
You can add multiple events to the timeline and display more than one design. In order for this to work, you need to edit the event and add a new design to it by clicking on the Add New State in the design editor window.
Conversion events
Finally, Conversion Events are events that can be triggered when the user performs a desired action on the website. They can be used to stop a campaign or trigger a different one once a visitor has converted. This feature is especially useful to funnel visitors who converted into a different campaign.
You can set up a conversion events by clicking Add New on your Thrive Ultimatum dashboard.

Next step is to select a trigger option and click Continue. If you don’t have Thrive Leads installed, there is only one option available: visit a conversion page.
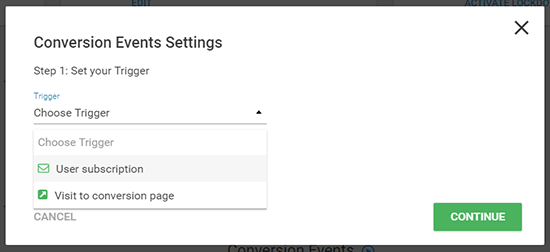
You can choose one of your pages to be your conversion page and in that case, the event will trigger when the user visits the chosen page.
In my case, the conversion event would be when a visitor visits a page with my branding packages page and decides to purchase one of the packages.
Next step is to choose what happens once the conversion event is triggered â you can end the campaign or you can move the visitor to a different campaign.
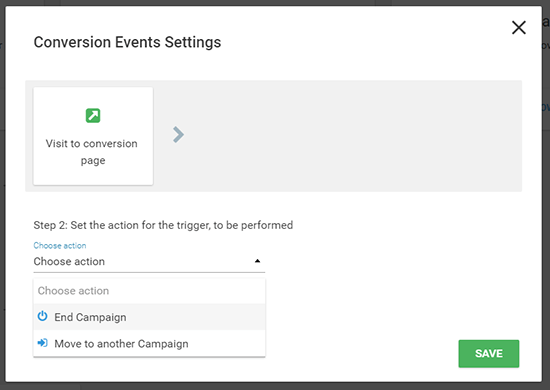
Ending the campaign will stop the campaign for everyone who converted. Moving a visitor to another campaign stops the current campaign and funnels them into a different one if you have it set up.
It’s important to mention that if you chose the second option, you can only select an evergreen campaign which can be setup here if you don’t have any evergreen campaigns.
If you’re using other plugins made by Thrive Themes such as Thrive Leads, you will have the option to trigger an event by choosing User Subscription. This option will trigger the conversion event when the user opts into the Thrive Leads form of your choice.
Just as we did for the conversion page earlier, the next step is to either end the campaign or move the visitor to another campaign.
After you complete the choices, click Save and your conversion event is ready. Bear in mind that you can add more than one conversion event to the same campaign.
Here is my example of the finished campaign:

Final thoughts
Scarcity marketing is a powerful way to increase sales but there is one thing to keep in mind: it’s not a technique to be used lightly and to take advantage of.
Over the years, many marketers tried to take advantage of the scarcity marketing by creating false ‘limited timeâ offers (which you can still find on the Internet!) which in turn led people to be wary of them and created an opinion that all limited time offers are just a ploy to get you to make the purchase.
We wholeheartedly recommend using Thrive Ultimatum for truthful scarcity, ie. if you really do have a limited time offer such as a type of service you provide only once or twice a year, or if you have a type of product that’s available only during certain times of the year.