
The new WordPress block editor in WordPress 5.0 – named Gutenberg while under development – brings with it a ton of new blocks (hence the name!).
Beyond the 34+ default blocks, third-party plugins can also add their own blocks for you to use in your designs.
All that means that you might be looking at potentially hundreds of blocks when you go to create content with the new Gutenberg block editor. Talk about clutter!
To help you get a better handle on those blocks, I’m going to show you how to disable Gutenberg blocks in the new editor. You can either disable blocks for all users. Or, you can disable Gutenberg blocks for specific user roles, user accounts, on certain post types, etc..
Some potential use cases for the strategies in this post are:
- Streamlining the block editor interface by removing blocks that you’ll never use. Essentially – less clutter.
- Restricting what types of content that other users can create. For example, if you have third-party authors at your site, you might not want them to be able to include a payment block or something. Or, if you’re building client sites, you might not want to let them use all the blocks.
- Limiting what type of content can be included in a specific post type. For example, you might only need a certain set of basic blocks for a certain post type.
Ready to dive in? Here’s how to disable Gutenberg blocks or restrict access to blocks based on user roles or user accounts. I’ll start with two simple plugins that let you do it. Then, I’ll dig into how to do it with your own code.
Note – if you want to completely disable the new editor and keep using the older TinyMCE editor, check out our full post on how to disable the new WordPress Gutenberg block editor.
How To Disable WordPress Gutenberg Block Editor Blocks With A Plugin
There are a few different plugins that purport to help you disable Gutenberg blocks, but I like the free Advanced Gutenberg plugin from JoomUnited, which I reviewed here a few months ago, and the Disable Gutenberg Blocks plugin, which is a more lightweight option. I’ll show you how to use both.
Advanced Gutenberg Plugin Guide
Advanced Gutenberg lets you create different profiles that define which blocks are available. To globally disable blocks, you can assign the profile to all users. Or, you can also create separate profiles for individual users or user roles to change which blocks are available depending on who’s using the editor.
Advanced Gutenberg also adds its own set of blocks, but you can disable those if desired.
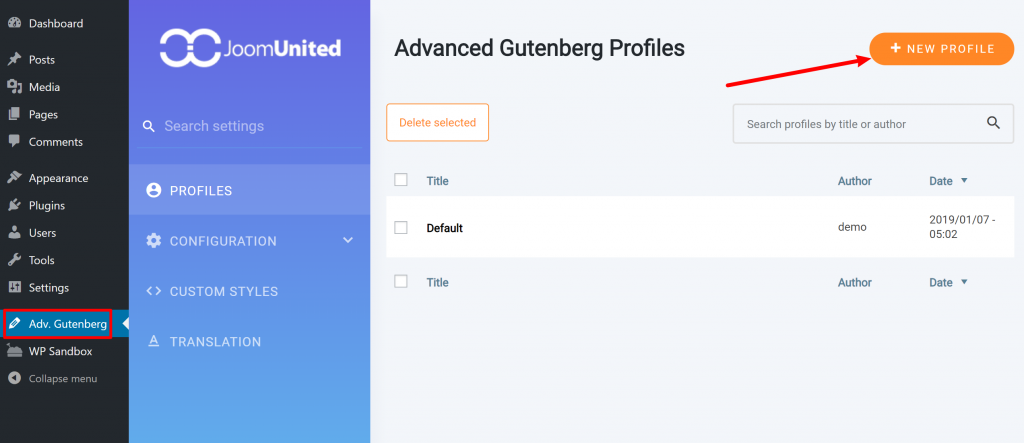
Step 1: Create A New Profile
Once you’ve installed and activated the plugin from WordPress.org, go to the new Adv. Gutenberg tab in your WordPress dashboard and click New Profile:

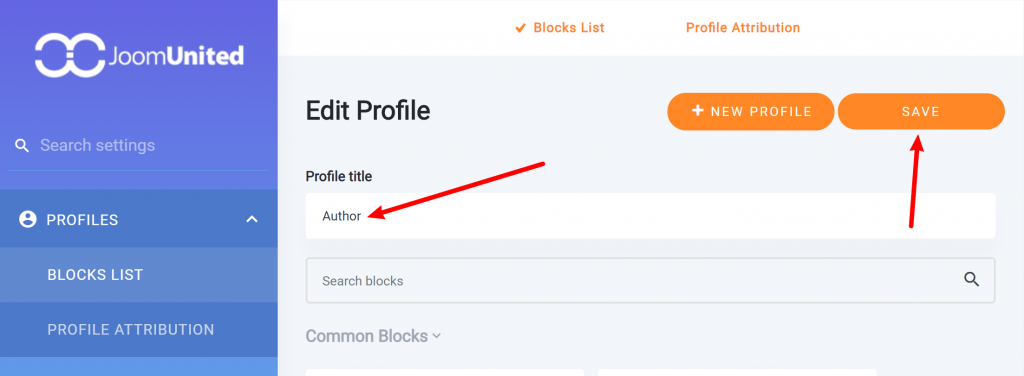
Then, give your profile a name and click save:
Step 2: Choose Which User(s) Profile Applies To
Next, go to the Profile Attribution area. This area will let you choose which users will use this profile.
You can either choose specific:
Or, you can do both:
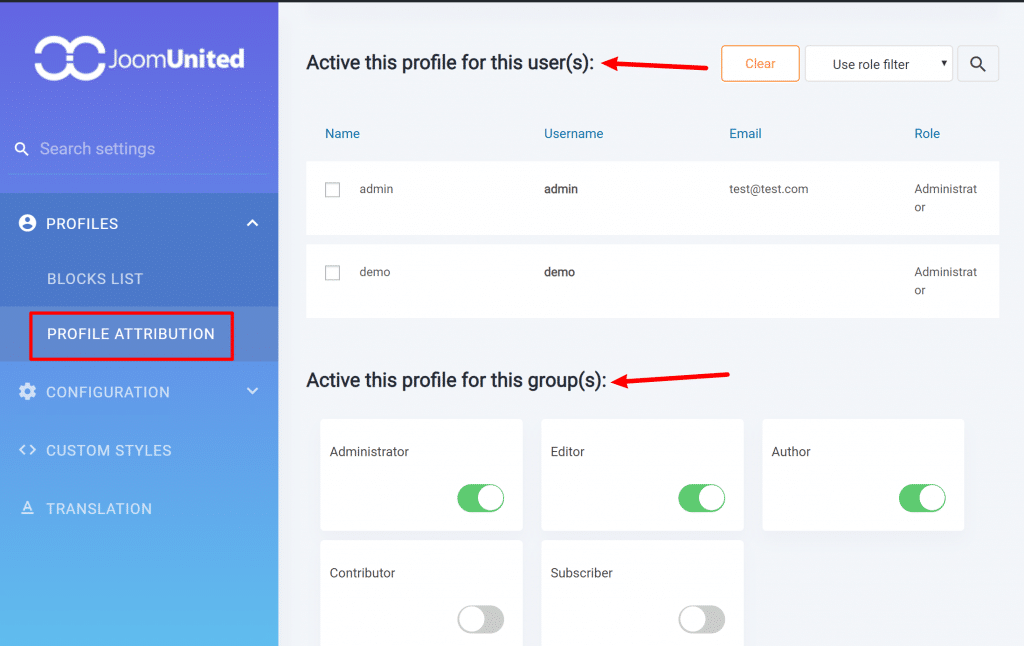
If you want to disable Gutenberg blocks for every single user at your site, you can just select all of the user roles to apply this profile globally.
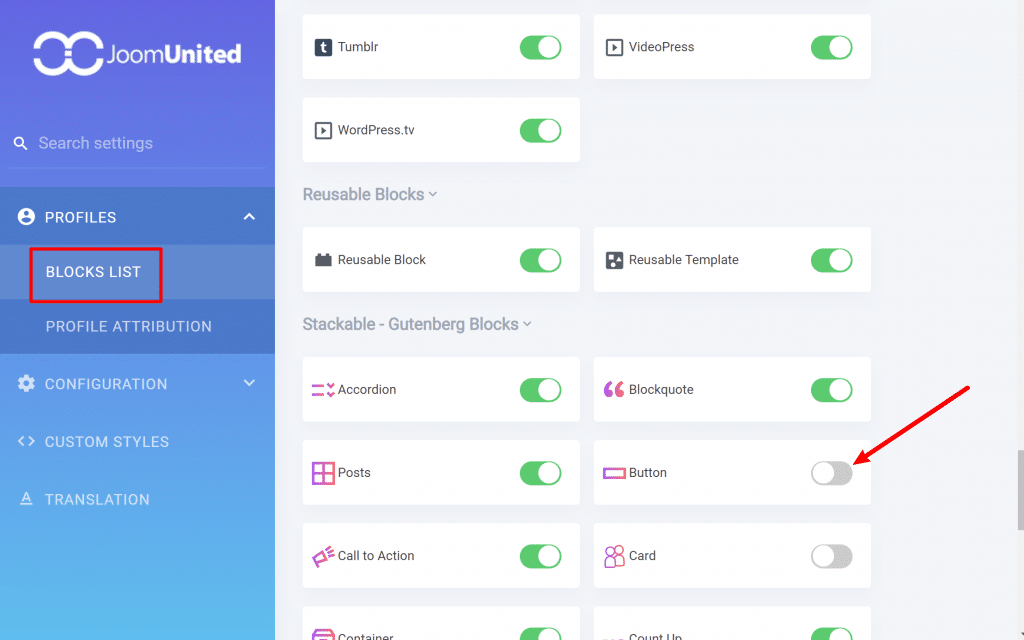
Step 3: Choose Which Blocks To Disable
To choose which blocks are available to users with this profile, go to the Blocks List. By default, all of the blocks are enabled. However, by using the simple toggle buttons, you can disable as many blocks as desired.
Beyond picking up the default blocks and its own blocks, Advanced Gutenberg will also show blocks from other third-party plugins. All of the blocks are divided into the same sections that you see in the Block Inserter while using the editor.
For example, here’s what it looks like to disable some blocks from the third-party Stackable plugin:
And that’s it! Once you’ve saved your changes, users to which the profile applies will only see the blocks that are still activated.
Disable Gutenberg Blocks Plugin Guide
Disable Gutenberg Blocks is another plugin that helps you disable blocks from Gutenberg. Unlike Advanced Gutenberg, it’s only focused on disabling blocks, though, which makes it a little bit more lightweight if that’s all you want.
However, you can only disable blocks globally. That is, there’s no way to target specific users or user roles like you can with Advanced Gutenberg.
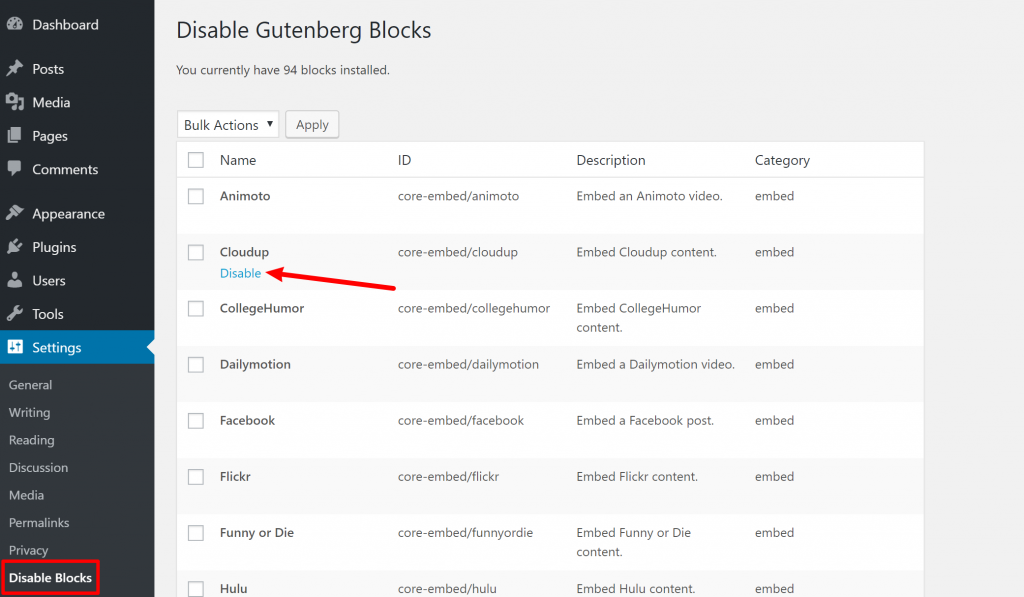
Once you’ve installed and activated the plugin from WordPress.org, go to Settings → Disable Blocks to start using it.
To disable a block, just hover over it and click Disable:
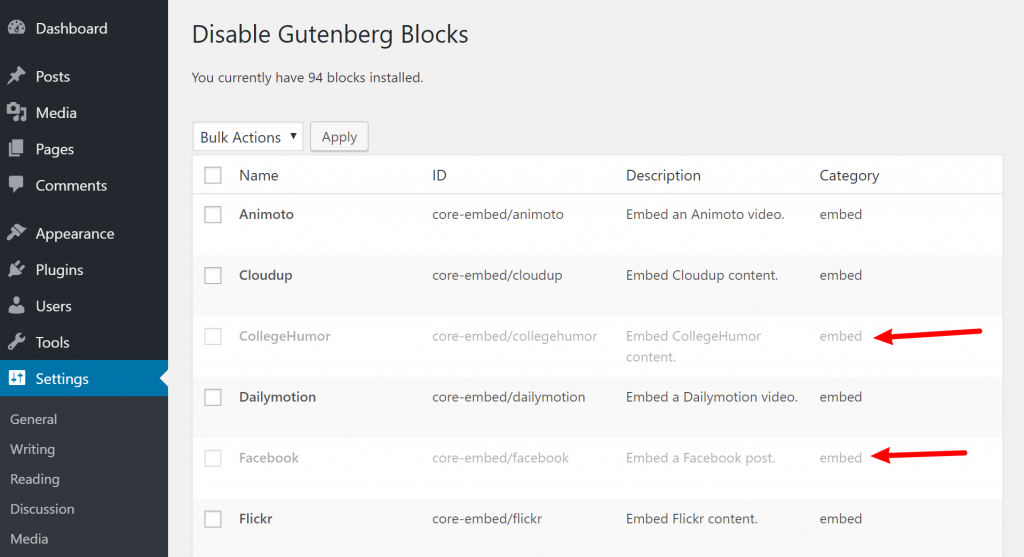
You can also use the bulk drop-down to bulk disable multiple blocks using the checkboxes.
Once you disable some blocks, they’ll be greyed out to help you recognize them:
And that’s all there is to it!
How To Disable WordPress Gutenberg Block Editor Blocks With Your Own Code
If you don’t want to use a plugin to disable Gutenberg editor blocks, you can also do things manually with your own code using the allowed_block_types filter.
For this method, you can add the code to your child theme’s functions.php or you can use a plugin like Code Snippets to manage the code. Or, you can even create your own custom plugin if that’s more your style!
With this method, you’re choosing which blocks you want to be enabled. So rather than listing out the blocks that you want to disable, you just only include the blocks that you do want to enable, and all the other blocks will be disabled.
Here’s the base code snippet that you’ll use:
function my_allowed_block_types( $allowed_block_types, $post ) {
return array(
'core/paragraph'
);
}
add_filter( 'allowed_block_types', 'my_allowed_block_types');
With this example, you’d only be able to use the paragraph block – all others would be disabled.
To enable more blocks, you just add the block slugs to the array like so:
function my_allowed_block_types( $allowed_block_types, $post ) {
return array(
'core/paragraph',
'core/image',
'core/heading',
'ugb/button'
);
}
add_filter( 'allowed_block_types', 'my_allowed_block_types');
To find the block slugs that you need to include in the array, you can use the Gutenberg code editor. For example, the block slug for Stackable’s Button block is ugb/button:

If you want, you can also further modify this base code snippet to target specific post types using if rules.
Final Thoughts On Disabling Gutenberg Blocks
If you don’t like sorting through all the many available Gutenberg blocks, or if you just want to restrict which blocks certain users have access to, any of these methods should work.
Advanced Gutenberg is the easiest to use if you want to restrict access to Gutenberg blocks based on user roles or user accounts.
But if you just want to globally disable certain blocks, all three solutions make that pretty simple, with Disable Gutenberg Blocks or your own custom code offering the most lightweight solutions.
Have any other questions about how to disable Gutenberg blocks in the new WordPress block editor? Let us know in the comments and we’ll try to help out!


