
Wondering how you can start a marketplace WordPress website from scratch? With the help of different plugins, you can create a marketplace easily and invite vendors. Managing your marketplace also becomes easier.

Starting an online marketplace website can be an excellent opportunity for you to take your brand to the next level. Platforms like Amazon, eBay, Aliexpress, and Etsy have shown us the potential that is tapped in online eCommerce businesses.
In this article, we are going to take you through various steps that you need to follow to set up an online marketplace website. We will also show you various marketplace plugins that can be used to ease up the process.
What Is A Marketplace?
A marketplace is an eCommerce platform that allows third-party vendors to come together and publish products they are planning to sell. Setting up a marketplace lets you earn a commission from vendors that are using your eCommerce platform.
To set up a marketplace, you need to follow specific steps. Here’s a quick overview of the steps:
While WordPress powers your site, WooCommerce transforms it into an online eCommerce platform. Not to mention, Dokan aids you in turning your website into a multi-vendor marketplace.
Make a Marketplace – Step 1: Register A Domain Name
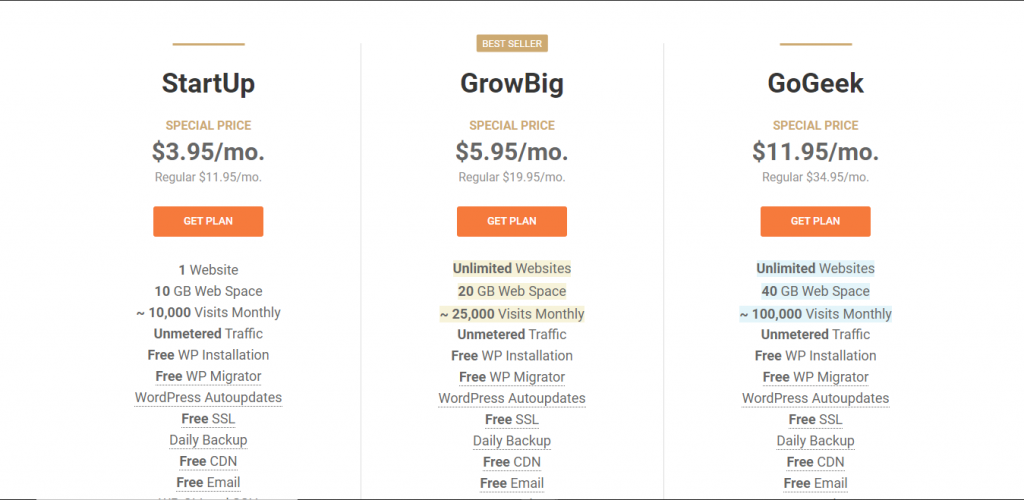
Firstly, you need to register a domain name that will be used to identify your marketplace WordPress website. One of the best options to consider is SiteGround. Go to their site and choose the most suitable hosting package. If you are planning on accommodating a lot of vendors on your marketplace, opt for the Go Geek plan.
Key in your domain name. Proceed to the next page then, add your account, payment, and purchase information.
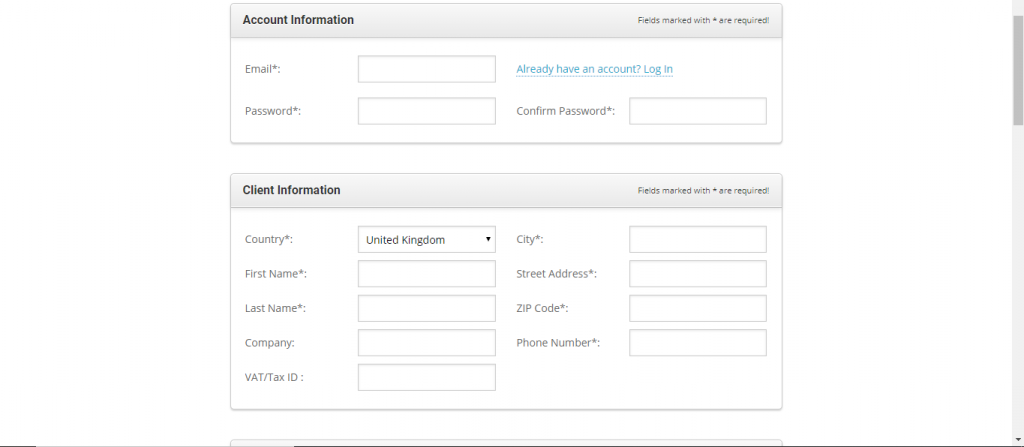
After that, you’ll be directed to the customer area where you can either choose between starting a new site or migrating an old website to your new domain.
Make a Marketplace – Step 2: Install WordPress
Due to its user-friendliness, rich plugins, and flexibility, WordPress is one of the most popular content management systems. Entrepreneurs praise it for its efficacy in managing different sites. Install WordPress from SiteGround’s customer area, then key in your log in details.
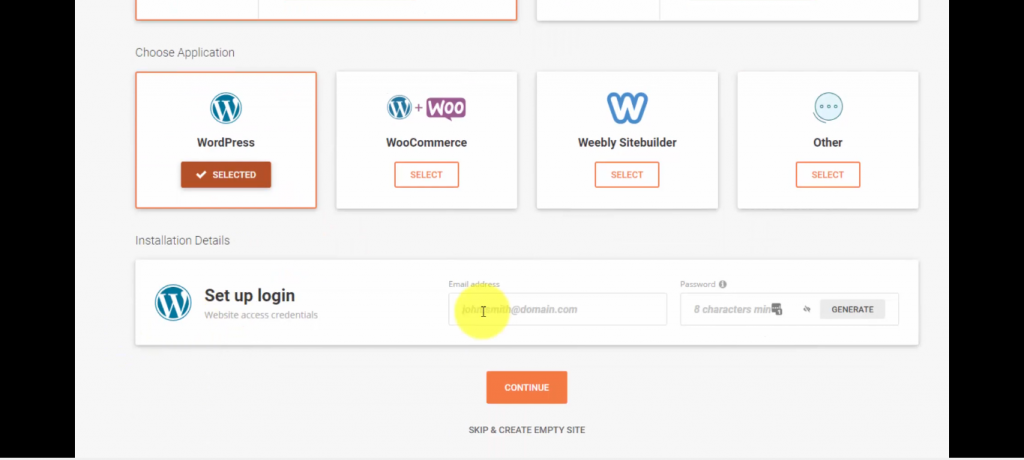
Your WordPress website will be created in two minutes, and you’ll receive a verification email. Make sure you verify your domain; Siteground has a new policy that allows them to suspend an unverified domain after a month.
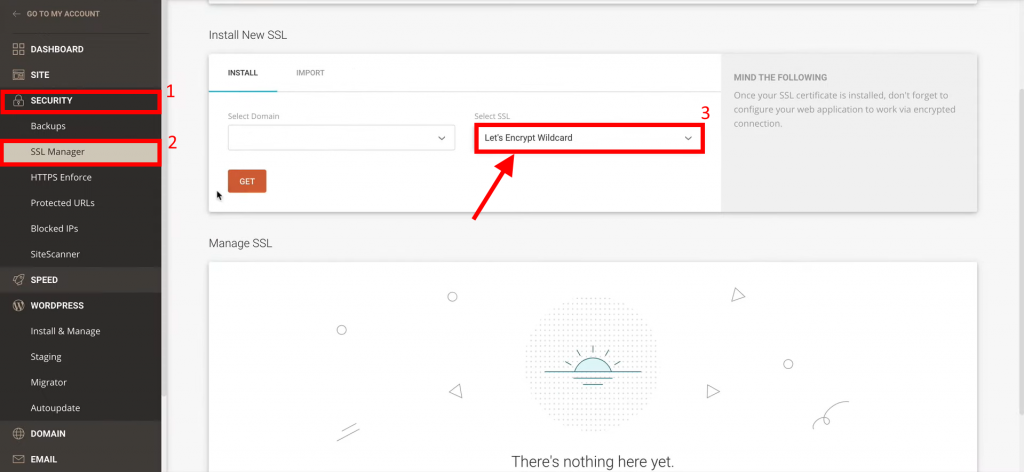
Make a Marketplace – Step 3: Install An SSL
Since you’ll be handling online payments in your marketplace WordPress website, you have to take the necessary precautions to maximize your site’s security. Head to your SiteGround dashboard, and click the Security button. Under the SSL Manager, choose the Let’s Encrypt Wildcard option, and an SSL certificate will be installed on your WordPress website.
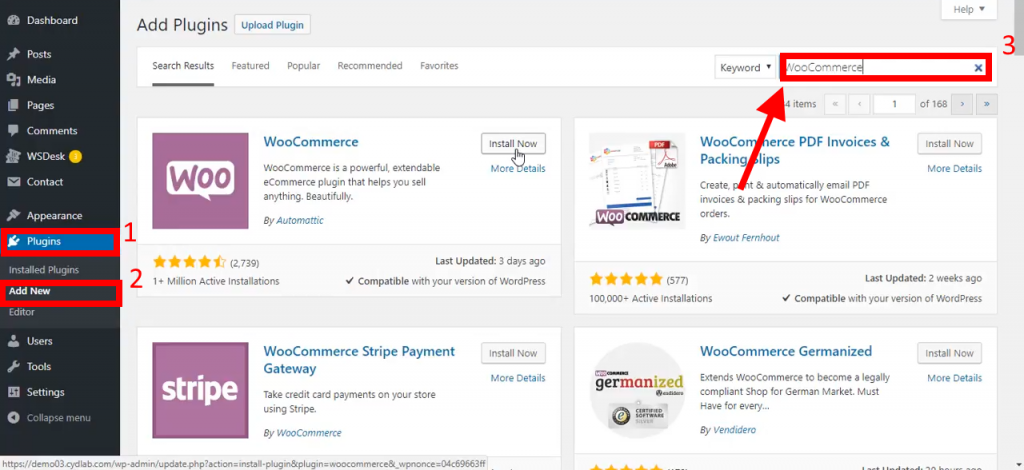
Create a Marketplace – Step 4: Install The WooCommerce Plugin
WooCommerce lets you add eCommerce functionalities to your WordPress website. To install this plugin on your WordPress website, navigate through your admin menu, and click the plugins button. Select the add new option, then search for WooCommerce.
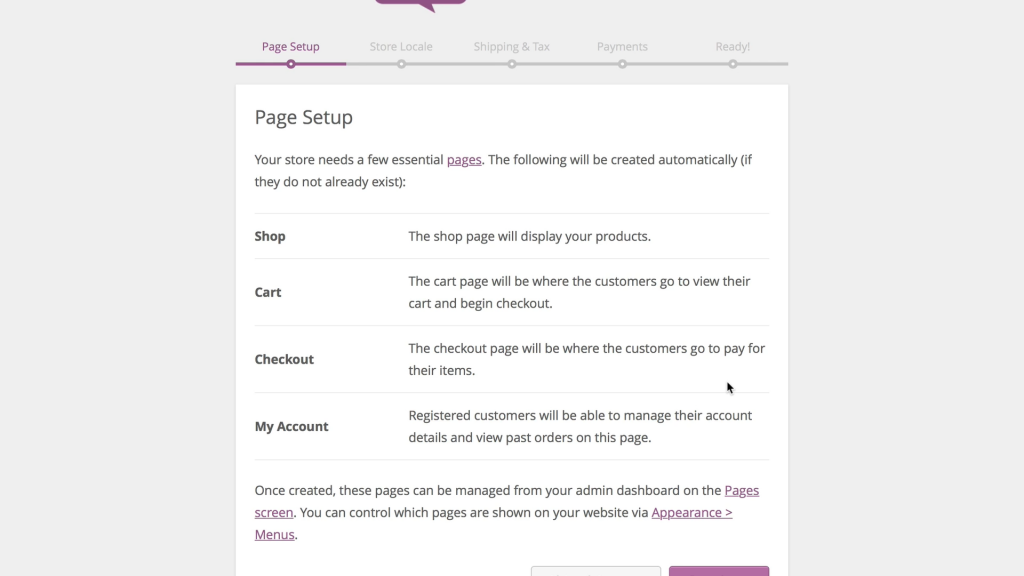
After installing it completely, a setup wizard will be activated to help you configure your online store. It will start by creating the necessary pages—shop, checkout, cart, and my account—required for your eCommerce website.
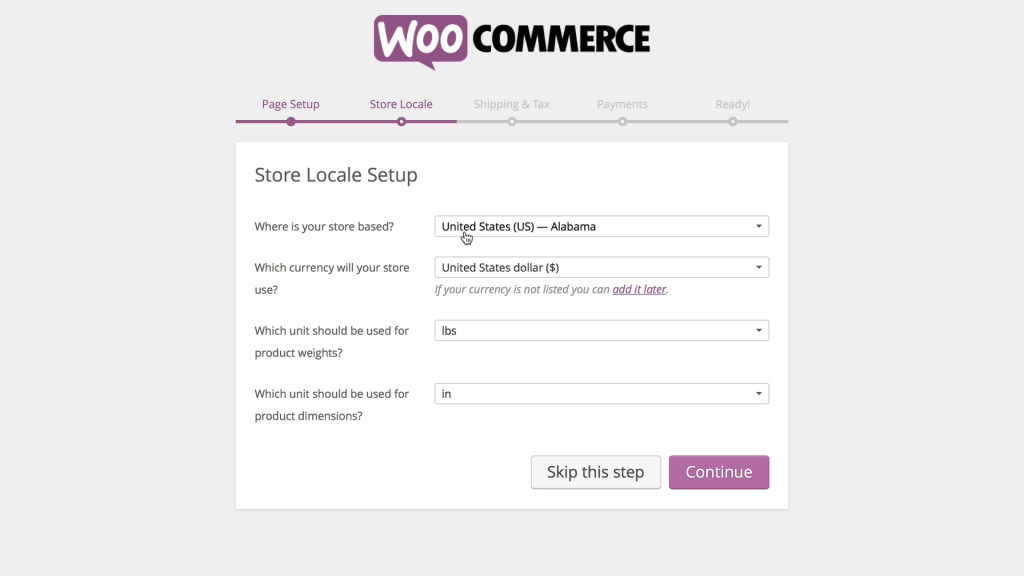
In the store locale setup screen, select the geographical location where your store will be established. This will help you set the tax and shipping information. Choose the default currency that you will be using in your store. Next, determine how you want to measure the weight and dimension of products in the last two options.
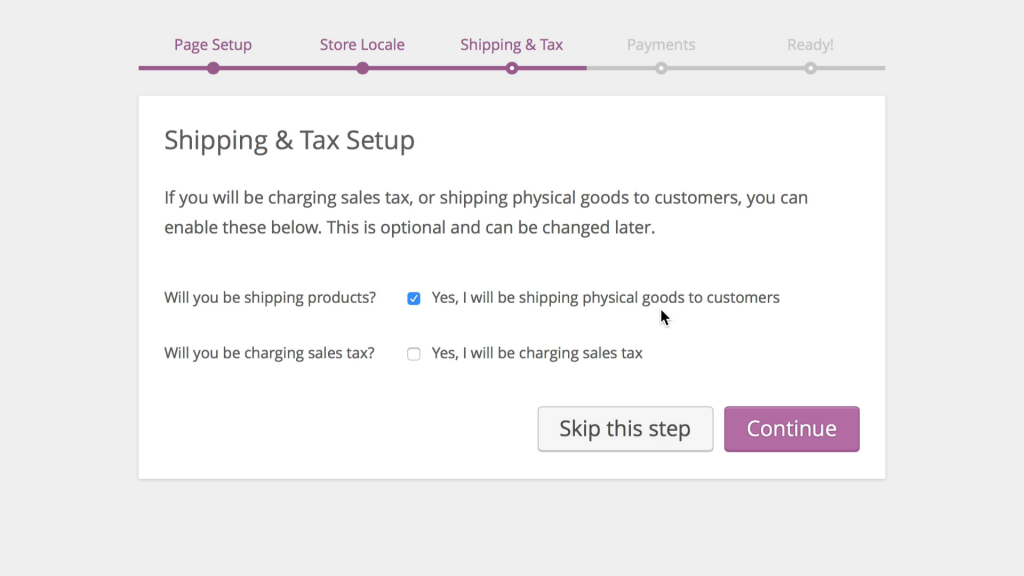
Afterward, you’ll be redirected to a shipping and tax setup screen. Choose whether you’ll be shipping products to your customers or not. If you are planning on charging sales taxes, check the box that allows you to do so. WooCommerce will automatically add tax rates based on your location.
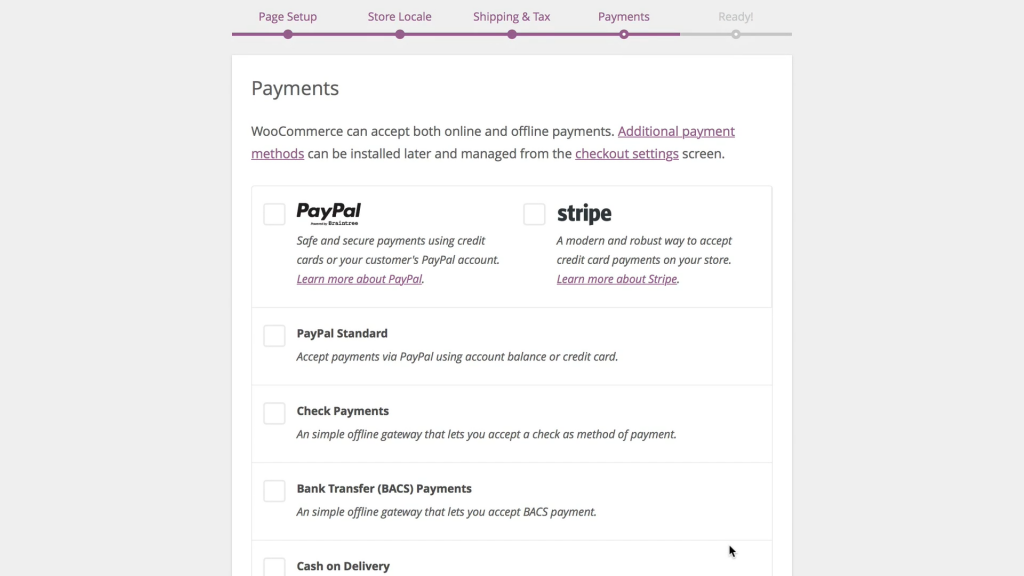
Enable different payment gateways for online and offline transactions on the payments screen.
Create a Marketplace – Step 5: Find A Suitable WordPress Theme
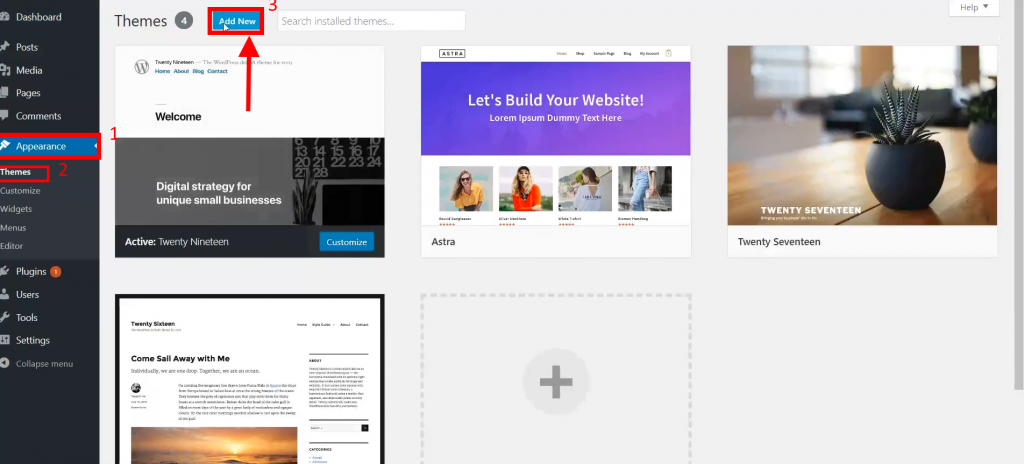
The next thing you need to do is to customize the appearance of your website. One of the most popular WordPress themes suited for that is Astra. Click the appearance button located on your WordPress admin menu, then select the themes option. Click the add new button. Key in Astra in the search box and install it.
Alternatively, you can find some really nice marketplace themes here.
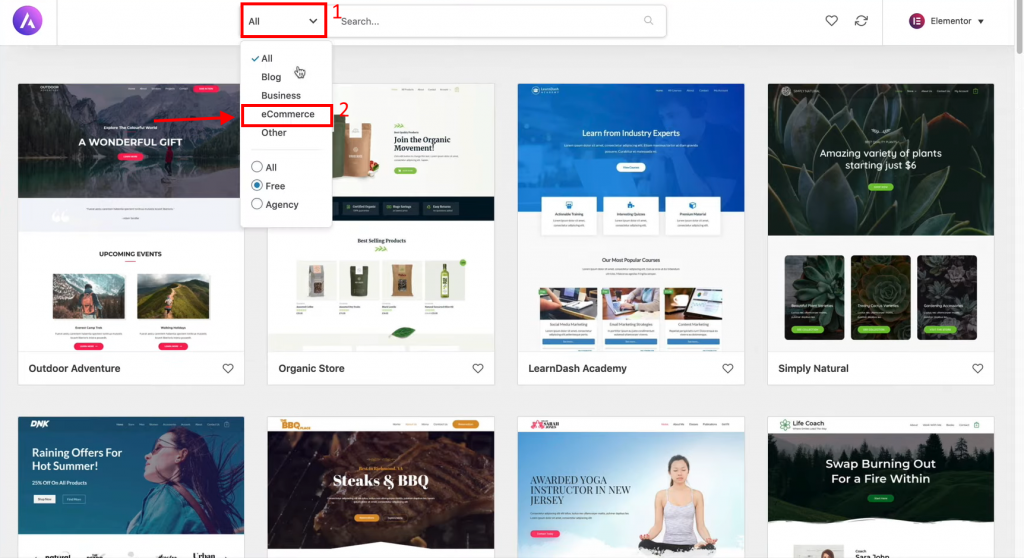
Once it is activated, select the page builder that you’ll be using to design your website. Proceed to the templates section, then click the drop-down menu located on the top part of the page. Select the eCommerce category to view different templates designed for that purpose. Choose the template that suits your style and import the website.
Make a Marketplace – Step 6: Convert Your Site Into A Marketplace Using Dokan
Now that you’ve gotten some insight on the basic steps that should be followed when setting up an e-commerce website let’s take a look at the multi-vendor marketplace plugin that lets you convert your website into a marketplace.
Dokan allows multiple vendors to register to your website, and sell different products from there. Not to mention, it helps you achieve high-security levels in your marketplace. Vendors are given an individual URL page, which lets them manage their products.
Installing Dokan
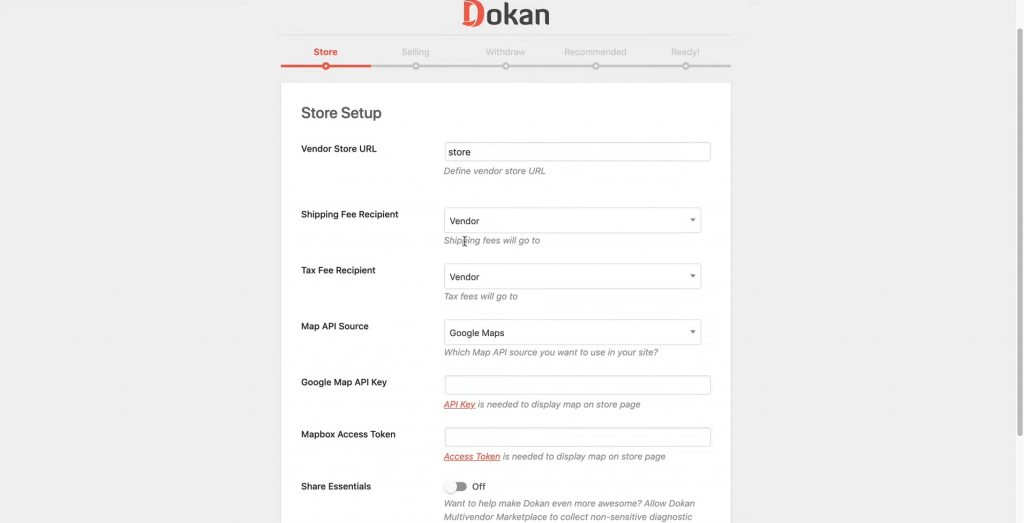
From your admin dashboard, go to the plugins section and select the add new option. Search for the Dokan plugin, then click the install button. Once you installed it, activate it to start the setup wizard. It might be worthwhile to note that; Dokan’s setup wizard is almost similar to the WooCommerce setup wizard.
Under the store setup section, determine who will be paying for the tax and shipping fees (admin or vendor).
Click the continue button to proceed to the selling setup screen. If you want vendors to sell their products immediately after registering to your website, activate the newly vendor enable selling option. You can also choose to verify vendors after registration. Set the commission of every sale on the selling setup screen. There are two options available here: a flat fee or a percentage.
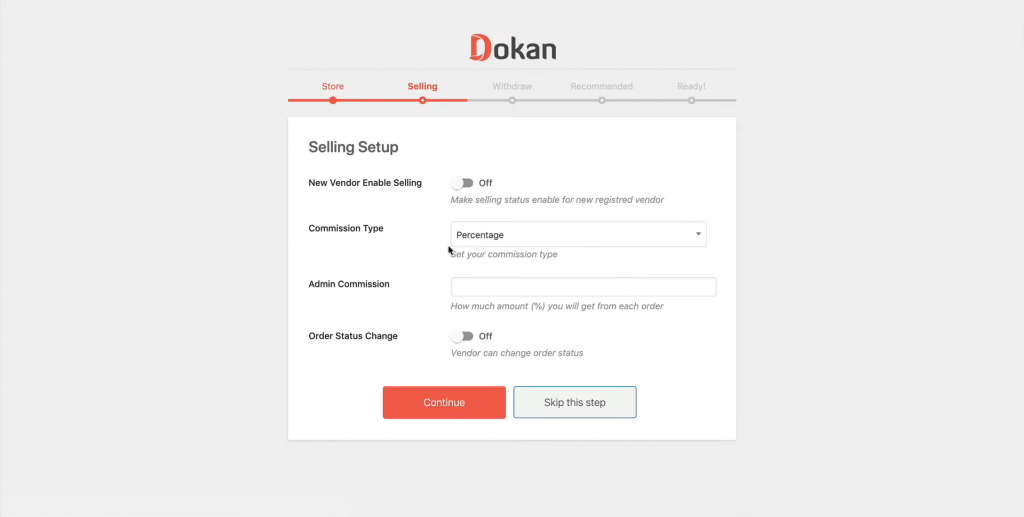
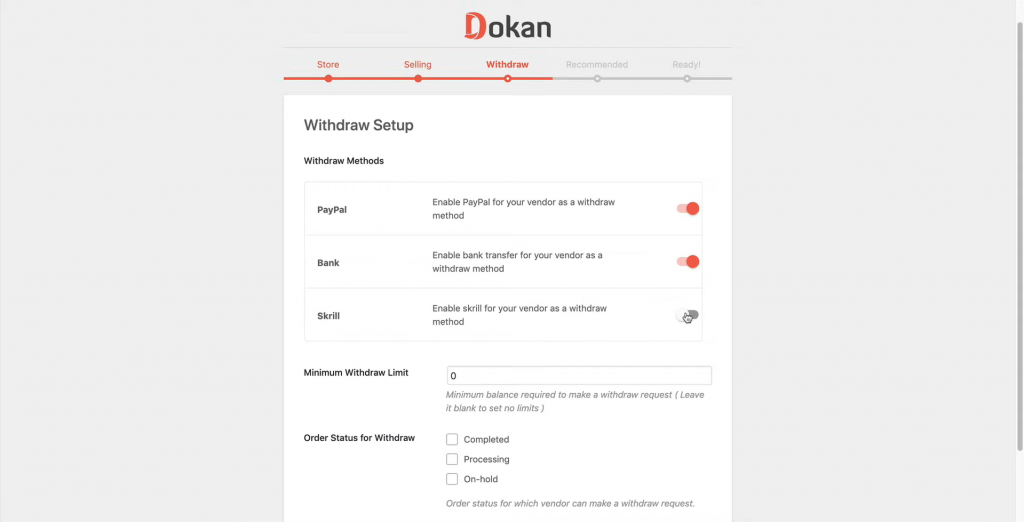
After that, decide the payment methods that will be used by vendors to withdraw their earnings, then set the withdrawal limit.
You will be redirected to Dokan’s dashboard after keying in the necessary information. From there, you can get an overview of what’s happening in your marketplace WordPress website. The dashboard displays the number of vendors, pending withdrawals, and the number of published products.
Step 7: Add Products To Your Marketplace
With Dokan, you can sell various products in your marketplace. There are two different ways to achieve this:
- Register as a vendor in your marketplace.
- Add products as an admin.
Registering As A Vendor In your Marketplace
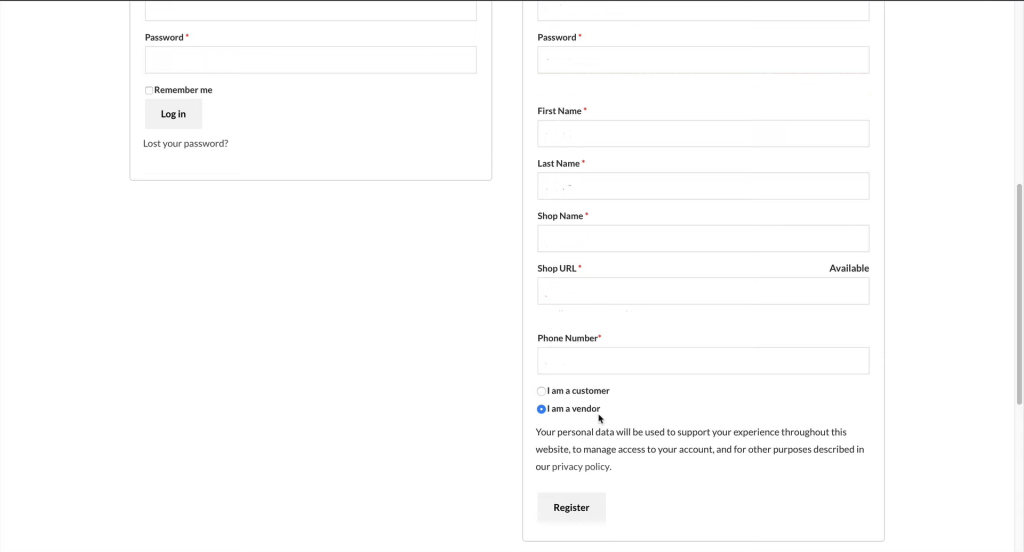
Visit your site’s front-end and select the register option. Key in your personal information—email address, store name, phone number, and password. After clicking the register button, you will be directed to a setup wizard.
If you don’t want to display the setup wizard in the vendor account registration process, disable it from Dokan’s general settings.
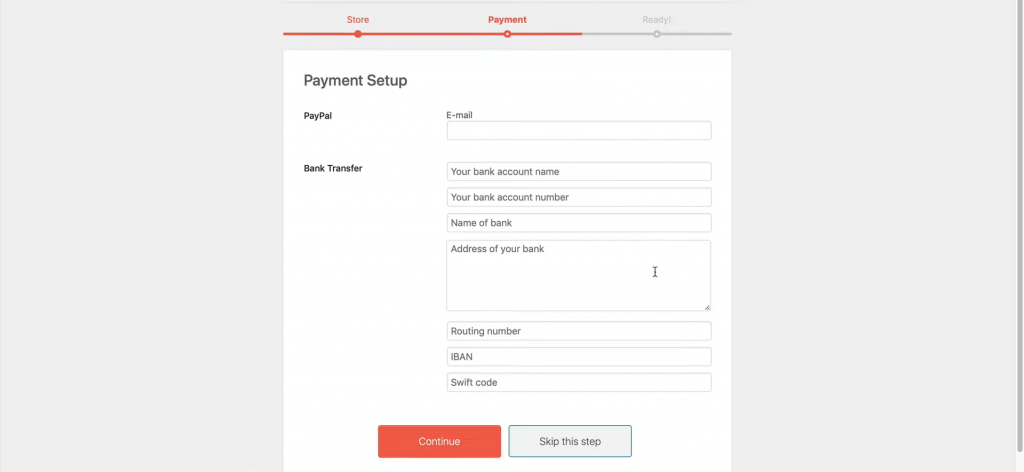
While it might seem annoying, a setup wizard is a very crucial tool that eases the registration process. As you proceed to the next screen, you will be required to choose the payment option that you’ll be using on your vendor store. You can either select PayPal or the bank transfer method. Once everything is completely set up, you will be directed to your store’s dashboard.
To create a new product, select the products option on the sidebar menu. Click the add a new product button.
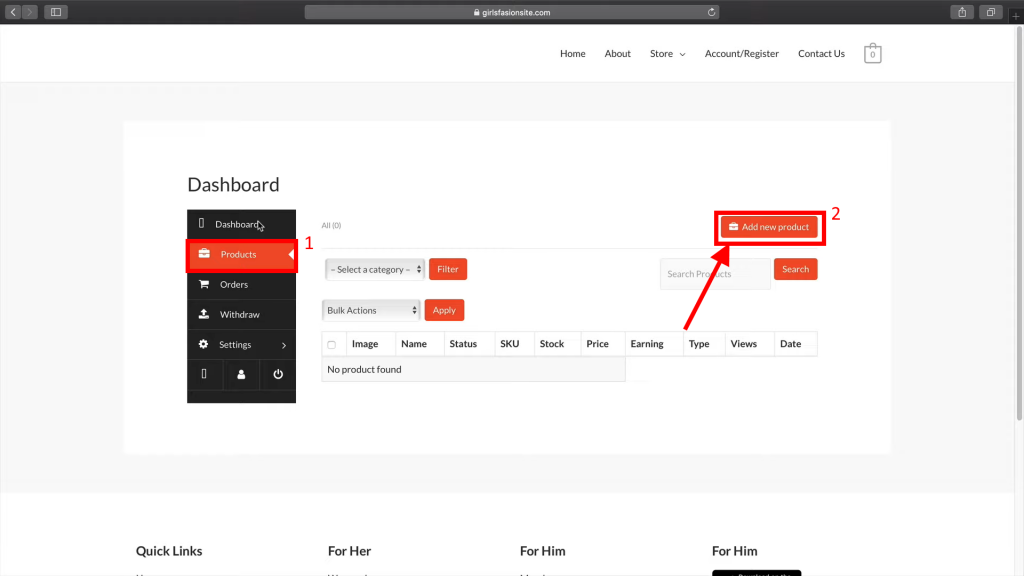
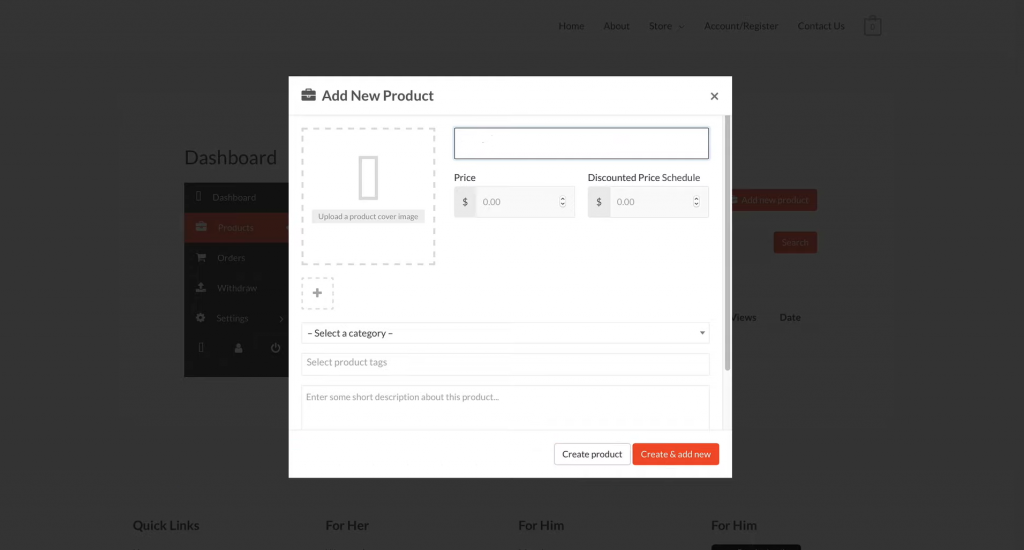
Key in the name of the product, then add its price. Upload an image to display your product. If you want to add more pictures, click the + button. Select a category for your product and add the necessary tags.
In the description box, add some content to inform your customers about your product, and click the create product button. Here’s a thing; your product won’t get published until you approve it from your WordPress admin. This also applies to all the products that are published by vendors in your marketplace.
Dokan also allows you to add downloadable and virtual products to your marketplace WordPress website. This might come in handy if you are planning to sell ebooks or guides. Under the products section, check the downloadable and virtual boxes.
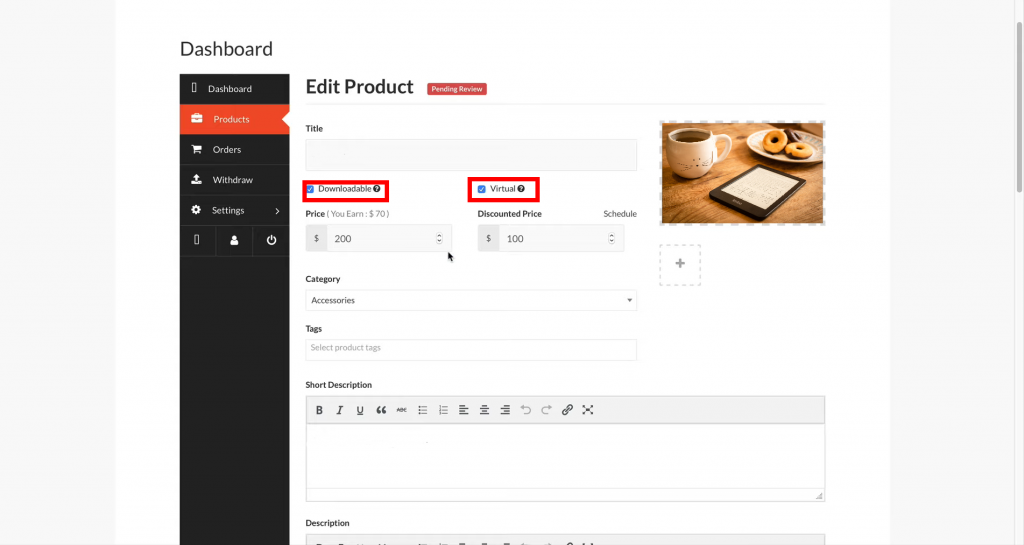
Scroll down to the downloadable options, and add the file you are planning to sell. Set the download limit for your file.

You can also add a purchase note, which will be sent to your customer’s email if they buy your product. Finish off by saving the product. Since products don’t get published automatically on the front-end of your site, you have to approve them from your WordPress backend. Log into your WordPress admin and select the products option on the admin menu.
Every product that’s created in different vendor stores will be displayed there. Click the publish button to approve a product.
Adding Products An Admin
To add products as an admin, go to the products section, then select the add new option.
Make a Marketplace – Step 8: Format Your Products
Creating A Variable Product With Different Attributes
Let’s say you want to sell a large T-shirt at a different price from a small T-shirt. To achieve this, you have to create attributes to differentiate it from other T-shirts, then sell it at a different price.
Navigate to the products section that’s located on your WordPress admin sidebar menu, and choose the attributes option. Add a new attribute that will display more information about a particular product. For instance, if you are planning to sell a shirt, you can create a color attribute that will let your customers choose colors that suit them.
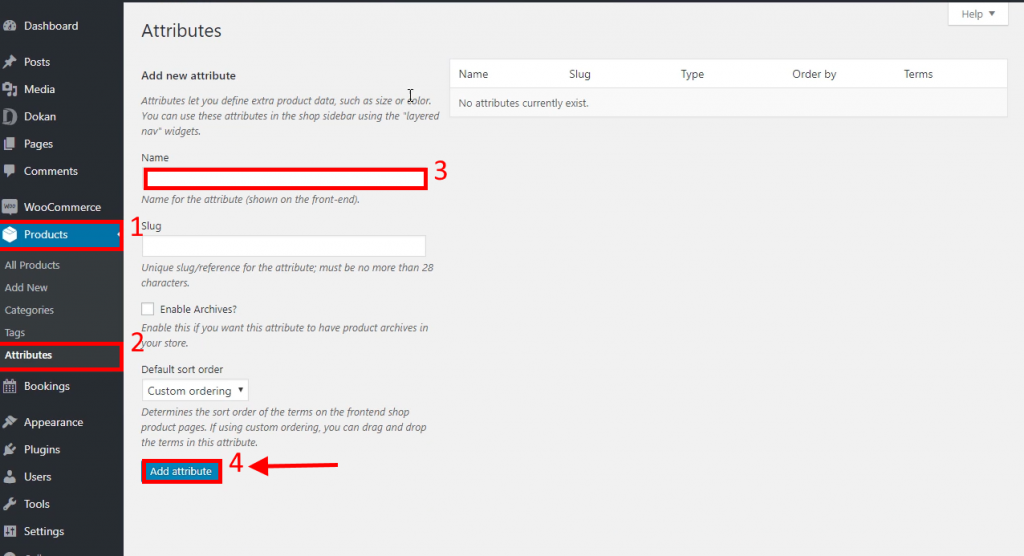
After creating a specific attribute, click the configure terms button to add more data.

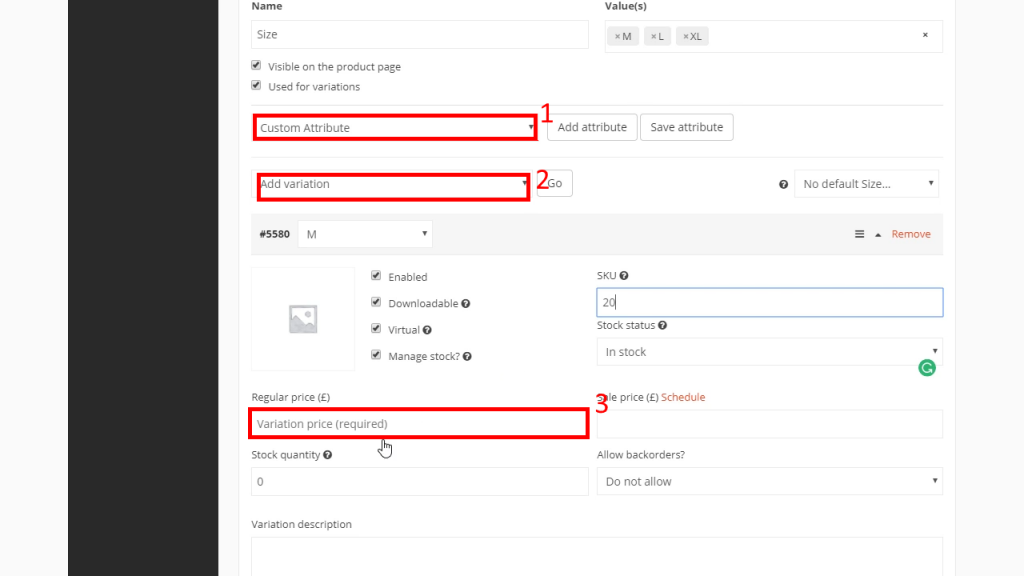
Log into your vendor store and add a new product. Once you’ve created it, start editing it. Under the product type section, select the variable option to make it more versatile.

Scroll down to the bottom part of the page. Add the different attributes you had created earlier on the attributes and variables section.
If the same product has a different price because of a certain aspect like size, you can input the cost in the variable section. Select the add variation option, and choose the product you want to sell at a different price. Add the image, price, stock quantity, and description of the variable product. Save the changes and approve the product.
Adding A Bookable Product In Your Marketplace
While it may seem like a challenging process, adding a bookable product like a ticket to your marketplace WordPress website is quite easy, head to the products section on your WordPress admin menu, and select the add new category option. Enter the title of the bookable category you are planning to add to your marketplace.
Create a new bookable product and group it under the category that you have created. Under the product data segment, choose the bookable product option.

Set how many bookings you want to sell per day on the availability section. On the maximum bookings per block segment, you can allow your customers to make multiple bookings in a single day. On the other hand, the future maximum block bookable section lets you set a specific date when your customers will start purchasing your virtual products. So if you set it to 10 days, the first customer will buy your product after ten days.

Afterward, go to the costs section and add the price of the product. Add a short product description, then publish the product.
Make a Marketplace – Step 9: Terms And Conditions Page
In an eCommerce website, a terms and conditions page is very crucial. It helps you set the guidelines and rules that should be followed in your marketplace WordPress website. To create it, click the + new button located on your WordPress admin top menu bar. Select the page option to create a new page. Key in your terms and conditions and publish the page.
Click the Dokan button on the sidebar menu, and head to the page settings section. Under terms and conditions option, select the page you had published earlier and save the changes. New vendors will be required to check the terms and conditions page when they register an account.

Make a Marketplace – Step 10: Payment Options
Successful purchases will prompt vendors to send multiple withdrawal requests. This is why you need to configure your marketplace to suit different withdrawal needs.
Adding More Payment Options
Since different vendors use different payment systems, you need to have every payment system set up on your marketplace WordPress website. Click the Dokan button on your WordPress admin menu. Under the withdrawal options, check the payment boxes that suit your vendors’ needs. Set the conditions of issuing the payment; Choose if you want to issue the payment when the customer’s order is completed, processing, or on-hold.

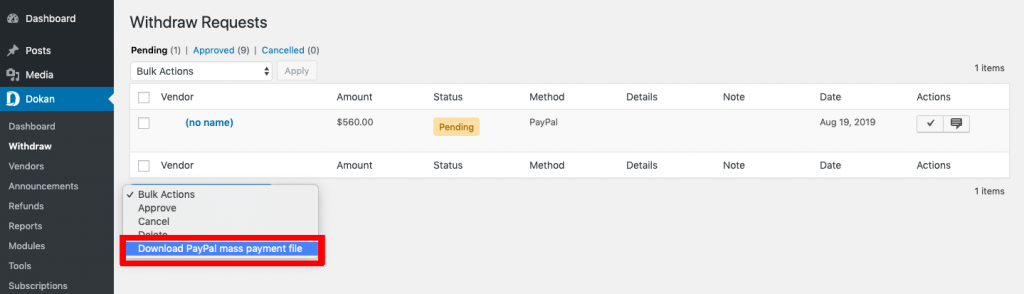
PayPal Mass Payment
Instead of sending one payment at a time, this system enables you to send multiple payments at once. However, you must be approved by Paypal to do so. Achieving this requires you to submit a payment information file to Paypal, then you will get notified when each transaction is completed.
To download the PayPal mass payment file, click the Dokan button, and select the withdraw option. Choose the download PayPal mass payment option on the drop-down menu.
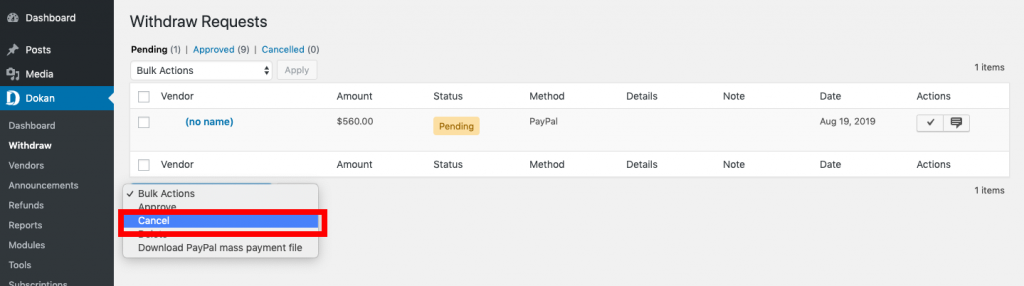
Canceling A Withdrawal Request
In some situations, you might be required to cancel a withdrawal request because a customer has asked for a refund. Navigate to the withdrawal section, and select the payment you want to cancel. On the drop-down menu, select the cancel option.
Benefits of Using Dokan
It’s user-friendly: Creating a multi-vendor marketplace WordPress website has been made easier with Dokan. You don’t need to have any technical knowledge to do so.
Maximizes your website security: Instead of vendors logging into the backend of your website, they are given a URL that lets them add products to their stores.
Reduces maintenance costs: Vendors are responsible for managing their store. This saves you from spending too much money on maintenance.
An easy way of making profits: Dokan doesn’t limit the number of vendors that register to your marketplace. Plus, you get a commission for every successful sale that happens in your marketplace.
It helps you save your time: The only moment you are required to spare some time is when you are issuing payments to vendors. Nonetheless, vendors are in charge of their store.
Over To You – Build Your Marketplace Website on WordPress
If you follow every step accordingly, you will easily create a multi-vendor marketplace. Most of the steps listed here are very simple to execute. Not to mention, different plugins like Dokan and WooCommerce will help you manage your marketplace.
What’s more? You receive notification emails when small changes happen in your marketplace. Once everything is set up, go ahead and perform test orders. Purchase some products that are listed in your marketplace. Use different payment methods to assess if everything works smoothly.
What’s your experience in creating a multi-vendor marketplace? Does it seem like an easy process or a rather intimidating process? Let us know your thoughts in the comments below.


