If you want to take WordPress beyond basic blog or brochure websites, learning how to create a WordPress custom post type is an important first step.
Custom post types let you store additional information outside of WordPress’ default “Post” and “Page” system.
For example, you can create a “product” custom post type for an eCommerce store or a “job” custom post type for a job listing website.
Many of your favorite plugins rely on custom post types in some way, but you can also create your own WordPress custom post type according to your needs, which is the focus of today’s post.
In this post, I’ll show you how to create a WordPress custom post type using two different methods:
- With the Types component in the Toolset plugin – no code required.
- Manually with your own code – it’s still pretty simple.
How to Create a WordPress Custom Post Type With Toolset Types
Toolset is a popular suite of tools for creating and working with custom content types in WordPress.
Toolset comes as a set of different components that you can use to work with custom post types in various ways, which is one of the reasons we’re using it for this tutorial.
To create a WordPress custom post type with Toolset, you just need a single component – Types. But once you’ve created your custom post type, you can consider other components like:
- Views – display your custom content on the front-end in any way that you choose.
- Layouts – build layouts for front-end content display.
- Forms – create front-end submission forms for your custom post type. For example, if you create an “Event” custom post type, you can let people submit events from the front-end of your site.
- Access – restrict access to custom content on your site, like to create a membership site.
- Maps – display custom post type entries on a map. For example, if you have an “Apartment” custom post type, you can display each apartment on a map.
To learn more about why we like Toolset (and use it here at WPLift), you can check out our full Toolset review.
Once you install and activate the Types component from Toolset, here’s how to use it…
1. Create a New Post Type
To get started, go to Toolset → Post Types. There, you should see a list of the three default WordPress post types (posts, pages, and media attachments).
To create a custom post type, click the Add New button:


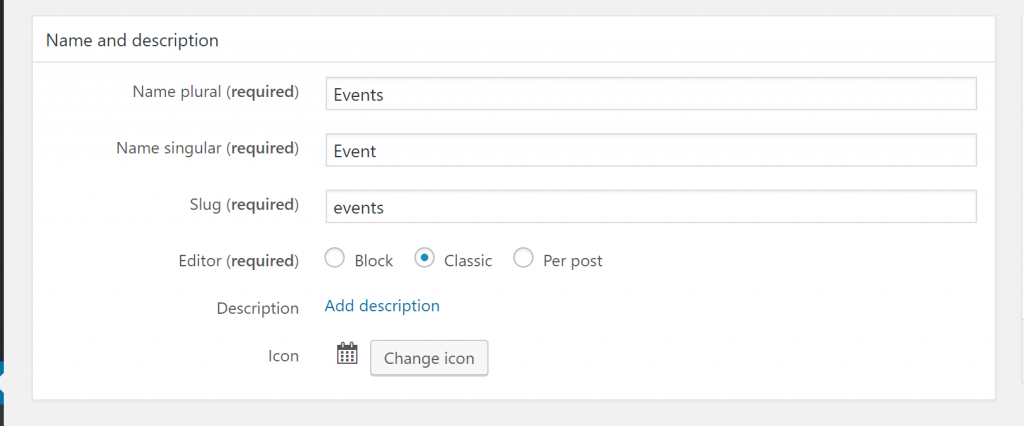
2. Enter Basic Details
At the top, enter the basic name for your post type, along with the:
- Slug – this will appear in the URL. For example, yoursite.com/events/event-name
- Editor – whether to use the Classic editor or the new Block editor
- Icon – the icon to appear in the WordPress dashboard sidebar

3. Choose Associated Taxonomies
Taxonomies help you organize your post types. For example, the default blog “Post” post type comes with two taxonomies – categories and tags.
In the Taxonomies to be used with… section, you can choose which taxonomies should be associated with this post type.
You can choose from the default Categories and Tags. Or, Types can also help you create your own custom taxonomies from the Taxonomies tab:
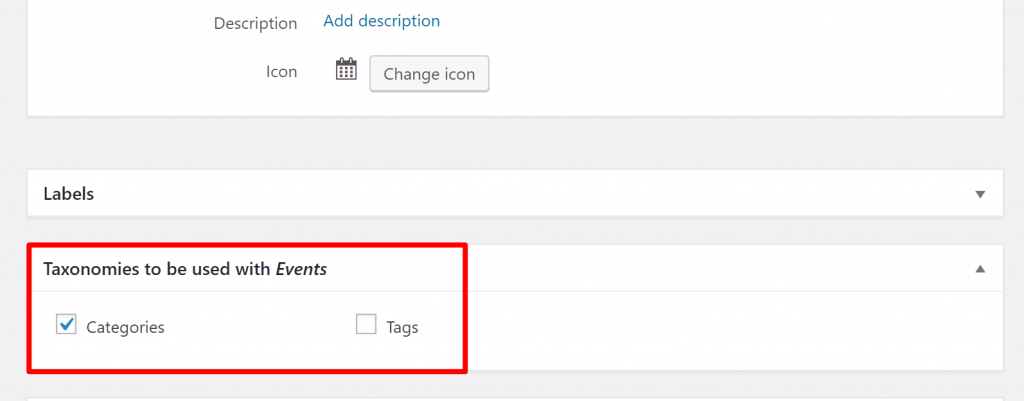

Keep in mind that if you use the default categories and tags, you’ll be mixing your categories and tags with blog posts. Normally, it’s better to create a custom taxonomy for your custom post type if needed.
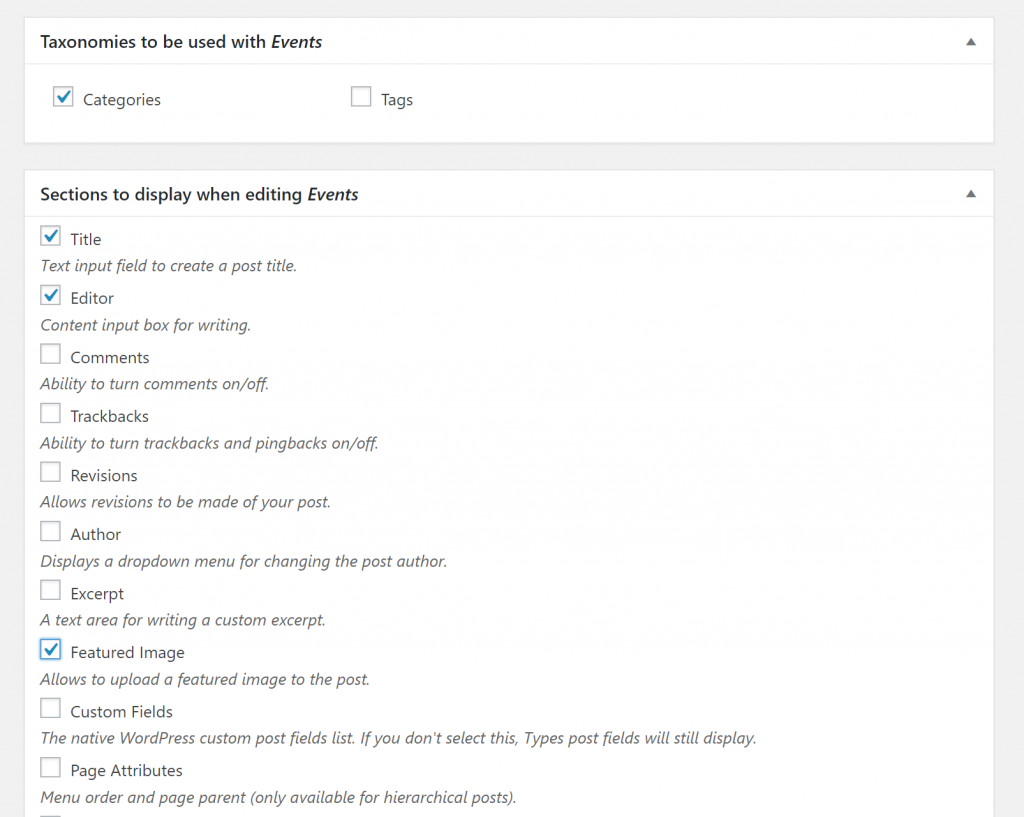
4. Choose Sections to Display in Editor
Next, you can use the Sections to display when editing… section to choose what additional options to include with the post type.
For example, do you want to be able to upload a featured image to this post type like you would to a blog post? If so, you’ll want to check the Featured Image box.
Want to enable comments? Then, make sure to check the Comments box.
And so on…

5. Configure Advanced Options
This section is totally optional. But if you want to get into more nitty-gritty settings, you can expand the Options accordion.
Some of the things that you can do here are:
- Change the URL structure
- Choose whether or not this post type should have an archive page (like the page that lists all your blog posts – but for this post type instead)
- Choose whether or not this post type should get its own RSS feed.
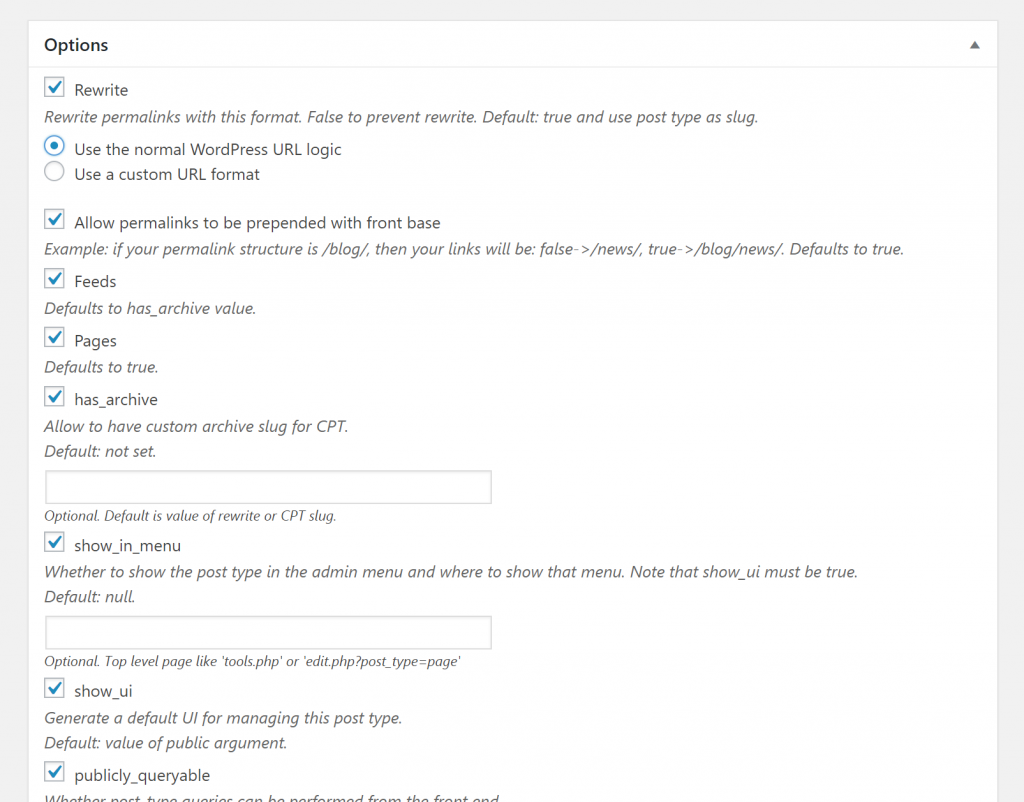

Unless you’re feeling overwhelmed, I’d recommend exploring all of the settings because you might find something that meets your needs.
Once you’re finished, click the Save Post Type button and you should see your new post type appear in the WordPress sidebar:


6. Enhance Your Post Type With Custom Fields
Another reason that we like Toolset Types is that it also makes it easy to extend your custom post type with custom fields.
If you’re not familiar with this term, custom fields basically let you store “extra” information about a post type.
For the “Event” post type that we created above, that could be details like the…
- Event location
- Event date
- Entry fee
- Attendance limit
- Etc.
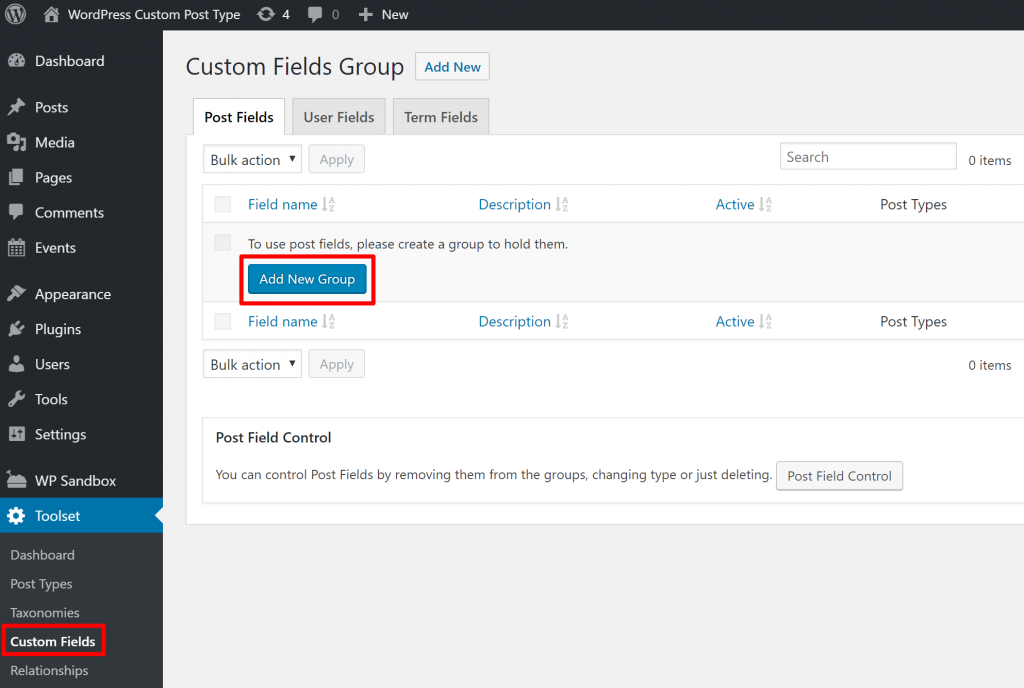
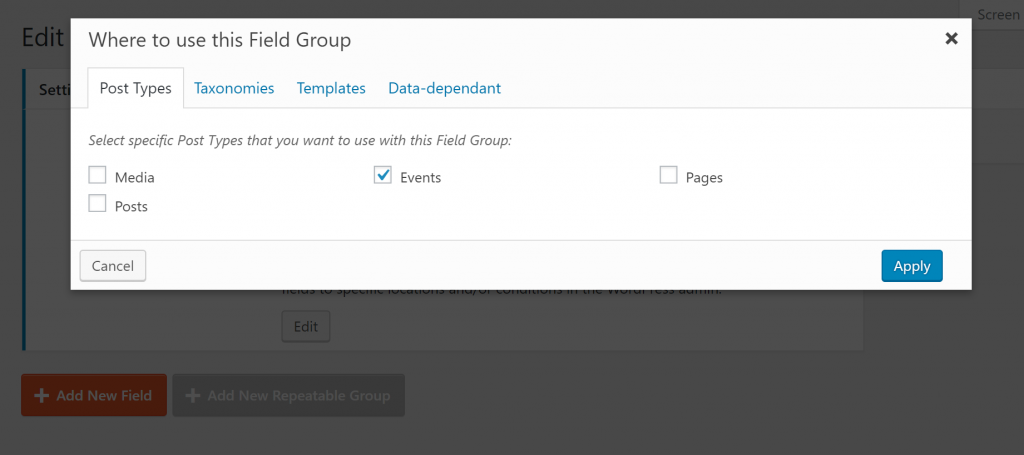
To create custom fields with Toolset Types, go to Toolset → Custom Fields. Then, click Add New Group:
On the next page, make sure to assign your field group to your custom post type:

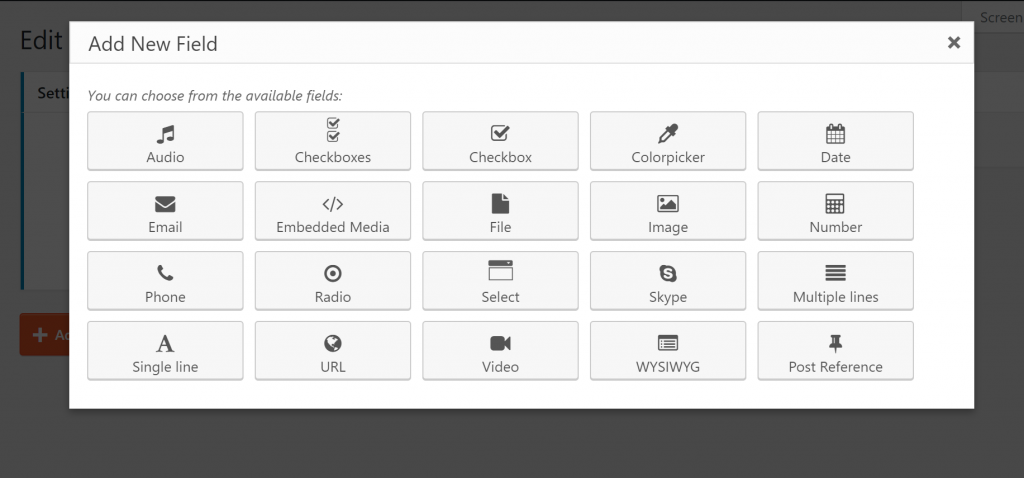
Then, you can add as many custom fields as needed:

Once you save your field group, those custom fields will appear when you go to create or edit one of your custom post type items.
Congrats – that’s how to create a WordPress custom post type with Toolset Types!
Now, let’s look at a method that doesn’t require a custom post type plugin, but does require a little more technical knowledge.
How to Create a WordPress Custom Post Type With Code
If you’d prefer a non-plugin solution, it’s also fairly simple to create your own WordPress custom post type with code – even if you’re not a developer.
I’ll go through the code snippet below…
You’ll want to add this code snippet to either…
- Your child theme’s functions.php file
- A plugin like Code Snippets (this is my preferred method)
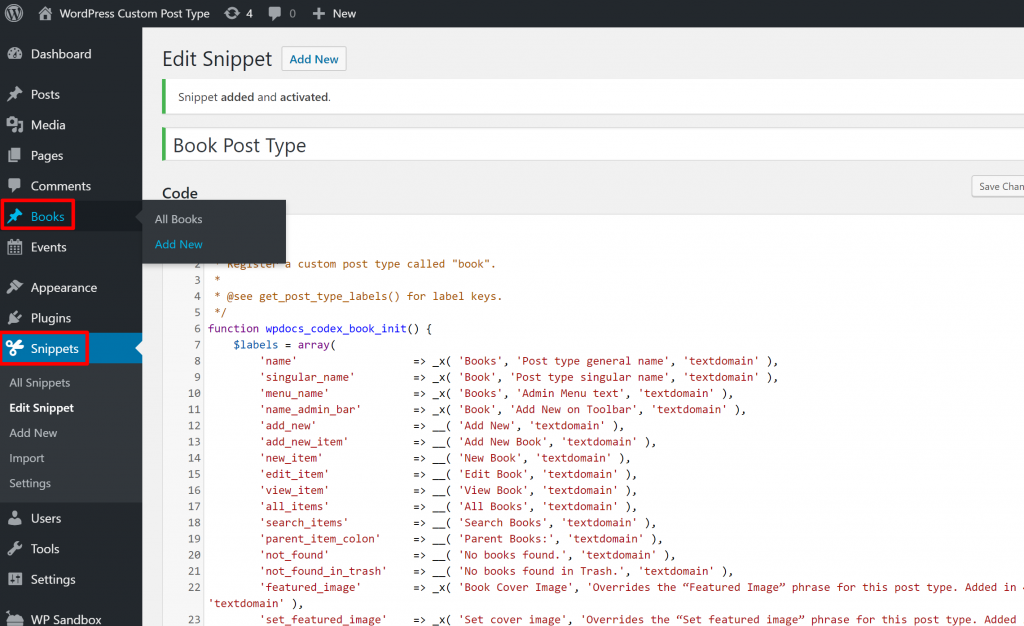
Here’s the full code snippet from the WordPress Codex, using a “Book” post type as an example:
/**
* Register a custom post type called "book".
*
* @see get_post_type_labels() for label keys.
*/
function wpdocs_codex_book_init() {
$labels = array(
'name' => _x( 'Books', 'Post type general name', 'textdomain' ),
'singular_name' => _x( 'Book', 'Post type singular name', 'textdomain' ),
'menu_name' => _x( 'Books', 'Admin Menu text', 'textdomain' ),
'name_admin_bar' => _x( 'Book', 'Add New on Toolbar', 'textdomain' ),
'add_new' => __( 'Add New', 'textdomain' ),
'add_new_item' => __( 'Add New Book', 'textdomain' ),
'new_item' => __( 'New Book', 'textdomain' ),
'edit_item' => __( 'Edit Book', 'textdomain' ),
'view_item' => __( 'View Book', 'textdomain' ),
'all_items' => __( 'All Books', 'textdomain' ),
'search_items' => __( 'Search Books', 'textdomain' ),
'parent_item_colon' => __( 'Parent Books:', 'textdomain' ),
'not_found' => __( 'No books found.', 'textdomain' ),
'not_found_in_trash' => __( 'No books found in Trash.', 'textdomain' ),
'featured_image' => _x( 'Book Cover Image', 'Overrides the “Featured Image” phrase for this post type. Added in 4.3', 'textdomain' ),
'set_featured_image' => _x( 'Set cover image', 'Overrides the “Set featured image” phrase for this post type. Added in 4.3', 'textdomain' ),
'remove_featured_image' => _x( 'Remove cover image', 'Overrides the “Remove featured image” phrase for this post type. Added in 4.3', 'textdomain' ),
'use_featured_image' => _x( 'Use as cover image', 'Overrides the “Use as featured image” phrase for this post type. Added in 4.3', 'textdomain' ),
'archives' => _x( 'Book archives', 'The post type archive label used in nav menus. Default “Post Archives”. Added in 4.4', 'textdomain' ),
'insert_into_item' => _x( 'Insert into book', 'Overrides the “Insert into post”/”Insert into page” phrase (used when inserting media into a post). Added in 4.4', 'textdomain' ),
'uploaded_to_this_item' => _x( 'Uploaded to this book', 'Overrides the “Uploaded to this post”/”Uploaded to this page” phrase (used when viewing media attached to a post). Added in 4.4', 'textdomain' ),
'filter_items_list' => _x( 'Filter books list', 'Screen reader text for the filter links heading on the post type listing screen. Default “Filter posts list”/”Filter pages list”. Added in 4.4', 'textdomain' ),
'items_list_navigation' => _x( 'Books list navigation', 'Screen reader text for the pagination heading on the post type listing screen. Default “Posts list navigation”/”Pages list navigation”. Added in 4.4', 'textdomain' ),
'items_list' => _x( 'Books list', 'Screen reader text for the items list heading on the post type listing screen. Default “Posts list”/”Pages list”. Added in 4.4', 'textdomain' ),
);
$args = array(
'labels' => $labels,
'public' => true,
'publicly_queryable' => true,
'show_ui' => true,
'show_in_menu' => true,
'query_var' => true,
'rewrite' => array( 'slug' => 'book' ),
'capability_type' => 'post',
'has_archive' => true,
'hierarchical' => false,
'menu_position' => null,
'supports' => array( 'title', 'editor', 'author', 'thumbnail', 'excerpt', 'comments' ),
);
register_post_type( 'book', $args );
}
add_action( 'init', 'wpdocs_codex_book_init' );
Just by looking at the names, you can see that this code snippet contains pretty much the exact same options as you get through the Toolset Types interface.
Essentially, you’ll just need to edit the snippet to match the post type you want to create. So – change all the “book” references to your own post type and use the “true/false” section to control how your post type should function:

If you’re not sure what I’m talking about, you’re probably better off using a custom post type plugin like Toolset.
Create Your Own WordPress Custom Post Type Today
At this point, you should be able to create your very own WordPress custom post type.
No matter how you create your custom post types, you need a way to display that custom information on the front-end of your site, though.
While Toolset can help with layouts on the front-end with its other components, another good option to display custom post types on WordPress is Elementor Pro.
With Elementor Pro’s theme building functionality, you can create templates for your custom post types using Elementor’s visual, drag-and-drop interface. What’s more, Elementor’s dynamic data integration also lets you include information from custom fields in your designs. To learn more, check out our full Elementor review.
Any other questions about how to create a WordPress custom post type? Let us know in the comments!