Searching for how to create a portfolio site to showcase all your awesome work?

WordPress – the world’s most popular way to build a website – makes a great choice. Not only will it only cost you a few bucks a month to use, but it also gives you the flexibility to make your portfolio site look and function exactly how you want it to.
But when you talk about building your own website, it’s easy to feel overwhelmed by trying to figure out exactly what you need to do to get started.
In this post, I’ll help fix that by simplifying the process and showing you exactly how to create a portfolio site using your own self-hosted version of WordPress without needing to have any special technical knowledge.
Why You Should Create A Portfolio Site With WordPress
There are a ton of website builder services out there competing for your attention. Squarespace, Wix, Weebly…they all want you to pick them (and pay them a hefty monthly fee). And don’t get me wrong, those website builders certainly have their place.
But here’s why I think you’re better off using self-hosted WordPress to create a portfolio site:
First – as I mentioned above – WordPress is by far the most popular way to build any type of website. It powers almost 33% of all the websites on the Internet. Yeah – almost one-third of all the websites that you visit use WordPress.
So why is WordPress so popular? Well, that leads me to my other two points:
- It’s affordable – the WordPress software itself is 100% free – all you need to do is pay for a service to host it, which can cost as little as ~$4 per month, especially when you’re just getting started.
- It’s flexible – using extensions called “themes” and “plugins”, you can make your portfolio site look and function however you want.
Finally, and most importantly, WordPress is still easy for non-technical people to use.
Now you can probably see why it’s so popular!
Note – the WordPress software that I’m talking about is different from WordPress.com, which is a service that helps you implement a limited version of the WordPress software. Learn more about the differences here.
How To Create A Portfolio Site With WordPress: Step-by-Step
Now, I’ll show you exactly what you need to do create an online portfolio with WordPress. Let’s go through it step-by-step…
Step 1: Sign Up For Hosting And Purchase Your Domain Name
In order to make your portfolio website accessible to people around the world, you need web hosting. Whenever someone visits your website, your web hosting will handle delivering your website’s files to that person.
Every single website needs a host, so this one is pretty essential!
Beyond web hosting, you also need a domain name. Your domain name is your website’s address on the Internet. For example, ours is “wplift.com”. If you’re making a personal portfolio site, you might want to try to use your name – e.g. “johnsmith.com”.
If you have a popular name, someone might have already registered the “.com” version of your domain. In that case, you can consider another extension like “.org” or “.me”. Or, you can use a domain name generator to come up with something more creative.
To host your website and purchase your domain name, we recommend a service called SiteGround. In fact, SiteGround is where we host this very website, so we’re putting our money where our mouth is!
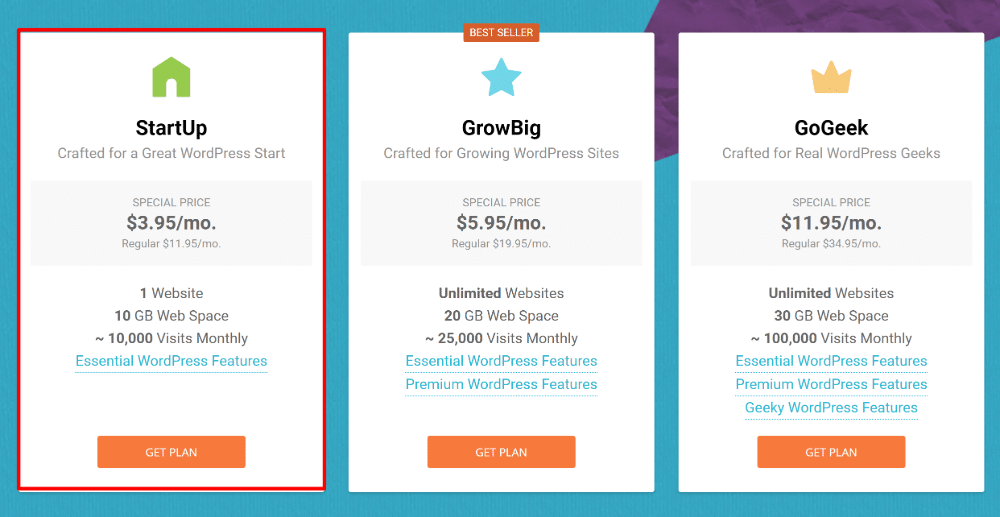
To get started, click here to go to SiteGround. Then, choose which hosting plan to use. We recommend the StartUp plan, which will give you all the power you need for $3.95 per month (billed annually):
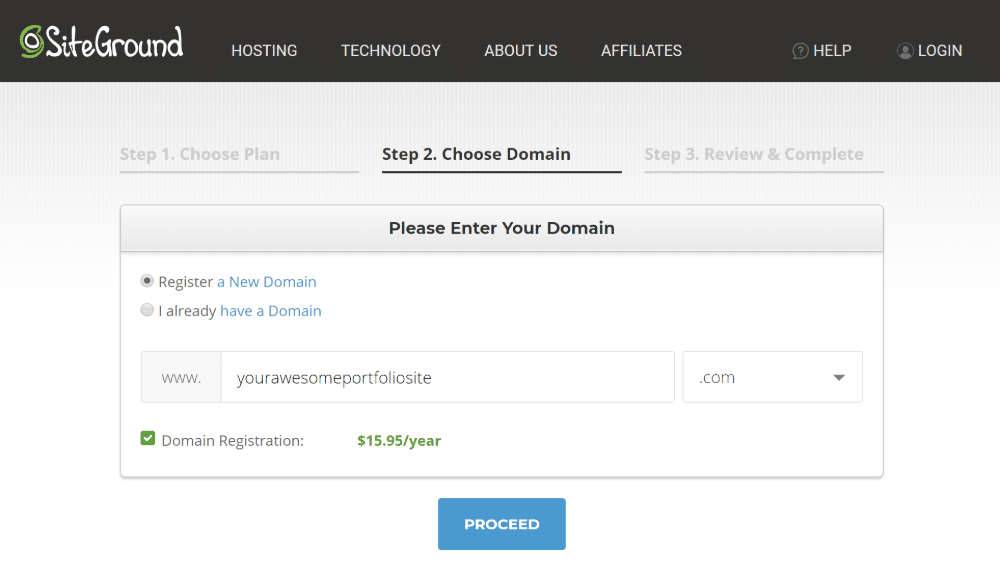
From there, you can enter the domain name you want to use. Your domain will cost you $15.95 per year on top of your hosting:
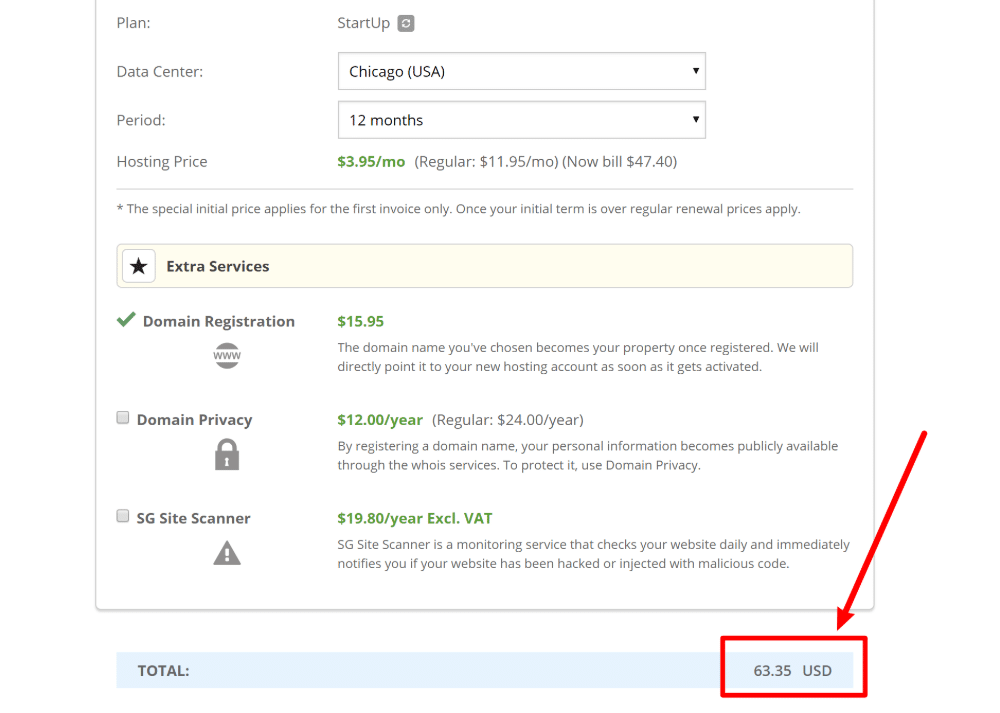
Then, you just need to enter your account and billing information to finish out the process.
For your entire first year, you should pay just ~$63, which is a lot better than the $144 you’d need to pay for something like Squarespace!
Step 2: Install WordPress
Once you purchase your hosting and domain name, the next step is to install WordPress.
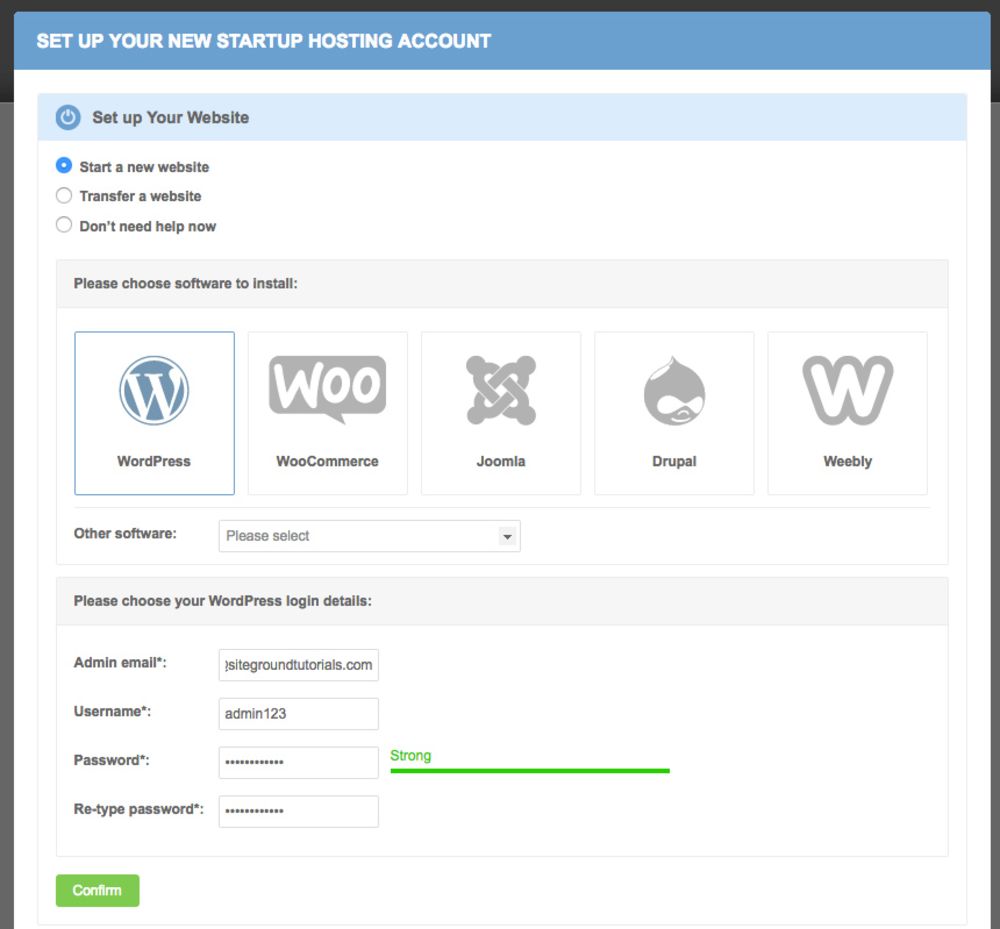
SiteGround makes this easy with its site setup wizard.
The first time that you sign in to your new SiteGround account, you’ll see the wizard. Choose the option for WordPress and complete the steps:
Once you finish the setup wizard, you’ll be able to log in to your new WordPress site by visiting “yoursite.com/wp-admin” and entering the login credentials that you created in the site setup wizard.
Step 3: Choose And Install A Portfolio Theme
Your WordPress site’s “theme” controls how it looks.
To instantly make your site look like a portfolio site, you can find themes specifically dedicated to creating a portfolio site. Check out our list of 40+ great portfolio themes for some suggestions. Or, you can find free portfolio themes at the official WordPress.org theme directory.
Once you choose your theme, you can follow our guide on how to install a WordPress theme to start using it on your site.
Step 4: Customize Your WordPress Theme To Make It Your Own
Once you install your WordPress theme, it will instantly change the looks of your site. However, you still might want to go in and tweak things a little bit to make the theme your own.
To do this, WordPress provides a tool called the “Customizer”. Using human-friendly controls and a real-time preview of your site, you can control things like:
For more on how to customize your portfolio website, check out our full WordPress Customizer tutorial.
Step 5: Deck Your Site Out With Plugins
Every WordPress site can have one, and only one, theme. However, the same is not true for “plugins”.
Plugins help you add new functionality to your site, and you can use as many as you want. They can help with everything from a contact form for people to get in touch with you to a filterable portfolio to help people browse your work.
So what plugins should you use on your portfolio site?
Well, a lot of that depends on what functionality you want.
First off, depending on your theme’s functionality, you might want a dedicated WordPress portfolio plugin. These plugins make it really easy to display your work in a ton of various ways.
Second, another plugin that almost every single portfolio site needs is a contact form plugin. Using a simple drag-and-drop builder, a plugin like WPForms will let you build a variety of forms that people can use to get in touch with you.
Finally, there are lots of general plugins that are good for all WordPress sites, portfolio sites included. We collected all of these plugins in our list of must-have WordPress plugins. This list includes plugins for things like security, SEO, social media, etc.
Step 6: Start Growing Your Portfolio Website
At this point, you should have a working portfolio site built on WordPress’ strong foundation – just add visitors!
To help you start getting more traffic to your site, we’ve curated some posts that will give you a good basic foundation for Internet marketing.
First, you’ll definitely want to learn about search engine optimization (SEO). Check out our post on WordPress SEO tips and our guide to keyword research.
Beyond SEO, you’ll also want to make your content more shareable on social media. And our general post on how to increase website traffic is always a good place to start, too.
And that wraps up our guide on how to make a portfolio website with WordPress. Do you have any other questions about how to get started with your portfolio website and WordPress? Let us know in the comments!