
What type of blogger are you?
Better question – how badly do you want to find out? If you’re like millions of other people, such existential questions grab your attention and make you want to know the answer. That’s why BuzzFeed style personality quizzes have become so dang popular.
People like learning about themselves. And personality quizzes let them do just that (or at least provide an illusion of doing just that!).
They’re also great way to harness viral traffic.
What you will learn in this tutorial
- How you can create your very own BuzzFeed style personality quiz on WordPress using Thrive Quiz Builder.
Tutorial information
Difficulty: Beginner
Time Required: 30 minutes
Content Management System: WordPress (self-hosted)
Tools Required: Thrive Quiz Builder ($)
Alternatives: None
Other Requirements: Prepared questions and results (although not essential)
Summary of tutorial:
- Create your quiz ending results
- Choose a quiz style
- Create your question type and text
- Creating the social share badge, results page, and splash page
- How to embed your personality quiz
A personality quiz? Why? I’m not a psychologist!
Don’t worry, this post is not about trying to create the next Myers-Briggs test. BuzzFeed style personality quizzes are just a little bit less scientific than that.
But despite an absence of the scientific method, personality quizzes are not worthless. BuzzFeed’s popular quizzes get tens of millions of shares. And while I’m not saying you’ll become as popular as BuzzFeed just by creating a quiz, I am saying that personality quizzes are inherently more likely to go viral on social media.
Best of all, you really don’t need any specialized knowledge to create a quiz. Some wit and knowledge of cultural references will get you most of the way there! And for the rest, I’ll give you some tips straight from BuzzFeed.
Our tool for the job: Thrive Quiz Builder
I don’t want to spend half this post rehashing my previous write-up of Thrive Quiz Builder’s features. Because trust me, I could wax on about how neat the setup is. But let me try to distill that long write-up into a few clear sentences.
I’m not showing you how to do this with Thrive Quiz Builder because it’s the only, or cheapest, way to create a BuzzFeed style personality quiz. It isn’t and it’s not.
But here’s why Thrive Quiz Builder is the best tool for the job:
Because of all the stuff going on behind the scenes.
See, the quiz itself is actually fairly trivial to implement. But with other quiz builders, you won’t get all of these important features in one package:
- Dynamic badges to create a customized social badge for every single visitor.
- The ability to show quiz takers different final pages depending on how they answered.
- Easy A/B testing for your splash page and results pages.
- Email segmentation depending on how people answer the quiz.
Those reasons, and more, are why I’m using Thrive Quiz Builder for this tutorial.
Conceptual tips for writing a personality quiz
Don’t worry – I’m going to show you the technical process for creating a quiz in a second. But before I get to that, I want to dig into the conceptual.
See, I don’t think creating a personality quiz is in most bloggers’ wheelhouses. It certainly wasn’t in mine! So to figure out what makes a successful personality quiz, I looked for an expert…
And that expert is Summer Anne Burton, the woman behind BuzzFeed’s quiz editing. In a Huffington Post interview, she gave a few tips for creating quality quizzes. Here’s what she said:
- Write the results first – According to Summer, you should never start with the questions. Start by writing down all of your results, along with the descriptions.
- Assign each answer to one of those results – Once you have your results, go through and craft the questions, assigning each question to one of the results.
So in a way, you’re supposed to work backward. Which is actually how Thrive Quiz Builder has you do it! Convenient, right?
As for what makes a personality quiz tick, Summer had a few more suggestions on that front:
- Guess something about a person’s desires or attributes – Writing a quiz that gives the quiz taker an insight into their own attributes or desires is responsible for most of BuzzFeed’s most popular quizzes.
- “Tap Into Fandom” – On another front, tapping into interests is another way to grab a niche audience. Summer gave the famous “Which Friends Character Are You?” quiz as an example.
Ok, so now we’ve got the conceptual background to create a quiz. Time to actually create one in the real world!
How to create a BuzzFeed style personality quiz With Thrive Quiz Builder
If you don’t already have Thrive Quiz Builder, you can purchase it by clicking here.
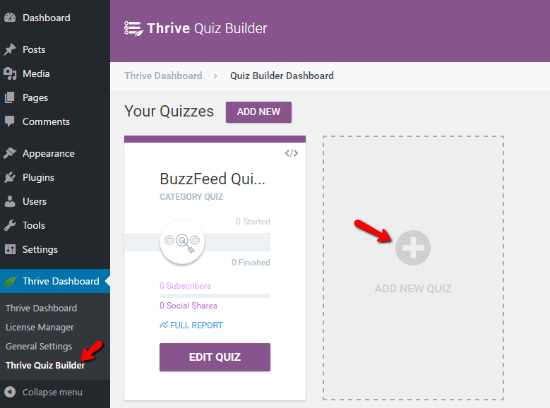
Once you’ve got Thrive Quiz Builder installed and activated, you should head to your Thrive Quiz Builder dashboard.
Then, click on Add New Quiz to get started:
On the next screen, Thrive Quiz Builder will ask whether you want to build a quiz from scratch or use a template.
Since you’re creating a BuzzFeed personality quiz, your best bet is to pick the Social shares option. You don’t have to, but that’s how I’m going to proceed with the tutorial:
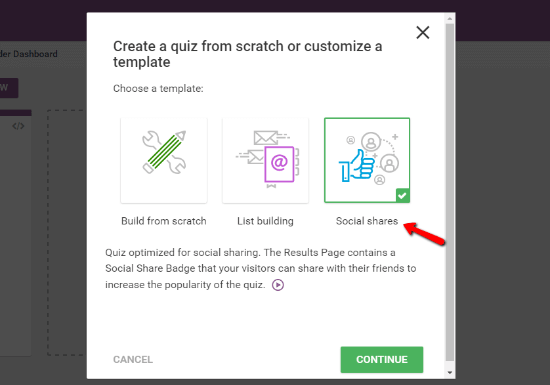
Give your quiz a name, and then click Continue.
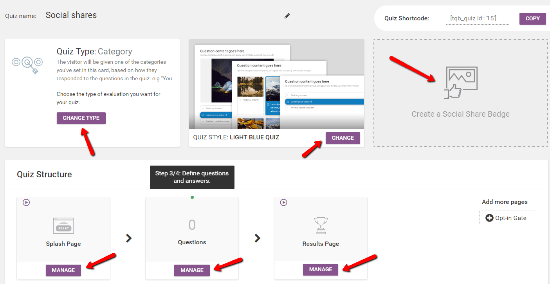
Now, you’ll be in your quiz’s dashboard. Below, I’m going to give you a quick overview of all the buttons you’ll need to click at various points of the process. This is mainly to orient you so that you can quickly find all of the steps I mention later on.
Don’t worry if you don’t see the whole interface at first – you need to complete a few steps before the entire interface shows up:
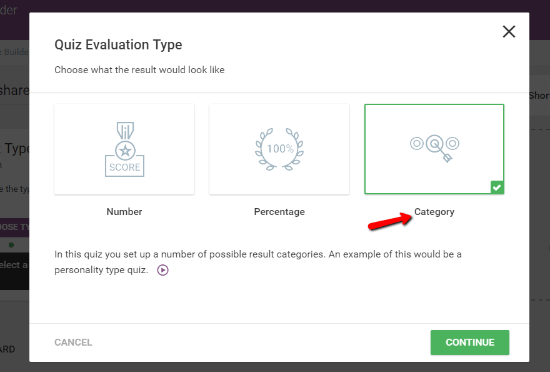
Ok, let’s get started. Step 1 is to choose your Quiz Type. Because this is a personality quiz, you should choose the Category option. The other quiz types are neat, but they don’t really fit the requirements of a personality quiz:
Create your results list first, just like summer said
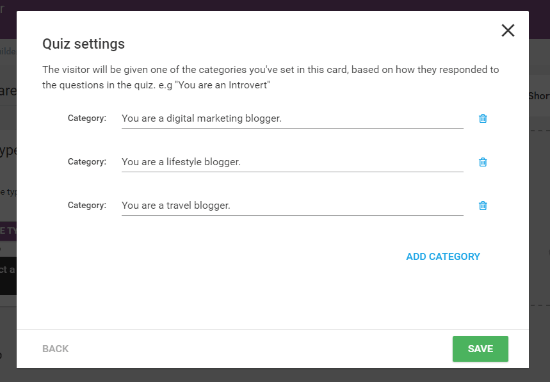
I guess Thrive Quiz Builder paid attention to how BuzzFeed creates quizzes, because once you select the category option, Thrive Quiz Builder will ask you to first enter different Categories.
These are basically the results for your quiz. So Thrive Quiz Builder actually lets you create your quiz in the optimal order.
Let’s have some fun and pretend the quiz is to answer that question I posed in the intro. That is, “What type of blogger are you?”.
As an answer to that question, you’d need to create categories like:
- You are a digital marketing blogger.
- You are a lifestyle blogger.
- You are a travel blogger.
Then choose a style for your quiz
Next up, you need to pick a style for your quiz. There’s no wrong answer here! It’s really just about your preference for your quiz’s aesthetics:
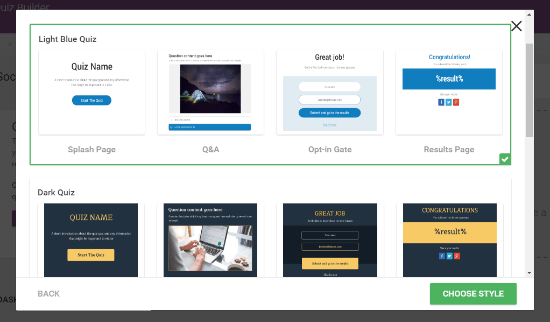
I like the Light Blue because it’s airy, so I’ll go with that for now.
Now it’s time for the questions
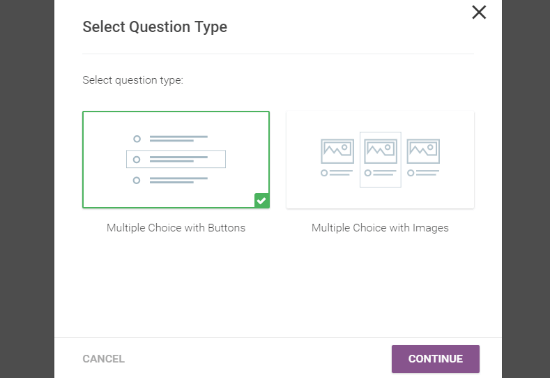
Once you’ve knocked out those two steps, you’re ready to create some questions! Remember, the way a personality quiz works is that you assign each answer its own “category”. Then, at the end of the quiz, whichever category has the most answers is the result your quiz taker sees.
With Thrive Quiz Builder, you can choose between:
- Multiple choice with buttons – Users click on text to answer the question.
- Multiple choice with images – Users click on an image to answer the question.
Again, this one is up to your personal preference. It’s easier to create a quiz with buttons because you don’t need to source images. But depending on the topic, images might make a quiz more viral.
That being said, I’ll stick with Buttons for the tutorial:
Then, it’s time to write the question. Start with the Question text, then add as many potential answers as needed. You can also add optional images or descriptions to your question. And if you want to weigh the answers differently, you can toggle that box on or off.
For our quiz of “What type of blogger are you?”, a good question might look something like this:
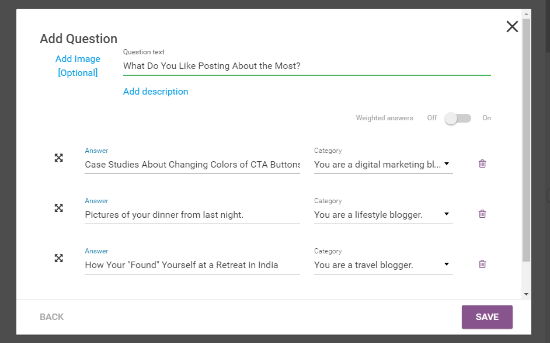
See how each answer is assigned to the category that it fits the most? My answers might be a little snarky, but hopefully you see how everything logically connects!
Of course, a one question quiz isn’t that interesting! So you’ll need to repeat the process until you have a decent number of questions. Most BuzzFeed quizzes seem to fall in the range of 10-20 questions, so that’s what I’d recommend shooting for.
As you add questions to your quiz, Thrive Quiz Builder will give you an overview of how your quiz looks. You also need to use this overview to create the order between your questions. You can do that by “connecting the dots” on your questions:
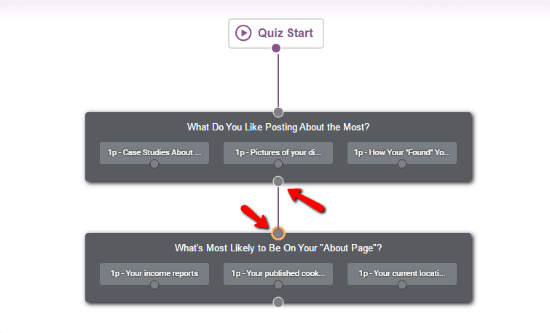
Just click on the dot on your first question and drag it to the dot on the second question. Thrive Quiz Builder will then create a “link” between the two in that order.
Add and connect questions until you fill out your quiz. Then click the Save & Exit Button.
Creating the social share badge, results page, and splash page
Now, it’s time for the most important part! Your results page, social share badge, and splash page. I think they’re the most important because they’re what actually push people to take and then, hopefully, share your quiz.
Without well-designed splash pages and results pages, you’ll struggle to have your quiz go viral.
Let’s start with the results page.
Before you dig into the actual results page, begin by first creating your social share badge. Once you click the social share badge button, you’ll be asked to choose a template:
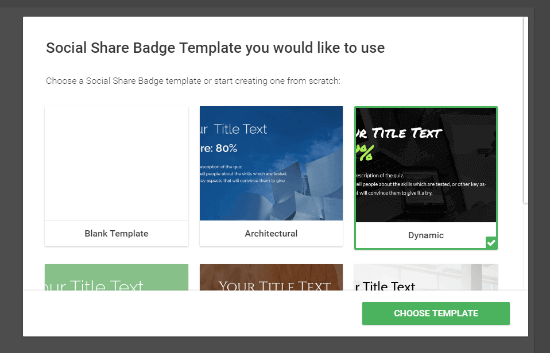
Again, there’s no right or wrong answer – it’s all preference. You can also use a blank template and upload your own background image.
Then, you need to configure the text on your social share badge. The most important part of your badge is that %result% bit, because it will automatically display whichever category the quiz taker was assigned.
You can edit everything in real-time with drag and drop. It’s super easy!

Once you have your social share badge, click Manage under Results Page on the main quiz dashboard.
Here’s where you can set up and, if desired, split test your results page. By default, Thrive Quiz Builder creates a Control results page. You can edit it by clicking the Pencil icon on the right.
To edit the page, you’ll use the normal Thrive Content Builder interface. That means you can add elements, change text, and anything else you’d like to do. If you’ve ever used a page builder, you’ll feel right at home:

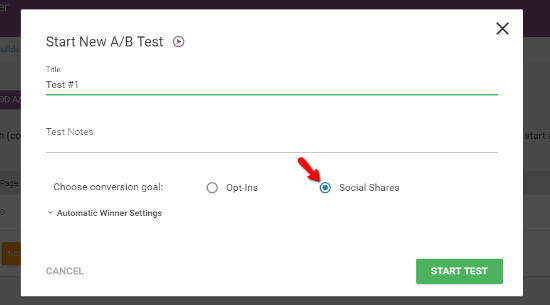
To add additional variants for A/B testing, just click the Add A/B Test Variation button. Then, when you want to run an A/B test, click Start A/B Test in the bottom right and choose a Conversion Goal:
Once you finish your Results Page, you should complete essentially the same process for your Splash Page. Your Splash Page is what visitors will see before they start the quiz. Everything, including A/B testing, is pretty much identical to the process of creating your Results Page.
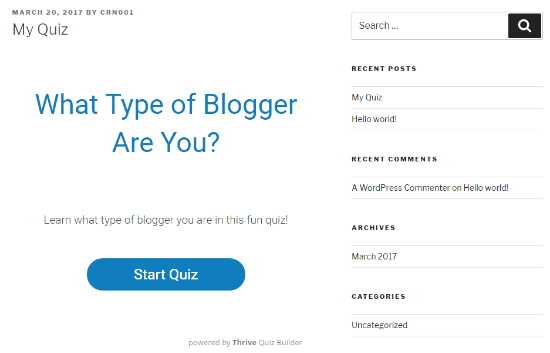
How to embed your personality quiz
At this point, you’re pretty much finished! Your last step is to embed the quiz somewhere on your front-end site so that visitors can actually, you know, find it…
To do that, Thrive Quiz Builder gives you a shortcode in the top right of your quiz’s dashboard:
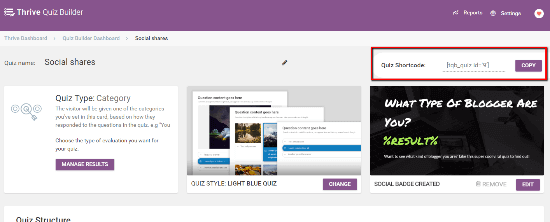
You can add that to any post or page. Then, you should see this on the front-end:
And you’re finished. Now, you just need to promote your quiz like crazy!
Wrapping things up
Creating a BuzzFeed style personality quiz with WordPress and Thrive Quiz Builder is actually pretty dang easy. Thrive Quiz Builder even provides a wizard that helps guide you through the process.
But if you have any questions, I’m all ears! Leave them in the comments and I’ll do my best to help out. I use Thrive Themes products on a number of my personal sites, so I’d like to think I’m fairly proficient with the interface at this point.


