Do you want to automate your newsletters with RSS using Sendinblue? With such an integration, you can automatically notify your subscribers about new posts on your site. This saves you from the hassle of sending newsletters manually.
You can also schedule your email campaigns and send multiple emails on a daily basis, weekly basis, or monthly basis. Needless to say, such emails will be sent automatically.
In this post, we are going to show you how to integrate RSS with Sendinblue. We are also going to highlight the benefits of integrating your RSS feed with Sendinblue. Let’s get right into it.
What Is RSS?
If you want to jump right into the steps, scroll down. But before we get into the nitty-gritty details, we are going to give you some insight on RSS and Sendinblue.
RSS (Rich Site Summary or Really Simple Syndication) is an online web feed that notifies subscribers about the latest blog posts and news published on various websites. It contains files called XML, which can be easily read by a computer.
To access such files, you need a feed reader application. It converts the XML files into real-time readable information.
What Is RSS to Email Integration?
Simply put, this is connecting your RSS feed with your email marketing account and sending scheduled campaigns on a weekly, daily, and monthly basis. This integration also lets you include different fields from your posts, making it easier for subscribers to follow up on your site’s articles.
Due to various social media applications, subscribers do not access their RSS feed as often as they used to back in the day. While different social media apps offer you multiple platforms to share your content, subscribers can get overwhelmed with posts. This is where RSS to email integration comes in. It offers you an effective method to share your content via emails.
What Do You Need?
- A Sendinblue account. If you don’t have one, you can sign up for an account on their official website.
- A URL of your RSS feed. If you are planning to import content from multiple feeds, you have to integrate various feeds into a single feed. You can either use RSS mix or RSSunify to achieve that—both are feed aggregators.
- Make sure you publish your blog posts one hour before sending your RSS campaign emails.
- An email template that is compatible with RSS. If you don’t have any pre-designed template, opt for the Sendinblue default RSS template.
Advantages of The RSS to Email Integration
- It helps you improve your site’s traffic. Since this integration allows you to send automated emails, your subscribers will be visiting your site frequently to read blog posts.
- It saves you time. You can send your newsletters automatically.
- Your RSS subscribers won’t miss out on hot blog posts.
- Sendinblue allows you to customize your email template, making it possible to include your brand’s name in such templates.
- Due to Sendinblue’s detailed report, you can easily know the emails that were opened and the ones that got ignored. This gives you an opportunity to improve various aspects of your email campaign.
Why Is Sendinblue Suitable for This?
Wondering why Sendiblue is a suitable email marketing service for your RSS newsletter automation? Well, here are the reasons why:
- For starters, the integration process is quite easy. You can set up everything in less than 30 minutes.
- This email marketing service has a default RSS email template that integrates smoothly with RSS and saves you from the trouble of creating a new template from scratch.
- It packs contact segmentation features that allow you to send your campaign to different subscribers.
- Sendinblue lets you schedule your email campaigns. You can either send them on a weekly or monthly basis, depending on your publishing frequency.
- Sendinblue features tags that let you add necessary elements in your email templates. You can add the title, publish date, and description data of multiple blog posts on your emails.
- Since Sendinblue has a detailed report, you can easily know the performance of your emails.
On top of that, Sendinblue offers you an affordable price that lets you automate your campaigns as you enjoy other features. The free plan lets you send 300 emails in a day. The lite plan costs $25, and it allows you to send 40,000 emails in a month. The essentials plan costs $39 and lets you send 60,000 emails in a month.
Steps on How To Automate Your Newsletters With RSS Using Sendinblue
Here’s a quick overview of the steps you need to follow while integrating RSS with Sendinblue:
-
- Access the integration section.
- Name the RSS campaign
- Fetch and enter your RSS feed.
- Design a default RSS-compatible template.
- Insert a dynamic list to an email template (optional).
- Choose recipients for your email campaign.
- Customize your campaigns.
- Schedule your campaign.
- Activate the RSS to email integration.
Follow these steps to integrate RSS with Sendinblue:
Step 1: Access The Integrations Section
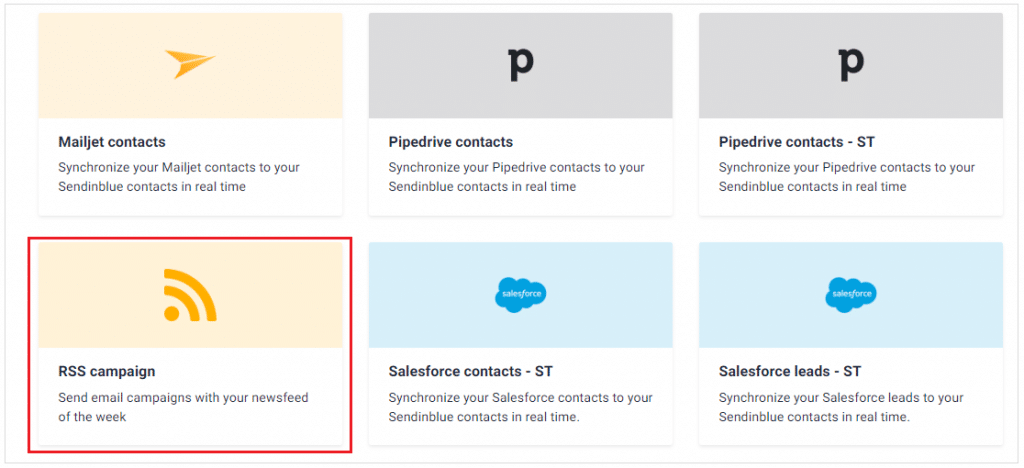
Login to your Sendinblue account. Click the + button on the top menu bar, then click the Integrations tab that is located on the Apps and Integration section. You can either search for the RSS campaign or scroll down until you find it. Select the RSS campaign option.
Step 2: Name The RSS Campaign
Once you choose the RSS campaign option, you will be redirected to a page that has a text box. Key in the name of the integration, then click the Create Integration button to proceed to the next page.

Step 3: Enter Your RSS Feed
Wondering how you can get your RSS feed URL?
If you are using a WordPress site, you can include a /feed after your site’s domain name. You will get something that looks like this: htpps//:yourdomain.com/feed.
The second method is a bit long. You have to visit a page on your website, then right-click on any section. Choose the page source option. While this might display some complicated elements, finding the RSS feed is quite easy.
Activate the search function by pressing CTRL+F simultaneously and search for RSS. The search function will display the section where the URL is located.
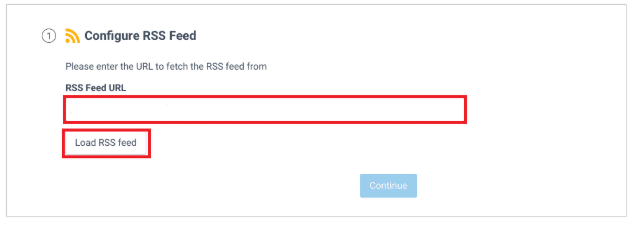
Once you get your RSS feed URL, copy and paste it in the text box. Click the Load RSS Feed button to test whether the URL is working or not. If it works, your feed will load automatically.

Sendinblue will display a list of pre-formatted keys, which will be used to customize your email.
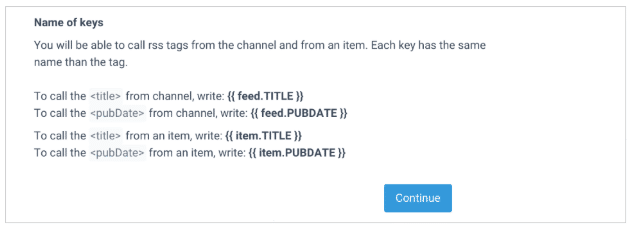
Click the Continue button to proceed to the next stage.
Step 4: Design Your Email Template
Note: While you can use a pre-designed email template from your collection, it won’t integrate smoothly with RSS. The best option to opt for is the default RSS template. It is designed to integrate seamlessly with RSS.
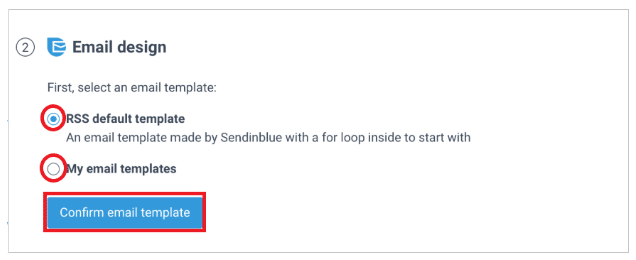
Various elements can be inserted into your email template using multiple keys.
- If you want to insert a title from a certain channel, use this key: {{params.feed.TITLE }}.
- If you want to insert the publish date of a blog post, use this key: {{params.feed.PUBDATE }}.
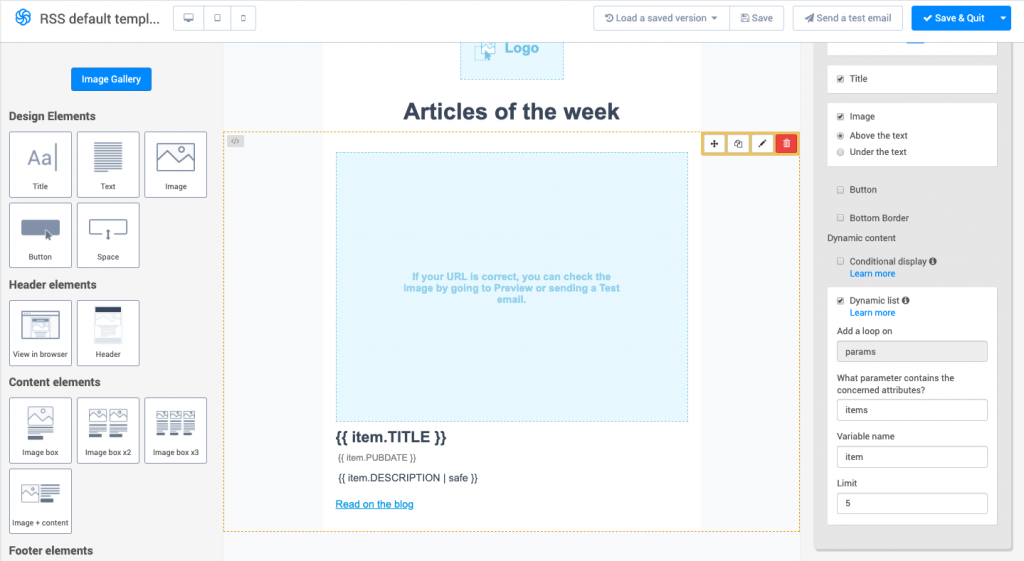
Once you finish inserting the necessary items, click the Continue button to proceed to the next page.
(Optional Step) Inserting A dynamic List
Are you wondering how you can insert a dynamic list on your email template? Creating a dynamic list lets you send varying lists to different recipients.
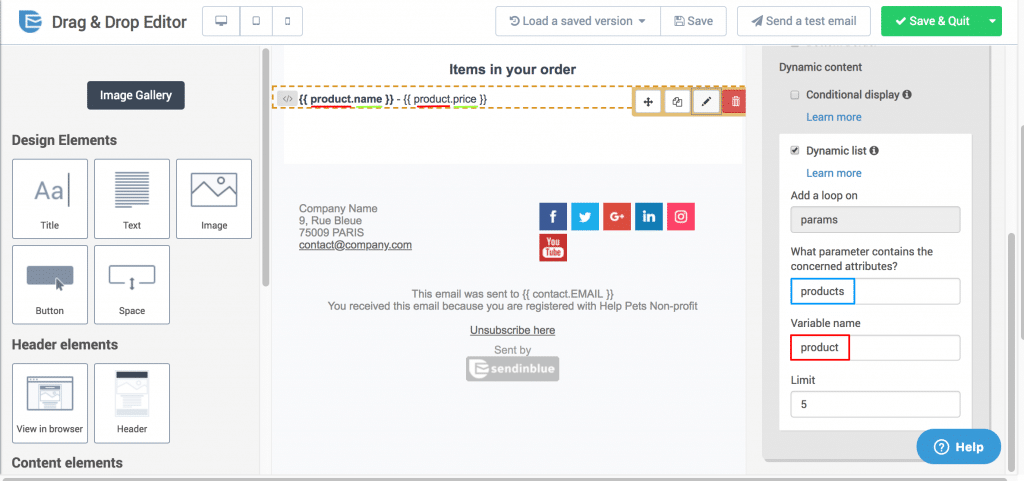
Choose a suitable block from the drag & drop editor, then insert the placeholders for different fields in the block. For instance, if you want to display the price of an item, insert a placeholder that will represent the final sum.
After that, click the pencil icon on the toolbar, then enable the dynamic list option. Navigate to the right-hand toolbar, then input the name of the parameters and variables that will be present in your dynamic lists.
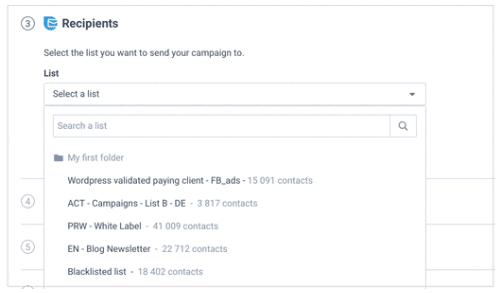
Step 5: Choosing Recipients
Before you send you an email to any contact on your email list, you should first send it to yourself to test whether everything is configured correctly.
If everything works perfectly, you can choose the email recipients from your contact lists.
Step 6: Customize Your Campaigns
You can customize your campaigns based on the tags in your email template. If you want to display the date your articles were published, you can easily create a subject line that notifies your recipients about the publish date.
You should also enter the name of your campaign and determine the address that will be displayed to your recipients when they receive your emails.
Moreover, Sendinblue offers you an option that allows you to preset campaigns in advance. This saves you from the trouble of customizing campaigns over and over again.
Step 7: Schedule Your Campaigns
Determine the frequency at which SendinBlue will be checking your feed for new posts.
If you want your campaigns to be sent during a certain day of a week, you can set the time and day of campaign creation. The same thing applies if you want your email campaigns to be sent monthly.
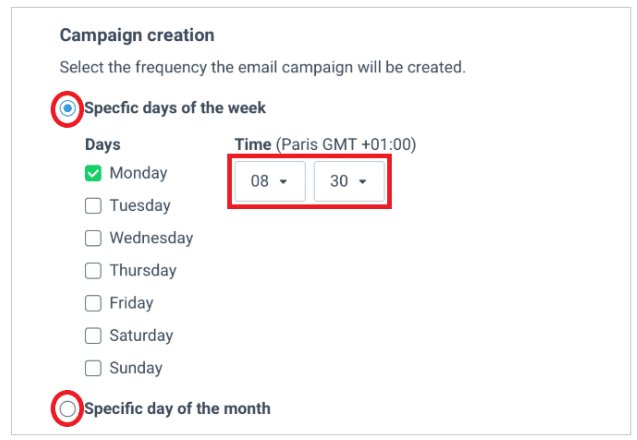
What’s more? This email marketing service has a feature that allows you to send email campaigns as soon as you publish some new content on your site. To activate this feature, you have to choose the option that lets you send emails every day. You have to tick every single day on your frequency list. If you update your RSS feed, a new email campaign will be created
Once you schedule your campaigns, determine whether you are going to send them automatically or manually. If you choose the latter, the email campaign drafts will sit on your Sendiblue account until you hit the send button.
The automatic option sends emails during the scheduled period. Click the Continue button to proceed to the next stage.
Step 8: Activate The RSS To Email Integration
If you want to activate the integration, click the Save and Activate button. On the other hand, if you want to save the integration as a draft, click the Save and Keep Inactive button. It lets you save it for later use.
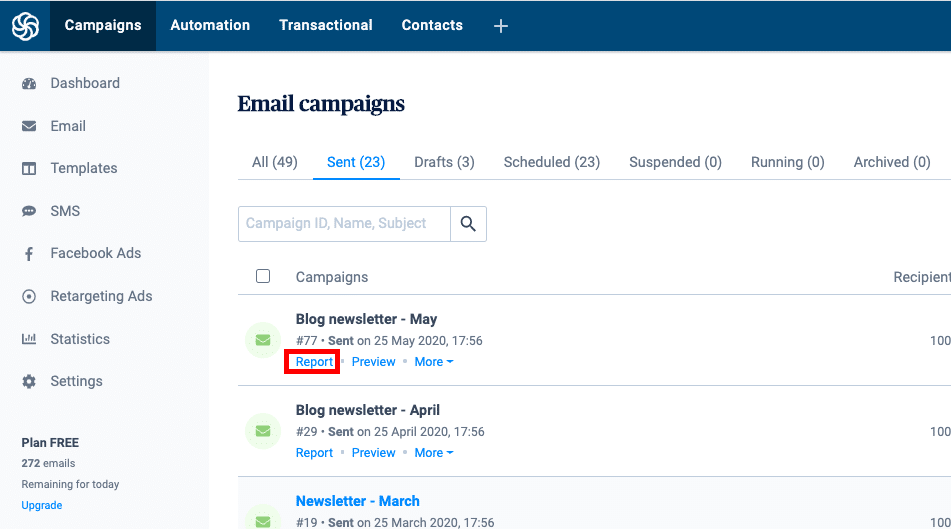
From there, you will be redirected to Sendblue’s integration page. It will display the newly-created integration. If you want to view the performance of different campaigns, select the Campaigns option on the header menu, then navigate to the email section.
To get the results of a certain email, just click the report button that is located under every email section.
Note: Sendinblue has a limit on the amount of data you can sync from your integrations. It limits you to 200,000 tasks in a single month. If you exceed 80% of the monthly quota, Sendinblue will send an email to notify you about the limit.
How can you overcome this?
You can contact Sendinblue if you want to sync large amounts of data in your integration.
Over To You
And there you have it. Everything you need to know about RSS newsletter automation with Sendinblue in a single comprehensive guide. The whole process can be done in under 30 minutes. Needless to say, it quite easy. With this integration, you can increase your site’s traffic by making sure that your subscribers get notified when you publish some new content on your site.
You can also schedule when the newsletters will be sent, depending on your publishing frequency. If you are busy, you can choose the automatic option that sends campaigns during the scheduled period.
Is this RSS to email integration going to keep your subscribers updated on the latest blog posts? Are they going to read the emails regularly? Let us know what you think in the comments below!

