Ever wished that you could go beyond your theme’s style settings and style every little bit of your WordPress site? You could fix that plugin that looks weird with your theme…or you could change how that one widget looks to make it work better…
Well, CSS is a markup language that lets you do just that. It’s super powerful for customizing your WordPress site but…there’s a catch.
Unless you’re a developer, or at least familiar with the basics of HTML, it’s nigh-on impossible to use CSS to style your own site. Basically, casual users can’t benefit from CSS because the learning curve is just too big.
YellowPencil is a freemium WordPress plugin that changes that.
It lets you make CSS style changes to any element on your WordPress site using a beginner-friendly, visual interface.
Whether you’re a casual user and want more control over your site, or you’re a developer just looking to speed up your workflow while working with CSS, I think YellowPencil has something to offer.
Keep reading my YellowPencil review for a hands-on look at how it works, as well as my thoughts on the plugin.
YellowPencil Review: The Full Feature List
With YellowPencil, you get a new Edit With YellowPencil button that you can access from the WordPress toolbar.
Once you open the YellowPencil interface, you’re able to:
- Click on any element on your page to select it.
- Style elements using a graphic interface with drop-downs, color pickers, etc.
That’s the core function of the entire plugin – I’ll show you it hands-on in a section.
Beyond that, YellowPencil also offers:
- Drag-and-drop layout controls. You can just drag-and-drop elements on the live preview to change their position.
- Drag-and-drop resizing. Similarly, you can also use drag-and-drop to resize certain elements on the visual preview.
- Responsive design. You can view responsive previews and make style changes that only apply to that device.
- Wireframe mode. This helpful mode makes it easier to adjust layouts by hiding visual elements and just showing a simple wireframe.
- Undo/Redo and Revision History. These make it easy to go backward or forward as needed.
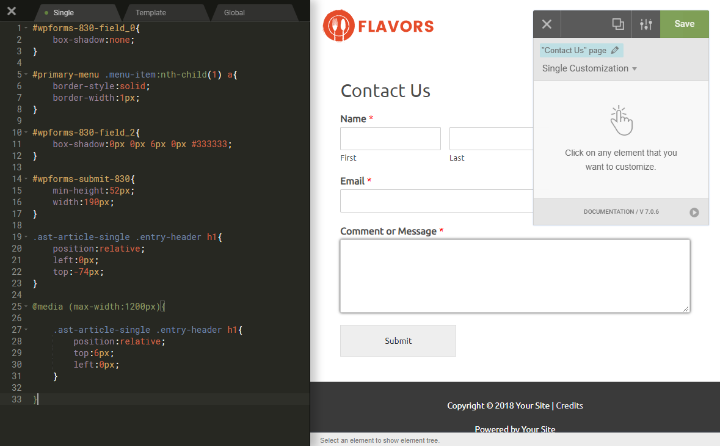
- Direct CSS Editor. If you are already familiar with CSS, you can also make direct changes in the code editor.
And one of the coolest things is that YellowPencil works with everything. That is, you can use it to style both your WordPress theme, as well as the output from any plugins you’re using.
Hands-on With YellowPencil: Styling A Page
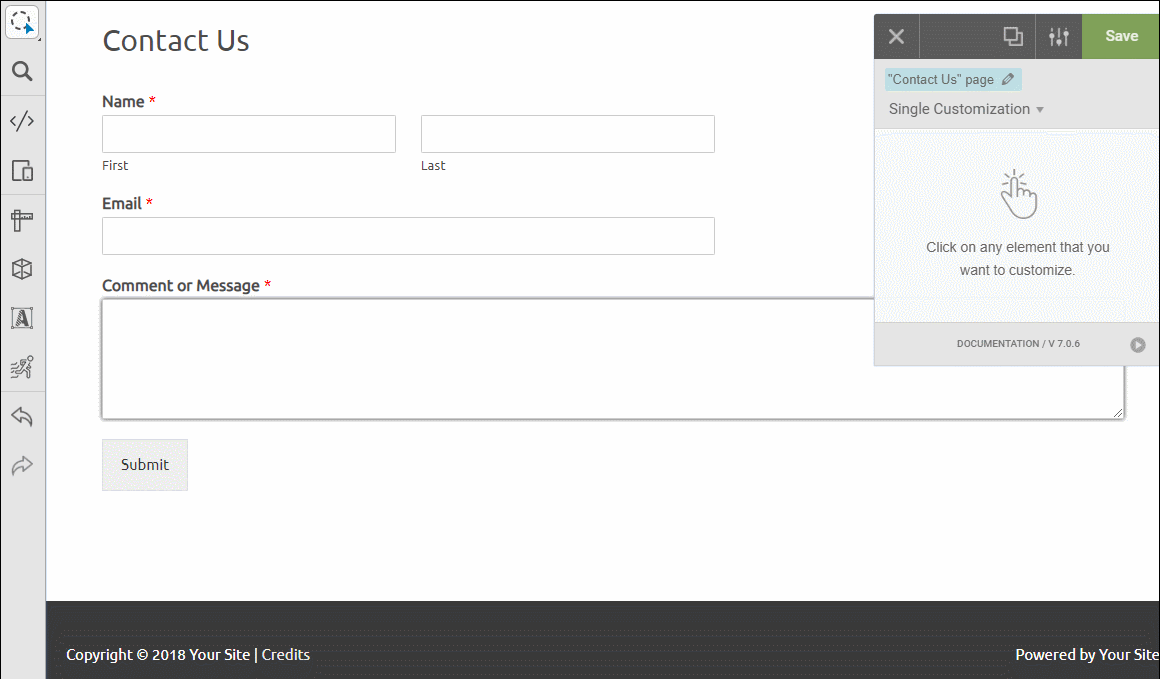
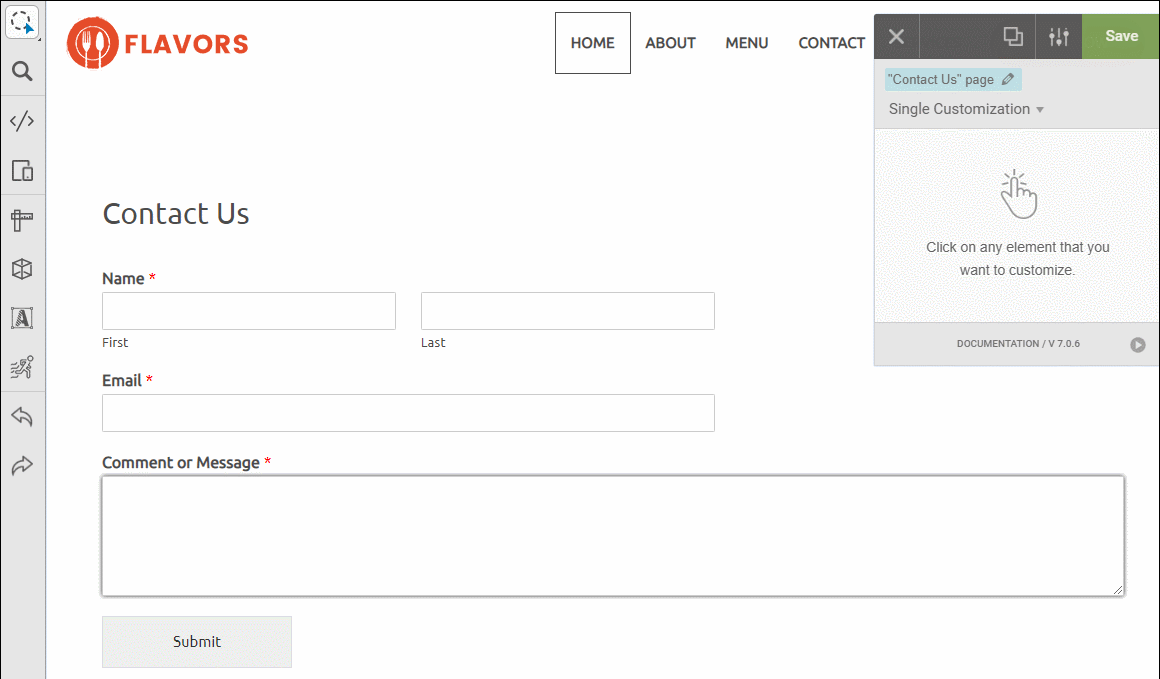
To go hands-on with YellowPencil, I set up a new Contact Us page with a WPForms contact form. Now, I’m going to style it, as well as my theme’s menu, so you can see how YellowPencil works.
When you open up the YellowPencil interface, it looks like this:
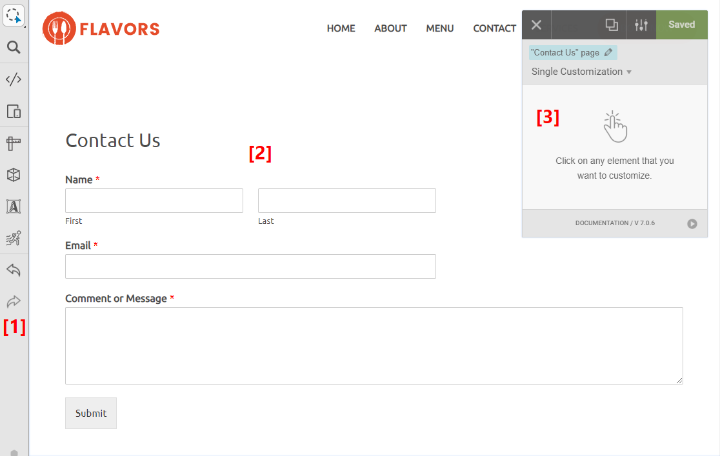
- 1 – this sidebar helps you access different modes, like responsive design mode or wireframe mode.
- 2 – this is a live preview of the page that you’re editing. As you make style changes, you’ll instantly see them reflected on this live preview.
- 3 – once you select an element, this is where you’ll set up the new styling.
Selecting An Element (2 Modes)
YellowPencil gives you two ways to select an element:
- Flexible Inspector – when you use the flexible inspector, you’ll select all of that type of element. For example, if you click on one menu link with the flexible inspector, you’ll be able to apply the same styles to all of the menu links.
- Single Inspector – when you use the single inspector, you’ll select just that one specific element. For example, if you click on one menu link with the single inspector, you’ll be able to apply styles to just that one link.
Here’s an example:
If I use the Flexible Inspector to select a menu link and add a border, you’ll see it apply to all the menu items:

Now, here’s how those same styles look with the Single Inspector (notice how only the Home menu link gets a border):
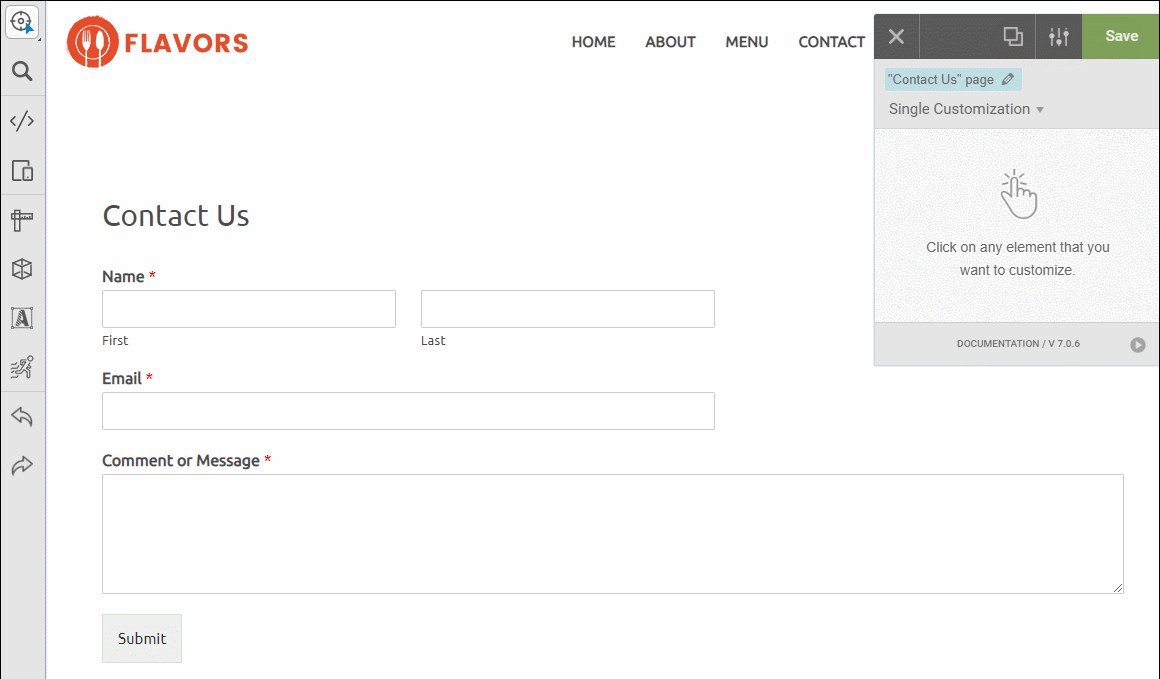
So right off the bat, that’s a pretty helpful feature to make sure that you can always select the exact element(s) you want.
CSS selectors get tricky – but being able to switch between these two modes makes them simple.
Styling Elements With The Side Panel
You kind of saw this above, but let’s go a little more in-depth with how styling an element works.
For every element, YellowPencil gives you tabs for:
- Text
- Background
- Margin
- Padding
- Border
- Border Radius
- Position
- Size
- Animation
- Box Shadow
- Extra (more developer-oriented features like opacity, float position, cursor, etc.)
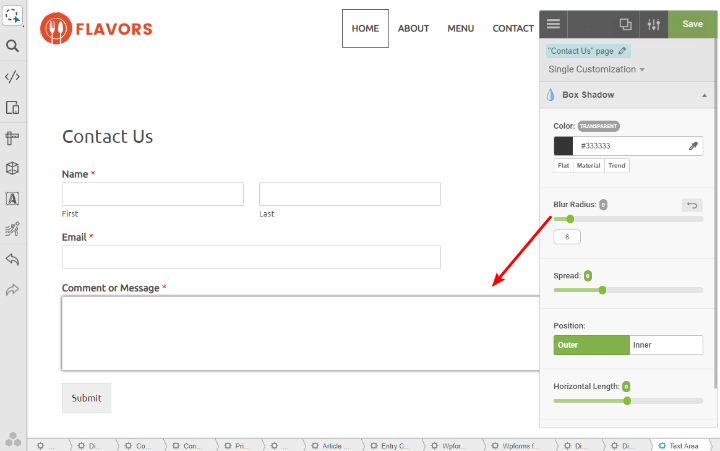
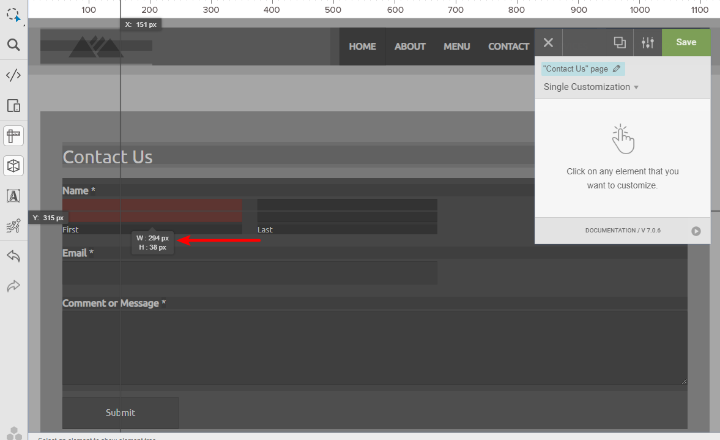
For example, to add some box shadow to the input form field, you just head to the Box Shadow tab and make your edits using the simple interface controls:
Here’s my favorite feature, though.
If you want to change the size of an element, you can use the same side panel. Or, you can just drag and drop like this:
Similarly, you can also use drag and drop to actually move some elements (it won’t work for every single element, but you can move most things).
For example, it’s easy to move the page title around:
Not only is the drag-and-drop functionality something unique for a visual CSS editor plugin, it’s also pretty dang handy for changing up how your pages look.
And that right there is the core of how YellowPencil works. Now, let me show you some of the other modes that you get.
Exploring YellowPencil’s Other Modes
You can use the sidebar on the left to access some of the other modes in YellowPencil.
Responsive Mode
In Responsive Mode, you’ll get a new ruler at the top of your screen with all the different responsive breakpoints for your site, as well as a message telling you which version you’re currently editing:
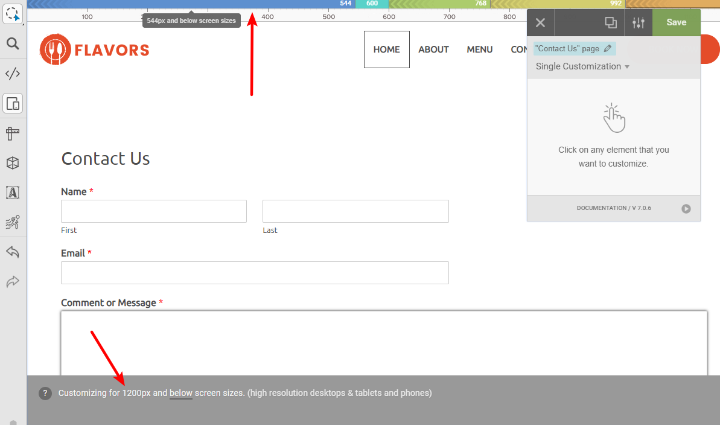
To edit a different device, you just click on one of the breakpoints at the top. That will give you a live preview of that device size.
But more than that – any style changes that you make in this mode will only apply to that device:
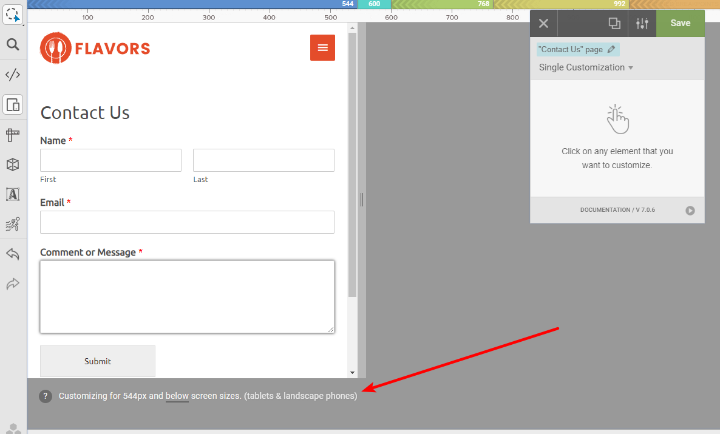
All in all, I like how YellowPencil has implemented its responsive controls. Being able to visually see the breakpoints on the ruler at the top is quite handy.
Wireframe Mode
Wireframe Mode helps you create the basic layout for your content. Essentially, it dims all the styling so that you can focus exclusively on positioning. And it also shows detailed sizing information whenever you hover over an element:
Again – pretty handy. You probably won’t use this mode a ton, especially if you’re a casual user. But it is nice to have.
Code Editor
If you ever want to work directly with code, you can open the full code editor to edit styles for:
- The specific post you’re editing
- The specific template you’re editing
- Your entire site (Global)
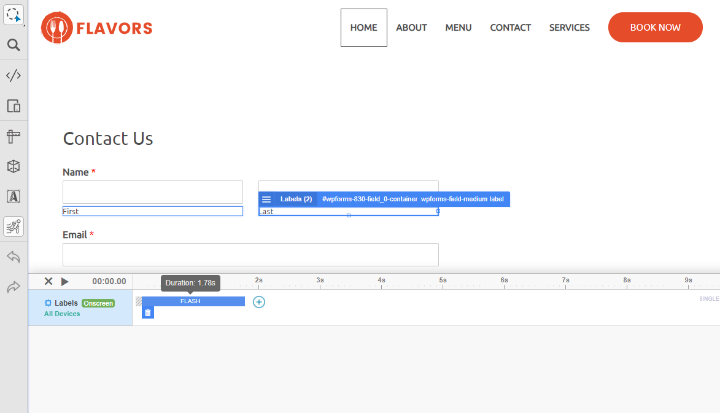
Animation Manager
If you’re using animations on your page, you can use the Animation Manager mode to see a timeline of all the animation events on that page. You can also use drag and drop to change the duration of an animation event, which is convenient:
Exploring The Other YellowPencil Settings
Finally, YellowPencil also gives you a few other helpful controls in its settings area.
In the Customizations tab, you can view all the custom CSS that you’ve added. And you can also export all of your CSS with the click of a button:
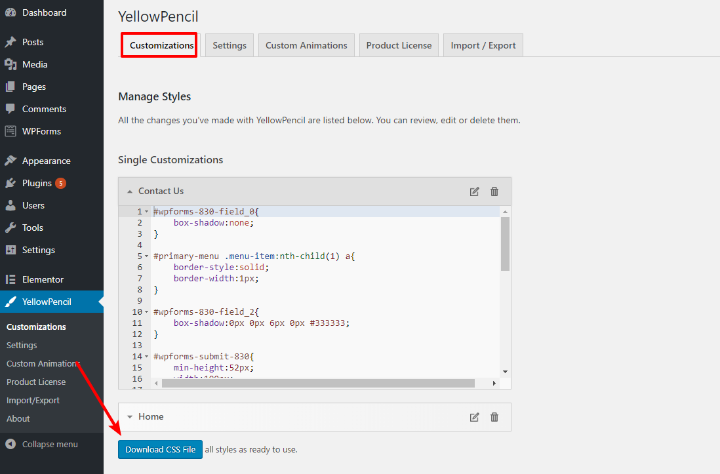
This means you’re never locked in and can stop using YellowPencil whenever you want.
And beyond that, the Settings tab lets you choose whether you want to include your custom CSS as Dynamic Inline CSS or a Static External CSS File:

How Much Does YellowPencil Cost?
The premium version of YellowPencil that I reviewed is available at CodeCanyon where it costs just $26 and has a 4.77 star rating on over 10,000 sales.
There’s also a Lite version available for free at WordPress.org if you want to test it out. It includes many of the basic features that you saw above, but doesn’t have quite as many options.
Still, that free version is a good way to play around with the plugin and see if you like it. Then, if you decide to go Pro, $26 isn’t exactly breaking the bank.
Final Thoughts On YellowPencil
YellowPencil is the best visual CSS customizer plugin that I’ve used from the perspective of a non-developer. If you’re a developer, you might want to check out CSS Hero as it has some neat developer-focused features in its newest version.
But for a regular user, I prefer YellowPencil because:
- The drag-and-drop positioning and resizing is super convenient.
- The responsive design mode is well done. And it’s also way easier for a casual user to grasp how breakpoints work in YellowPencil.
- You get lots of design controls for each element.
If you’re interested, head to WordPress.org to play around with the free version. And if you like it, consider purchasing the Pro version.
And if you want to learn some CSS yourself, check out our beginner’s guide to learning CSS for WordPress.