Airtable and WordPress are two of the most popular tools used by businesses and individuals for managing data and creating websites. Now, imagine being able to seamlessly integrate the two for even more efficient and powerful data management. With Air WP Sync, you can do just that.
Air WP Sync is a WordPress plugin that enables you to set up data and information in Airtable, then sync all of it to WordPress. This means you can use Airtable to develop custom websites powered by WordPress without having to rely on third-party connectors like Zapier.
But is Air WP Sync easy to set up and use? How many Airtable databases can I sync with this tool? Can it map data to WordPress custom fields?
In this hands-on review of Air WP Sync, I’ll answer these questions and show you how to use the plugin to streamline your workflows/processes.
Air WP Sync: Overview & Key Features
The USP of Air WP Sync is that you can use it to connect as many Airtable databases to your WordPress website as you like. More specifically, it lets you map data from Airtable to fields in WordPress—you can publish the data as WordPress pages, posts, or custom post types.
Air WP Sync maps to standard WordPress fields like data, title, category, etc. But if you need some advanced implementations, there’s support for custom field data mapping. You can also set up your own custom schedules for work and decide between syncing data automatically or manually.
Other salient features of Air WP Sync include:
- Preserves Airtable rich text formatting (e.g., headings, paragraphs, etc.)
Gives the option to select the post status of imported content (draft, private, published) - Provides custom post types for displaying any type of Airtable record in WordPress (events, case studies, etc.)
- Offers different sync methods (add, update, delete)
Hands-On With Air WP Sync
In this section, I’ll demonstrate how to create an Airtable WordPress integration with the help of Air WP Sync.
Before I begin, I should point out that I did the testing with the premium version of the plugin.
But even if you start with the free version, the basic steps should be the same.

Article Continues Below
Setting Up Data in Airtable
To begin, set up your data in Airtable. If you have done this already, you can jump straight to the next step.
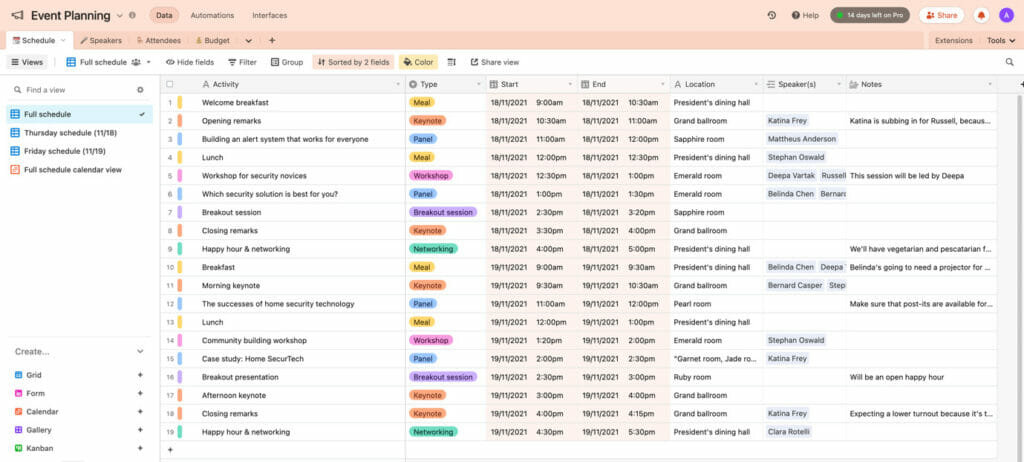
For this review, I used Airtable’s pre-made Event Planning template. With Air WP Sync, I was able to sync the event activities to WordPress so that each activity gets its own individual page.
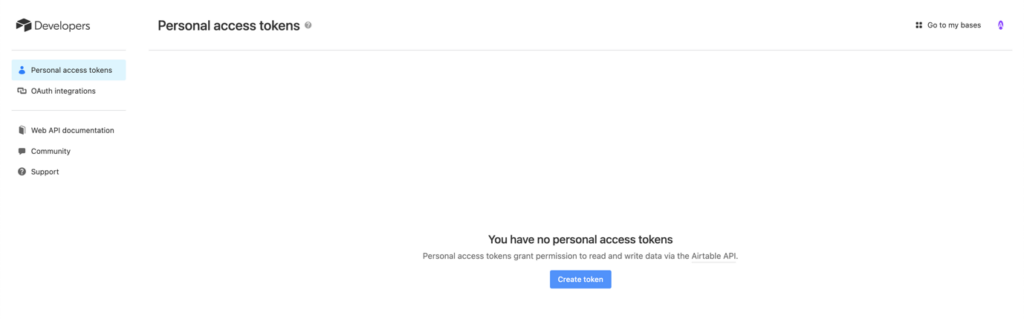
Generating Airtable Access Token
To connect the plugin to your Airtable account, you will need to generate what’s called an Airtable access token.
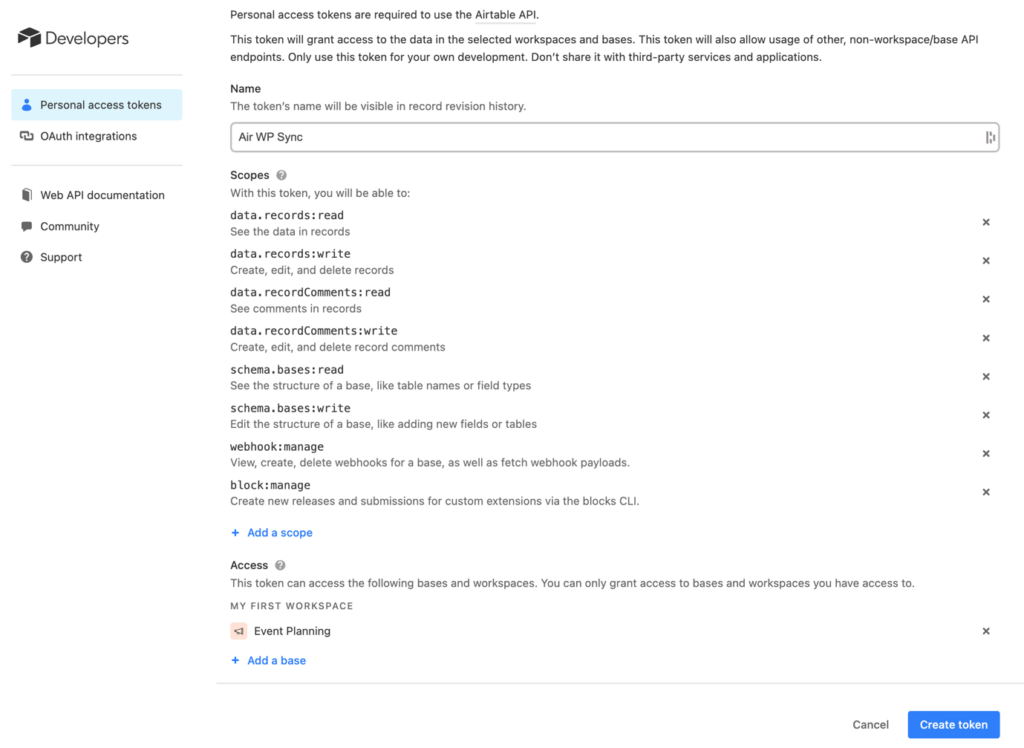
Follow the steps here to generate one and click the Create Token button:
Feel free to name your token for easy recall.
Next, add everything that appears under the Scope heading. Then, under Access, choose the Airtable bases you wish to connect to WordPress.
Once you have made your selections, click the Create Token button to generate your Airtable token.
Creating a New Connection in WordPress
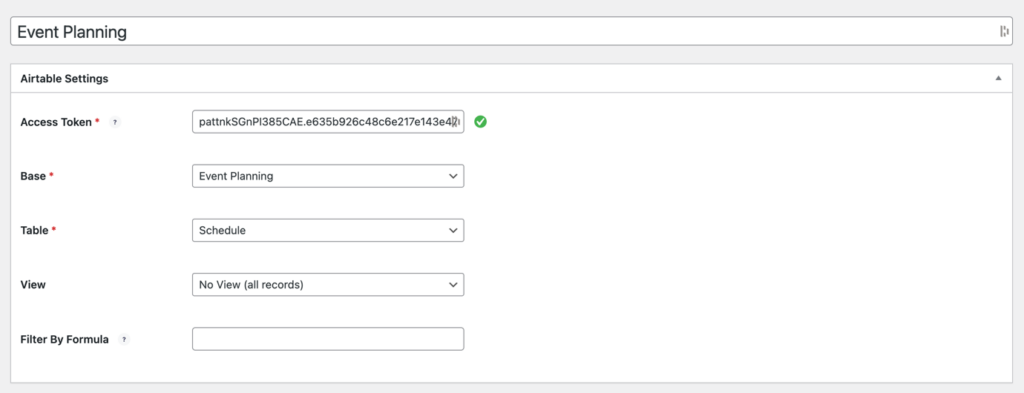
Next, go to your WordPress admin area and select Air WP Sync > Add New to create a new connection. Enter a name for it and then paste your access token in the box. Once you’ve done this, wait for Air WP Sync to gather relevant tables and bases (you don’t need to do anything at this point—the plugin will fetch everything automatically).
Moving on, choose what Airtable content to connect to by using the following options:
- Base – Select your base connection. Only the bases you selected while creating your token will be available for selection.
- Table – From the tables available in the selected base, select the one you want to work with.
- View – Select a certain view within the table. If you have multiple views for your data, select the one you want to use. Alternatively, you can choose the “No View” option to bring in all records.
- Filter by formula –This is an optional, advanced method for choosing what data to import. Here, you can enter an Airtable formula to set things up. I decided to skip this step because I didn’t know how Airtable formulas work.
Configuring Content Import Types
Next, select how you want to import Airtable content by scrolling down to Import As… options. Here, you can choose from the following:
- Post Type – Select the type of post you want to import. Options include Posts, Pages, Products, and any custom post types you’ve made. The plugin even includes a function to create a new custom content type directly from its settings.
- Post Status – You have the option to immediately publish the post or import it as a different status, such as Scheduled, Draft, etc.
- Post Author – Choose the author for the post from any user account registered on your website
Note that I imported the content as a standard post for this tutorial.

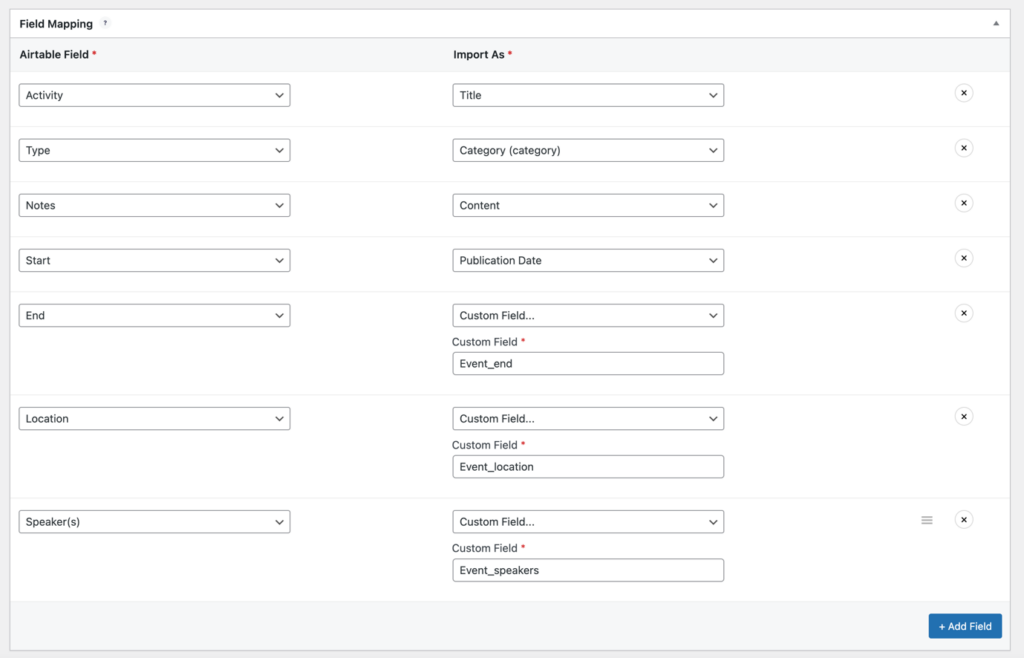
Next, you can set up field mapping to link the data from your Airtable base to fields in WordPress.
This feature supports core WordPress fields such as post title, post content, categories, etc., as well as custom fields. Advanced Custom Fields support is also available (ACF) in a Pro+ Version.
To get started, simply click the Add Field button.
Now, go through the following parts:
- Airtable Field – Select a column from your Airtable base.
- Import As – Select the corresponding WordPress field to which you want to add the data from that column. You can also create new custom post type and custom fields at this stage. The plugin can also automatically detect fields created with ACF or CPT UI or any CPT included in your theme.
For instance, to set the event activity as the title of the post, map it like this:

You can then map more data by repeating the process. With Air WP Sync, there’s no limit to the number of mapping rules you can set up.
However, the mapping rules might vary based on the Airtable field you connect. For instance, when choosing a column with images, you can map the images to the featured image in WordPress.
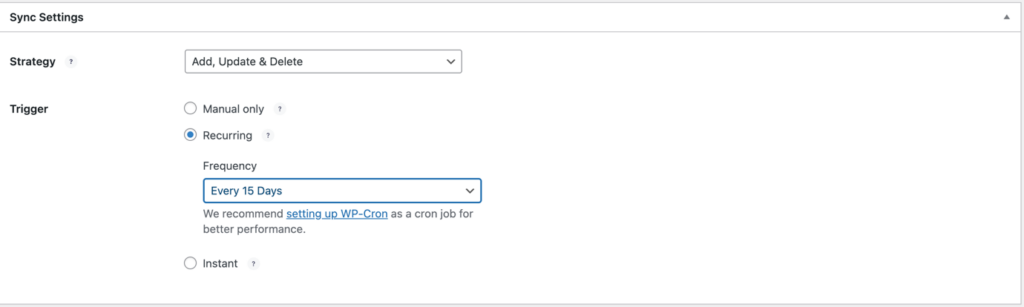
Configuring Sync Settings
Sync settings setup is next. Doing this lets you define when and how to sync data from Airtable bases to your WordPress site.
Here, you can pick from three methods for how to sync:
- Add, Update & Delete – This choice provides a comprehensive synchronization. New content will be added as needed, existing content will be updated if any changes occur in the base, and any WordPress content that corresponds to a deleted Airtable record will be removed.
- Add & Update – This option will add new content and update any existing content that has been altered in Airtable. However, existing content will not be deleted, even if it is no longer present in your Airtable base.
- Add – Only new content will be added, and no changes will be made to any existing WordPress content, even if it has been altered in Airtable or is no longer in your Airtable base.
After that, you get to choose from three options for your sync trigger:
- Manual only – Syncs content only when you initiate it.
- Recurring – Automatically syncs content based on your set schedule , which can range from once every 15 days to every five minutes.
- Instant – sets up real-time syncing by configuring an automation in Airtable to trigger a webhook URL. This allows you to automatically sync whenever you make changes in Airtable.
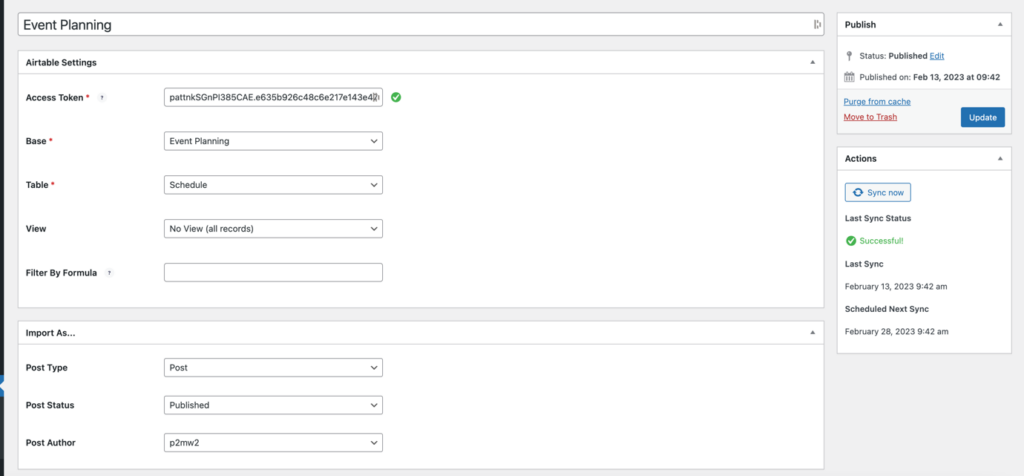
Publishing your connections
Once you’re satisfied with your connections’ settings, click Publish to go live. Air WP Sync also lets you manually sync the connection from the interface after publishing it.
After the sync ends, you should be able to see everything that you’ve imported, like I did:
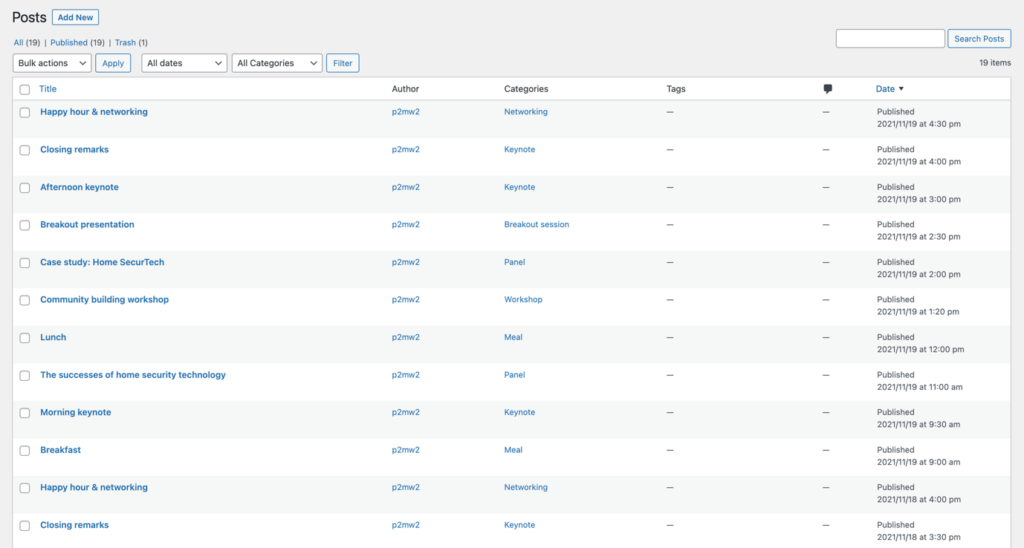
As you can see, I was able to import all of the event activities as posts on my site.
If you want to manage your connections, head over to Air WP Sync > All Connections. You can do this after you’ve published them.
Air WP Sync Pricing
Air WP Sync is a powerful plugin that is available in two versions: a free version at WordPress.org and a premium version with added features.
If you opt for the free version, you will be able to take advantage of the core functionality of the plugin, including building connections between your WordPress fields and Airtable data, and synchronizing your data manually or automatically.
However, the Pro version takes things to the next level. With it, you will be able to:
- Set your own custom update frequency for automatic data synchronization
- Publish unlimited connections from Airtable to WordPress (the free version limits you to only one active connection at a time)
- Publish Airtable data to custom post types rather than only the default Post and Page post types
- Build custom fields and sync Airtable data to WP custom fields
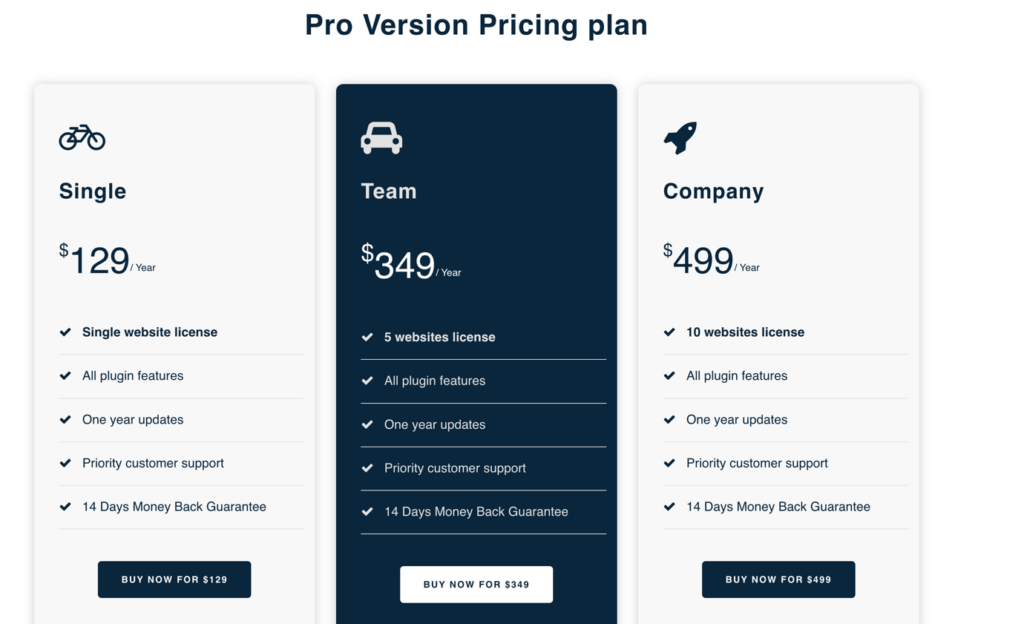
Pricing for Air WP Sync Pro starts at $129 per year for a single website license. If you want to use the plugin on more websites, you will need to get a higher-tier plan. Here are all the price plans:
The developer also offers ACF (Advanced Custom Fields) thanks to Air WP Sync Pro+.
Final Verdict
Overall, using Air WP Sync is a great way to build custom websites and manage your WordPress content better.
I think it does a great job at letting users sync and map data, as well as link Airtable columns to WordPress fields.
And with the premium version of this plugin, you get the ability to work with custom fields and custom post types.
Set up an Airtable WordPress integration today to save time and improve your work efficiency.