In this WooCommerce Stripe tutorial, you’ll learn how to integrate one of the world’s leading payment processing tools into your eCommerce website so that you can start accepting both one-off and recurring credit card payments with ease.
Why Stripe and not another popular payment gateway option like Authorize.Net, Amazon Pay, or PayPal?
Partly it’s because Stripe’s fees are some of the most affordable and straightforward in the market. The company charges a single flat fee of 2.9% plus 30¢ per card charge, with none of the sneaky service charges that other providers add in.
Party it’s because Stripe helps your website look the part. Sure, PayPal may not be difficult to install on your WooCommerce website, but it doesn’t exactly have the best reputation and it often leaves eCommerce sites looking somewhat amateur and unprofessional.
Mostly though, it’s because Stripe is a breeze to use. Within the space of less than half an hour, you can have it fully integrated into your WooCommerce store with no fuss, hassle or complications and start offering your customers a completely smooth and secure checkout process.
Here’s how it’s done:
1. Set Up SSL for Your Website
Ever noticed that some websites start with HTTP while others begin with HTTPs? The sites that show up as https are using what’s known as an SSL (Secure Sockets Layer) certificate, a handy piece of encryption technology that ensures any information exchanged between your website and a visitor is exchanged securely so that only the intended recipient receives it.
It’s for this reason that having SSL in place is a prerequisite for using Stripe with WooCommerce. The company makes it impossible to use their service properly, if at all, without it, so let’s start here.
Where to Get an SSL Certificate
Most domain registrars and web hosting companies will also offer SSL, with some even including them for free as part of your hosting plan. Otherwise, you’ll have to pay, though how much depends on which type of SSL you opt for.
Domain-validated SSL certificates are relatively cheap, often costing little more than $10 – $20. These are enough for small sites and will ensure your website displays ‘HTTPS’ in the browser.
Extended-validated certificates can cost upwards of $150 but are generally better for eCommerce stores as they require you to have a publically registered company and phone number, providing greater peace of mind and protection for your customers.
However, if you’re on a limited budget right now, you can also check out our guide to the best free SSL certificates and use one of those instead.
Setting up Your SSL
Each company that offers SSL will have its own method of activating your new certificate and deploying it on your website.
Personally, we love the effortless one-click approach used by SiteGround, though almost all brands will have their own step-by-step tutorial to make life easier for you.
Activating SSL on WordPress
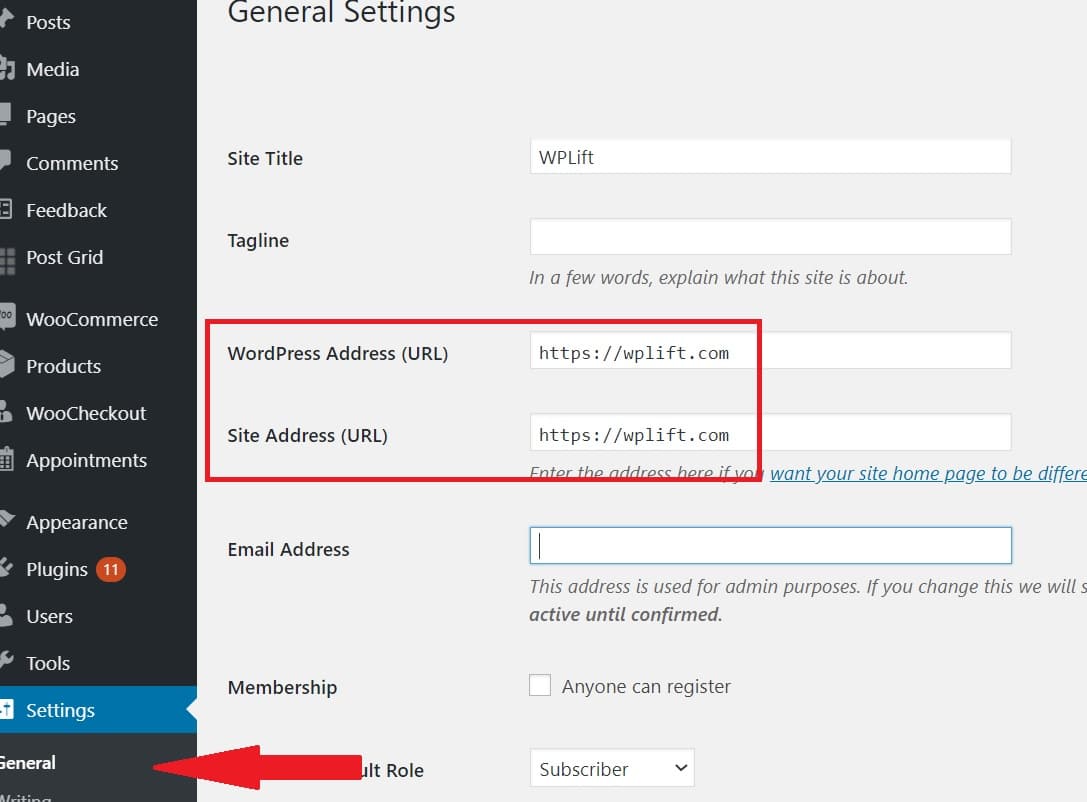
Once you have your SSL certificate in place, you need to tell WordPress to start using the ‘HTTPS’ version of your URL.
To do that, simply go to Settings – General from your dashboard menu, then change your website from ‘HTTP’ to ‘HTTPS’ in the relevant boxes as in the image above.
2. Sign up to Stripe

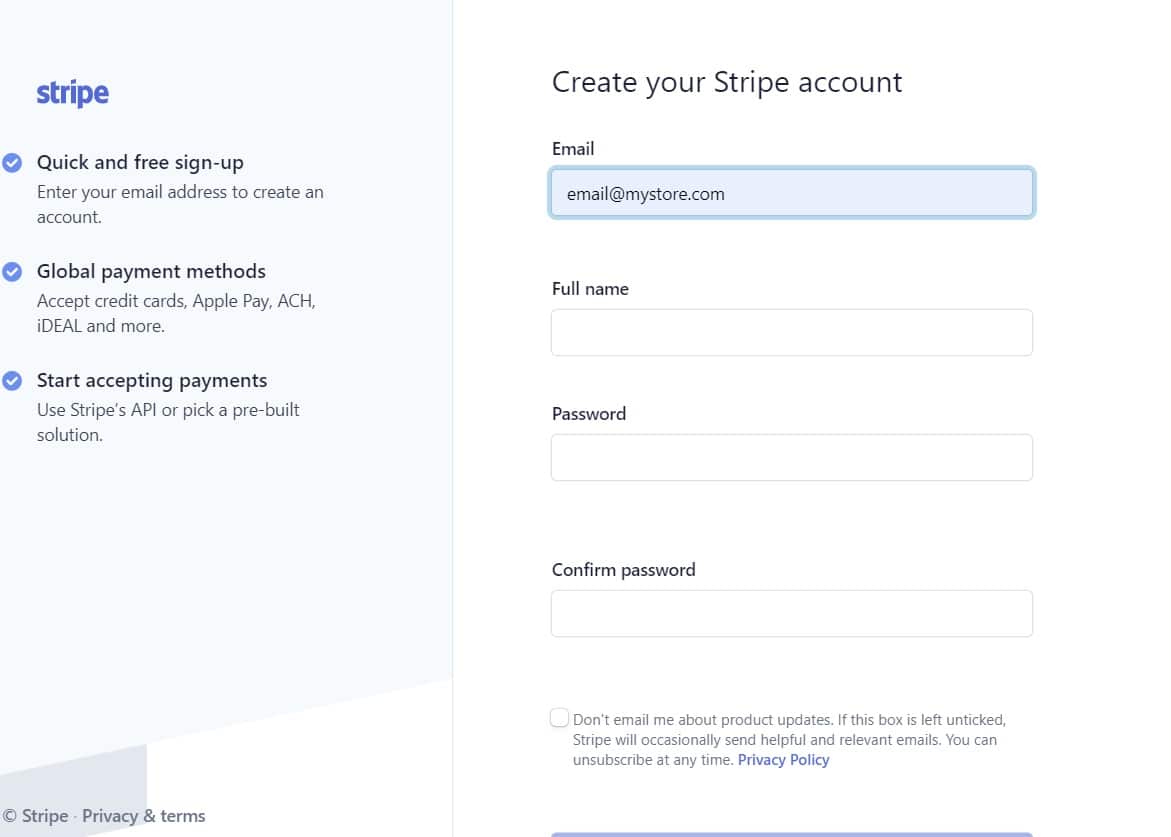
Proving our point that setting up Stripe on your website is as easy as can be, all you need to do to get started is head to the official Stripe website and click ‘Start Now’ on the home page.
Add in your name and email address, choose a password, and you’re good to go.
3. Activate Your Stripe Account
Once you’ve verified your email for security purposes, your next step is to activate your account by filling in key details about your business.
To do this, select ‘Activate your Stripe account’ from the main dashboard menu and then click ‘Start Now.’

- Your business structure (Sole trader/LLC etc.)
- Your contact details (or those of your business’ representative)
- Your bank details (for accepting payments)
- How your company will appear on customers’ bank statements.
You can also use this stage to set up two-factor authentification to protect your account.
Once all of that is done, your account is verified and activated and it’s time to get Stripe integrated into your website.
4. Download the Stripe Plugin for WooCommerce
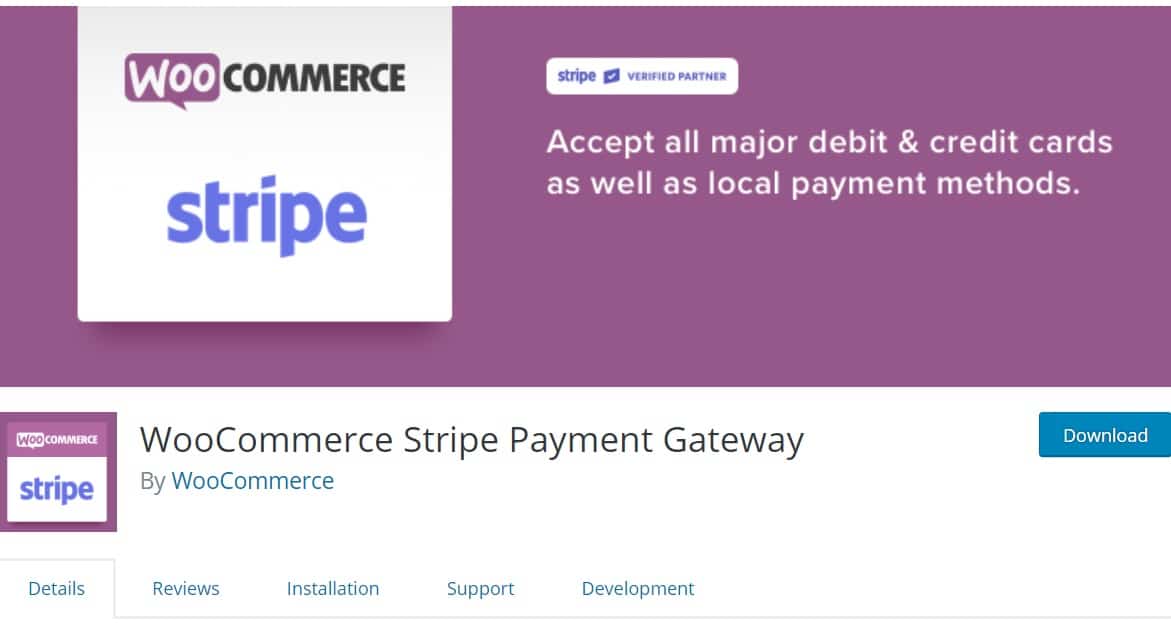
To do that, you’re going to need a plugin. Fortunately, the official WooCommerce Stripe Payment Gateway can be used for free.
As with all plugins, you can either download it from the WordPress Plugins Directory and manually install it on your website, or go to Plugins – Add New from your dashboard menu, then search for WooCommerce Stripe and install it that way.
Either method works just as well as the other.
5. Setting Up Your Stripe Plugin
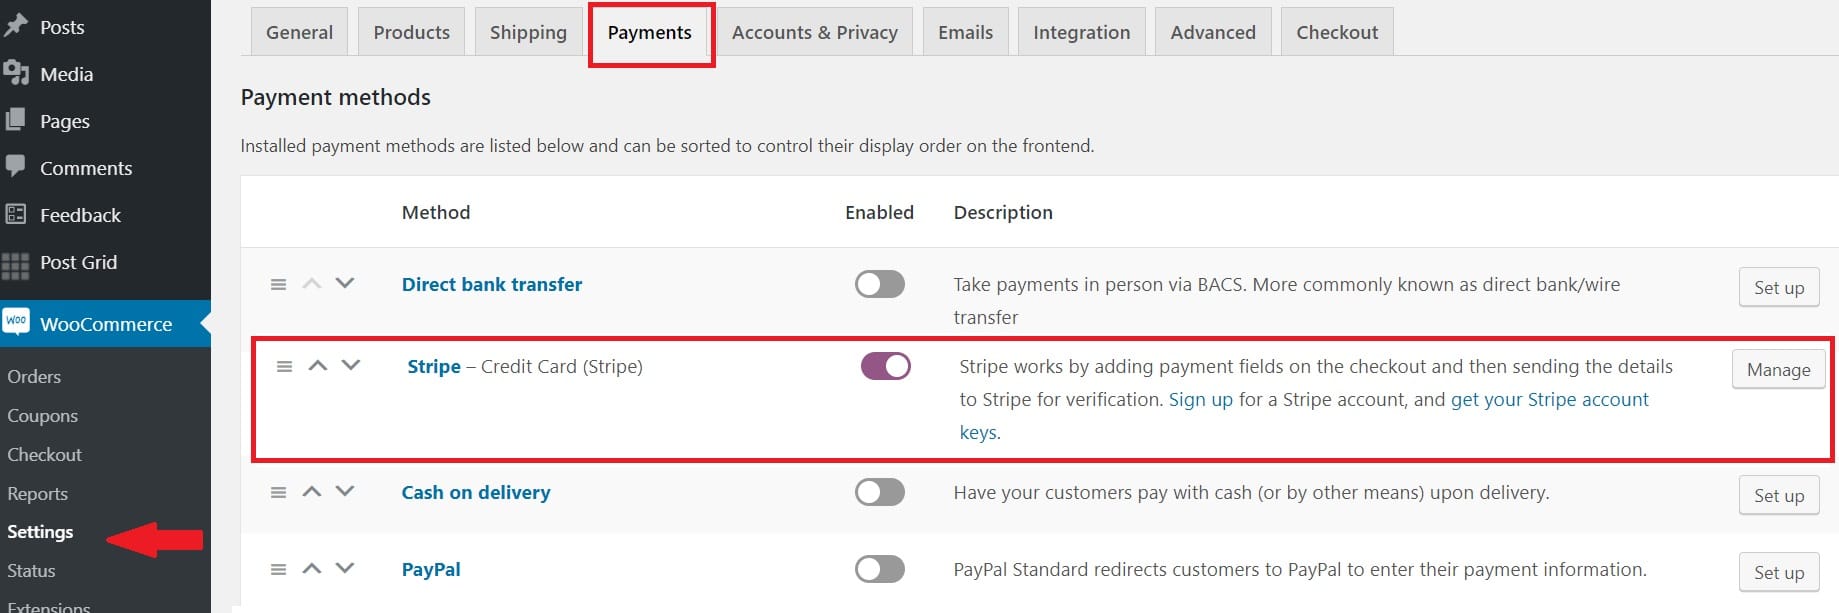
Once the plugin has been installed make sure it’s activated, then find the WooCommerce option in your dashboard menu and go to Settings – Payments.
As seen in the image above, this brings up a huge list of all the different payment methods you could potentially use to allow customers to pay you for your goods or services. This includes everything from direct bank transfer and cash on delivery to payment gateways like Stripe, PayPal, and SagePay.
Scroll down this list until you see Stripe, then toggle the switch to enable it.
Next, click ‘Manage.’
The first part of managing your Stripe integration is straightforward:
Just make sure Stripe is enabled and give it a title and description. This controls what your customers see during the checkout process. For the sake of simplicity, we kept our title and description as “Credit Card – Pay with your credit card via Stripe” so that users know exactly what this checkout option will allow them to do.
From there on in, things can seem a little more complicated, but trust us, they’re really much simpler than they look.
Add a Webhook Endpoint
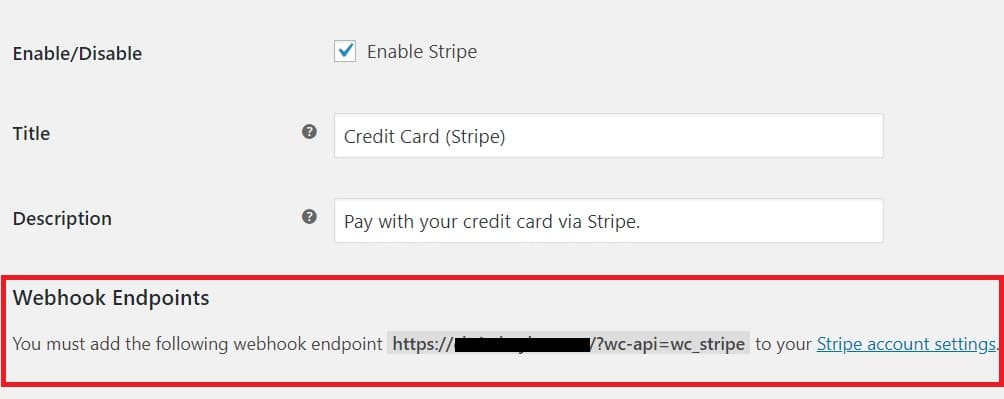
Webhook endpoints are used to enable the Stripe API to give you updates on the status of your payments and other important notifications. It sounds technical but really it’s just a case of copying the web address that Stripe provides (usually yourdomain.com/?wc-api=wc_stripe) and adding it to the Webhook Endpoints section of your account settings.
Stripe even provides you with a link directly to that section which opens in a new browser tab.
Follow that link, then click ‘Add Endpoint.’
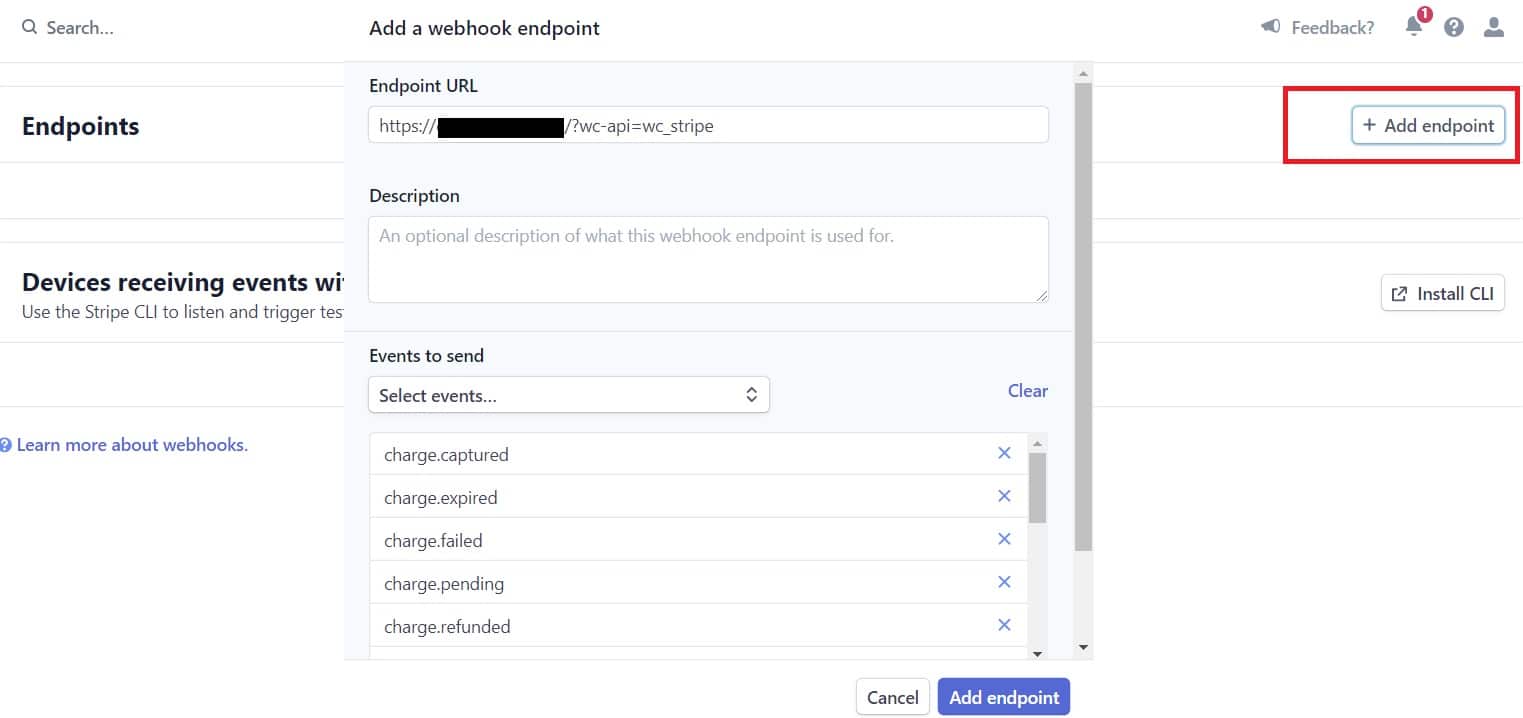
Paste the provided URL into the ‘Endpoint URL’ box, then choose the events that you want to receive notifications about (such as when new accounts are created or a payment fails). You can even add a description if it helps you to identify what that webhook is for.
Add Your Live API Keys

While still on the Stripe website, click ‘Home’ to return to the dashboard menu.
From there, find the box labeled ‘Get Your Live API keys.’ Copy each key in turn and paste it in the appropriate box back on the Stripe settings page on your website.

Additional Settings
With the API keys in place, you’re technically good to go, but there are a few more things you might want to configure in order to present the best possible checkout experience for your customers.
These include:
Inline Credit Card Form
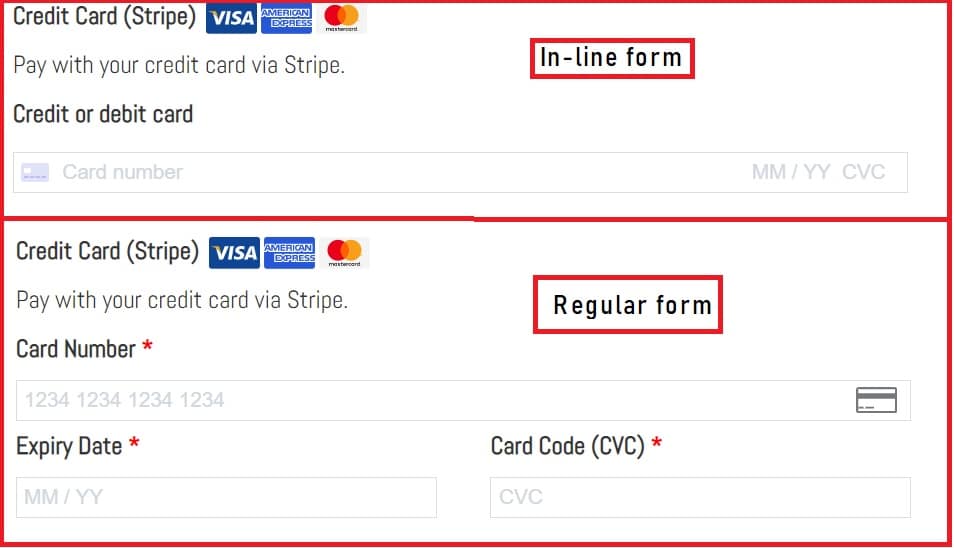
This box is unchecked by default. If you leave it that way, your credit card form will display separate boxes for the card number, expiry date, and CVC number. If you check it, your form will have one long, in-line box in which to add all those details.
Personally, we think the first version looks better. It’s much more in keeping with most credit card forms and is generally much less confusing, but you can always play around with it and see which one works best for you.
Statement Descriptor
Use this to write down how you want your business name to appear on your customer’s bank statements. You can leave this blank if you already set this up when activating your Stripe account.
Payment Capture
keep this box checked to capture the payment charge immediately. If you uncheck it, the charge will issue authorization and will need to be captured in under 7 days.
Payment Request Button Type, Theme, and Height
Choose the look of the button that users click to pay you. These three options allow you to set the color, size, and button text.
Saved Cards
Checking this option allows users to pay using one of the cards stored in the Saved Cards feature on Google.
Set up International Payments

If you’re planning to offer your products or services internationally, you’ll benefit from integrating Stripe with the most popular payment methods in other countries.
The platform is compatible with 12 different international payment methods including:
- Alipay – China
- Bacs Direct Debit – United Kingdom (regular payments)
- Bancontact – Belgium
- Cartes Bancaires – France
- EPS – Austria
- Giropay – Germany
- iDEAL – Netherlands
- Klarna – Europe and US (flexible financing)
- Multibanco – Portugal
- Przelewy24 – Poland
- SEPA Direct Debit – Single Euro Payments Area (regular payments)
- SOFORT – Austria, Germany, Belgium
- WeChat Pay (Beta) – China.
Setting this up is a simple 2-step process.
First, head back to the main Payments tab in your WooCommerce settings dashboard and scroll down until you see the payment method you want to set up.

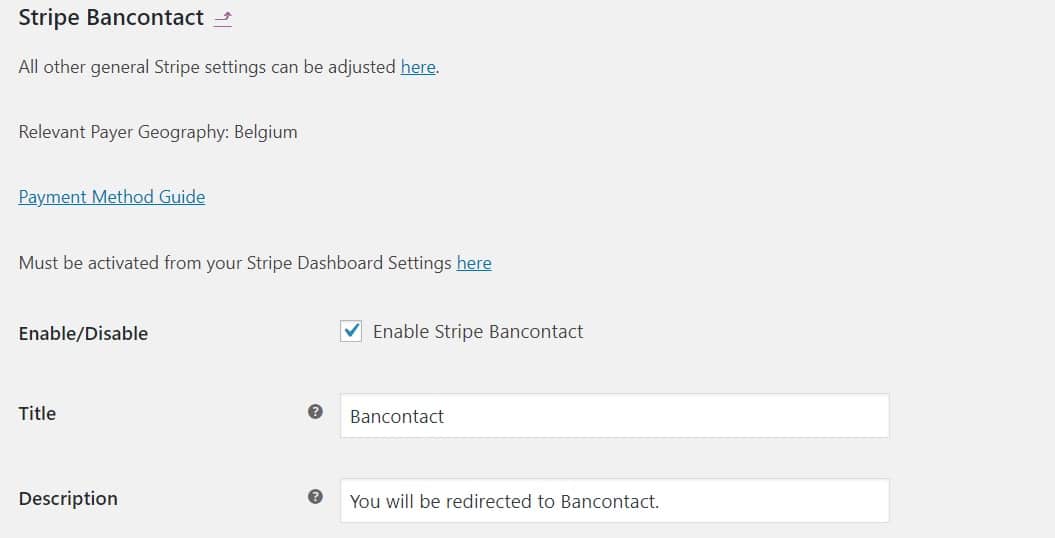
For the purposes of this tutorial, we’ll configure Bancontact so that we can see our products to our friends in Belgium.
Once you find the one you want, simply toggle the switch to enable it then click the setup button.
This allows you to change the title and description for this payment method if you wish to.
Next, log in to your Stripe Account and go to Settings – Payment Methods.
There, you’ll see the full list of available payment methods. Again, scroll down until you find the one you want. This time, click Activate.

It usually takes two or three minutes for the new payment to become fully activated, but once it does, you’re good to go. Some methods, such as SERPA direct debits, require you to add additional information before you can use them, but most are simply a case of activating it at the Stripe end and switching it on in your WooCommerce dashboard.
With that, you’re all done.
Frequently Asked Questions About Stripe Integration
Can I Use Stripe on My WordPress Website if I Don’t Have WooCommerce?
Yes. Although using both tools together tends to be the best option, you don’t actually need WooCommerce to make use of Stripe.
See our guide to accepting Stripe payments on your regular WordPress website for a complete step-by-step tutorial.
What Payment Types Does Stripe Accept?
Stripe accepts all major cards used in the country you’re based in such as American Express, JCB, VISA, VISA Debit, Mastercard and discover. It also allows you to accept international payments by integrating other payment methods and is compatible with services like Apple Pay.
What’s a Good Alternative to Stripe for WooCommerce?
Though we’re adamant that Stripe is the best payment gateway for WooCommerce, there’s no reason why you couldn’t use something else if you decide it’s not quite working for you.
Choosing the best alternative to Stripe all comes down to the needs of your business and, of course, those of your customers. If you’re planning to reach a global audience, then Authorize.Net does a great job of managing international payments but is pretty expensive. The Authorize.Net WooCommerce plugin alone costs $79 and there’s also a monthly gateway fee of $25 plus a fee of 2.9% + 30¢ per transaction.
If you’re just starting out and you want to make a great impression on customers, Amazon Pay is a great way to go. Its instantly recognizable brand inspires customer confidence while the actual checkout process is very similar to the one used on the world’s biggest online store. It’s much cheaper than Authorize.Net too, with no monthly gateway and the standard processing fee of 2.9% + 30¢ for US domestic transactions and 3.9% for international ones.
Stripe and WooCommerce: A Winning Combination for Processing Payments
Stripe may not be the only payment processing option out there, but in our opinion, it’s hands down the best.
Unlike Authorize.Net and similar plugins, there’s no monthly gateway fee or hefty price to pay just to download the plugin, nor does it suffer from the same low-grade reputation that can often put people off from using PayPal.
What we like best about it, however, is that it’s just so simple to use.
You may have read elsewhere that Stripe is a technical platform best left in the hands of expert web developers. While that may have been the case once upon a time, the arrival of the WooCommerce Stripe Plugin made the whole thing accessible and easy to use even for novice WordPress users.
As you’ll see in the above tutorial, the only aspect of integrating Stripe into your WooCommerce setup is configuring the API keys, and even that is as simple as copying and pasting them from one place to another.
Otherwise, what you’ve got here is an excellent tool that not only takes out all the hassle and hard work of accepting card payments via your website but also guarantees a smooth, secure checkout experience for your customers.


