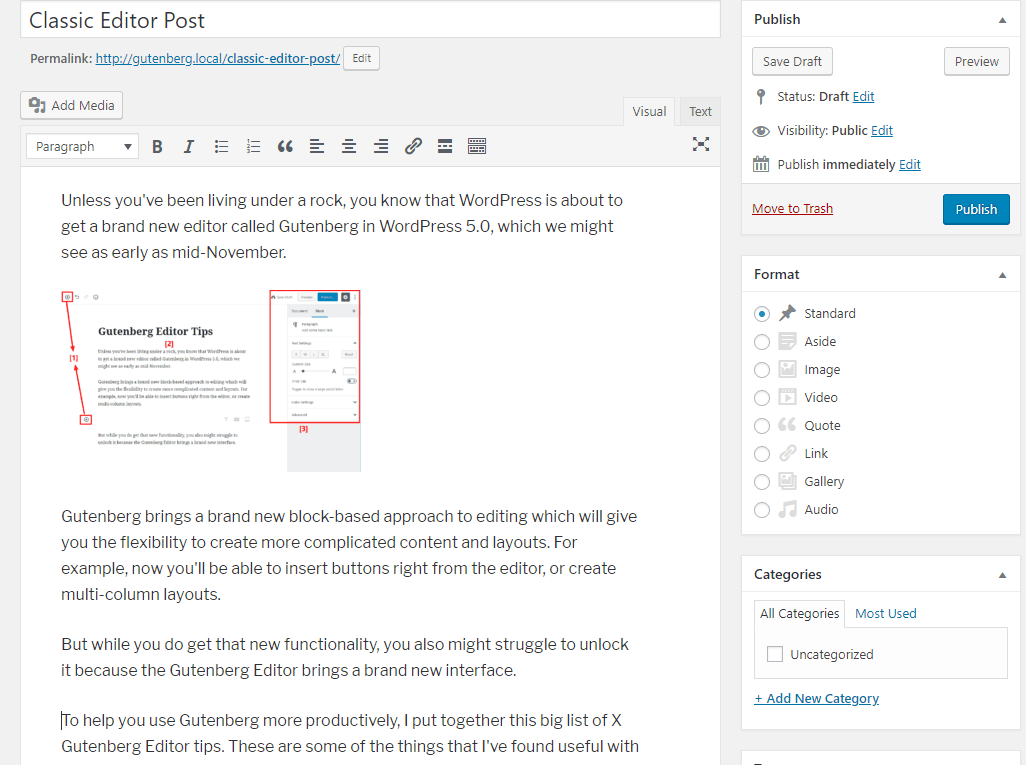
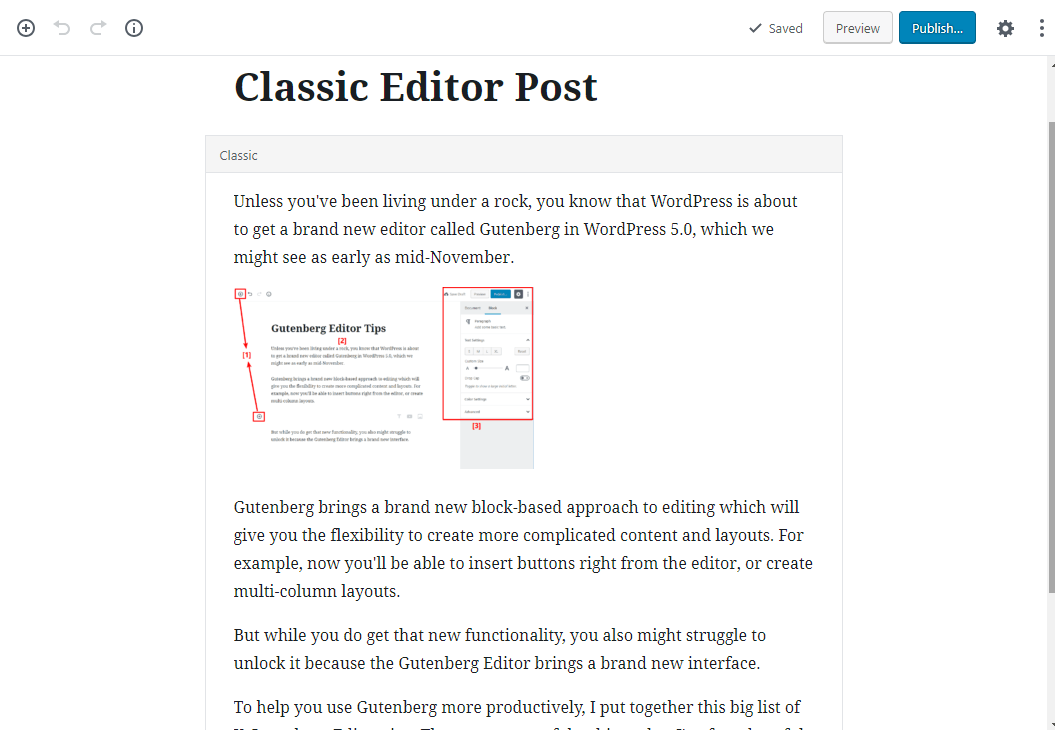
Unless you’ve been living under a rock, you know that WordPress is about to get a brand new editor called Gutenberg in WordPress 5.0 (a release which we might see as early as mid-November).

Gutenberg brings with it a brand new block-based approach to editing which will give you the flexibility to create more complicated content and layouts. For example, now you’ll be able to insert buttons right from the editor or create multi-column layouts without the need for a page builder.
But while you do get that new functionality, you also might struggle to unlock it because the Gutenberg Editor brings an unfamiliar interface, as well.
To help you use the Gutenberg Editor more productively, I put together this big list of 20 Gutenberg Editor tips. These are some of the things that I’ve found useful based on my own hands-on experience with already using Gutenberg on production websites.
If you haven’t tried Gutenberg already, head to WordPress.org and play around with the live demo. Then, once you’ve got your feet wet, keep reading for 20 Gutenberg Editor tips to help you work more productively.
20 WordPress Gutenberg Editor Tips To Help You Work More Productively
These are in no particular order, though I will start with some more general tips and then get into more narrow features.
1. Learn Where Everything Is In The Gutenberg Editor
Ok, this one isn’t a single tip, but it’s important to have a good understanding of where everything is in the Gutenberg editor. Here’s a quick graphic to help you get started with the core interface parts:
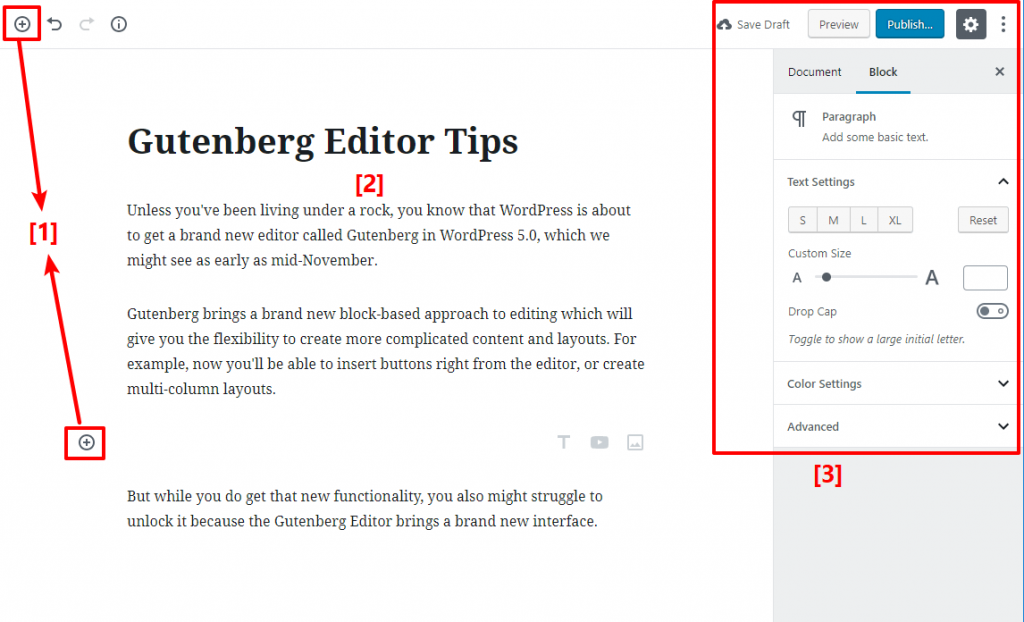
- These buttons let you add new blocks to Gutenberg. While they’re helpful for seeing all the available blocks, I’ll actually show you a quicker way to insert blocks in this article.
- This is the body of the editor. At the top, you have your post/page title. And below that, you have the actual content.
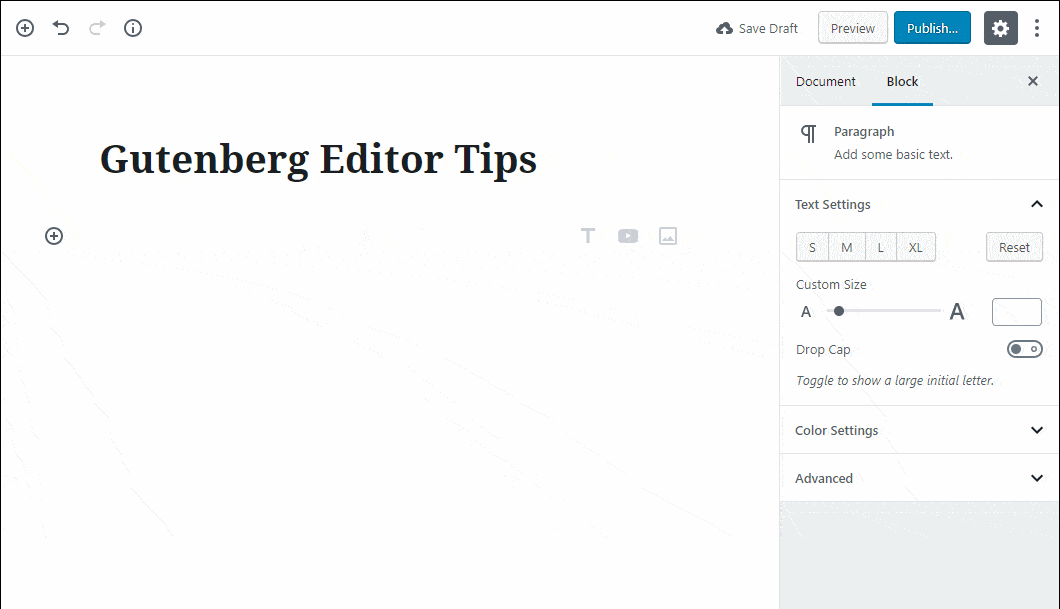
- This area lets you perform a lot of the same actions that you perform in the sidebar of the current editor. The big difference is that if you select a block, it will switch to let you edit that block.
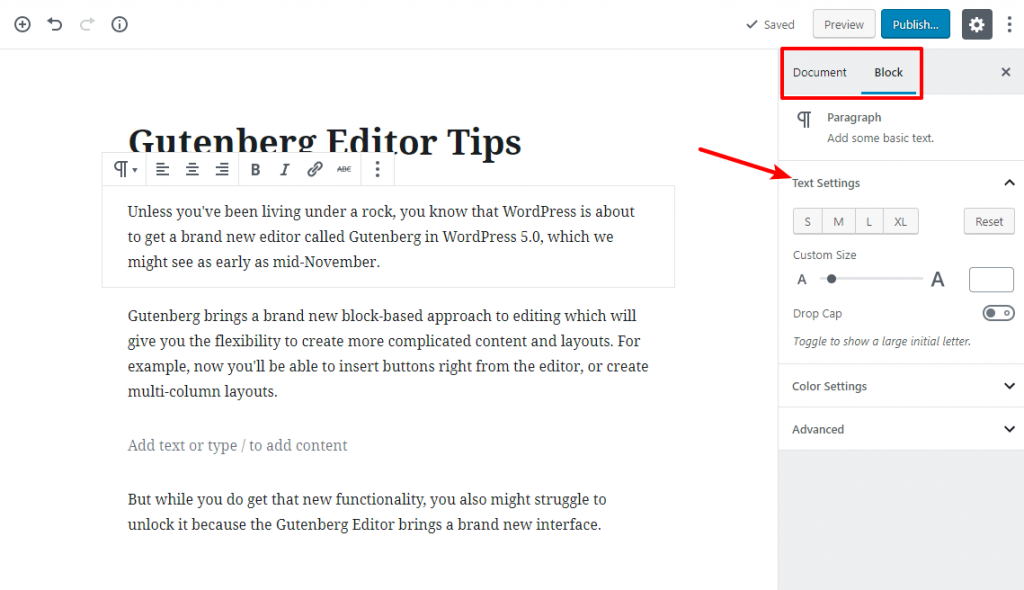
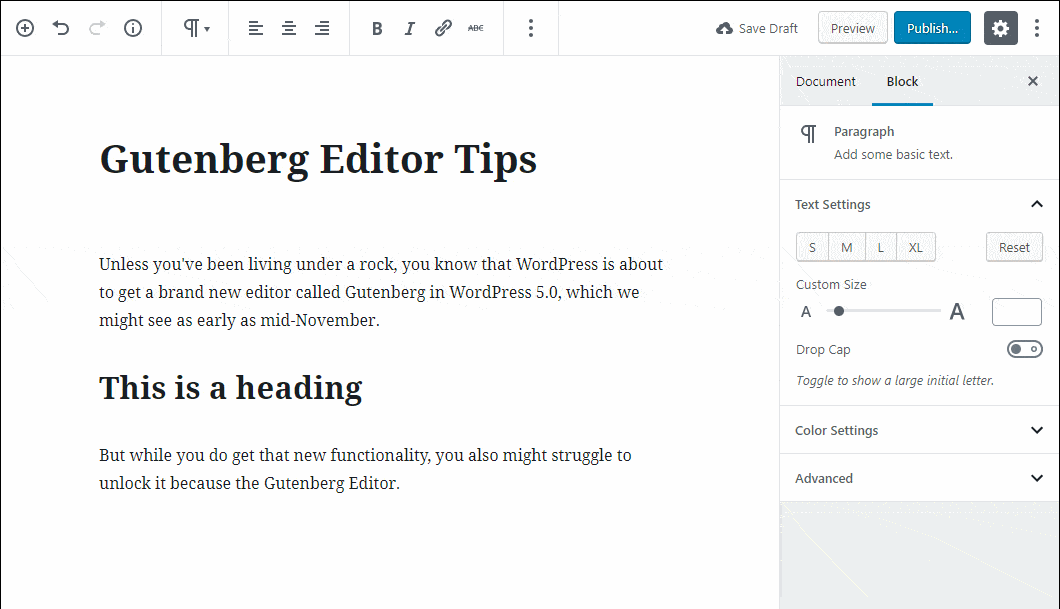
Here’s an example of that third point. If you click on one of the paragraph blocks, it will switch to the Block tab and give you options for text size, colors, drop cap, etc. To get back to the other settings, you can either click out of the block or manually select the Document tab:
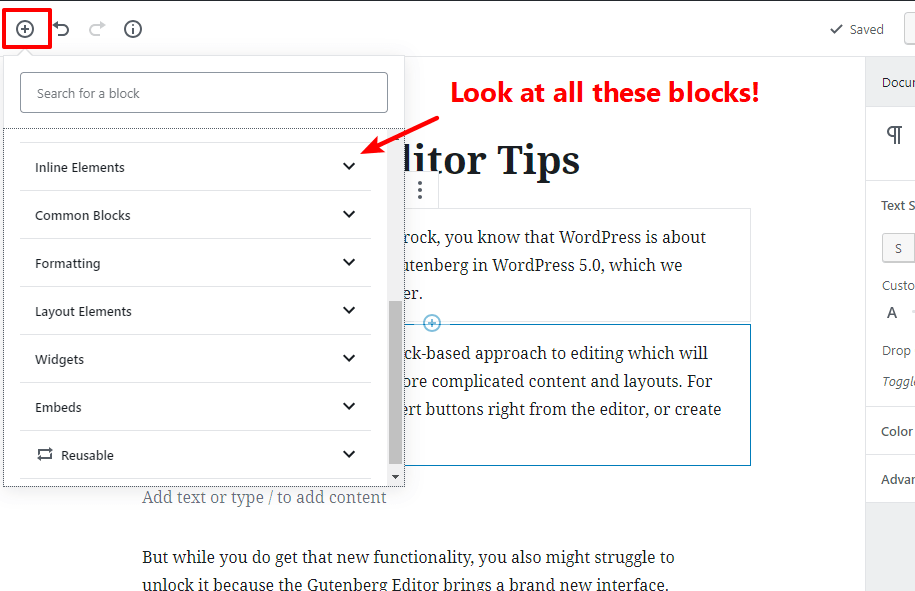
2. Take Advantage Of The New Content Blocks
One of the big advantages of Gutenberg is the new content blocks. You’ll be able to insert content types that were never possible in the TinyMCE editor (or that would’ve required a third-party plugin or your own custom HTML).
I won’t cover every single option, but I highly encourage you to browse the full block list. Some of the cool new things that you can do are insert:
- Buttons
- File downloads
- Cover images
- Etc.
Some of your favorite plugins will also probably create their own blocks, so make sure to check for those as well. For example, if you have a gallery plugin, it will probably create a dedicated gallery block for you.
3. Use Slash “/” To Quick Insert Blocks
Ok, let’s start getting a little more specific now. While those + icons are good for being able to browse all the available blocks, they make it pretty slow to insert new blocks. It’s a lot of extra mouse clicks. And over a whole post, that’s a lot of wasted time.
So – if you already know which block you need, there’s a much quicker way to insert it. Just type “/” and then start typing the name of the block.
As you type, Gutenberg will autosuggest blocks that match. Then, you just need to hit “Enter” to insert the block:

4. Insert Images By Dragging Them From Your Desktop
Here’s another time-saving feature that I love. Rather than inserting images by manually creating a new image block for each image and uploading the file to your Media Library, you can simply drag images straight from your desktop into the Gutenberg editor interface at the exact spot you want to appear.
Then, Gutenberg will automatically upload the image to your Media Library and insert it at that spot.
It’s pretty simple – you just need to make sure that you see the “blue line” while you’re dragging in your images, otherwise it won’t work:
Based on my experience so far, this one has been the biggest time-saver that I’ve found.
5. Learn The Gutenberg Editor Keyboard Shortcuts
I love keyboard shortcuts. And if you like working productively, you should too!
While most generic keyboard shortcuts will work in Gutenberg (e.g. Ctrl + B for bold), Gutenberg also comes with its own set of dedicated Gutenberg Editor keyboard shortcuts that you can use to save time.
To view a full list, you can use the Shift + Alt + H shortcut:
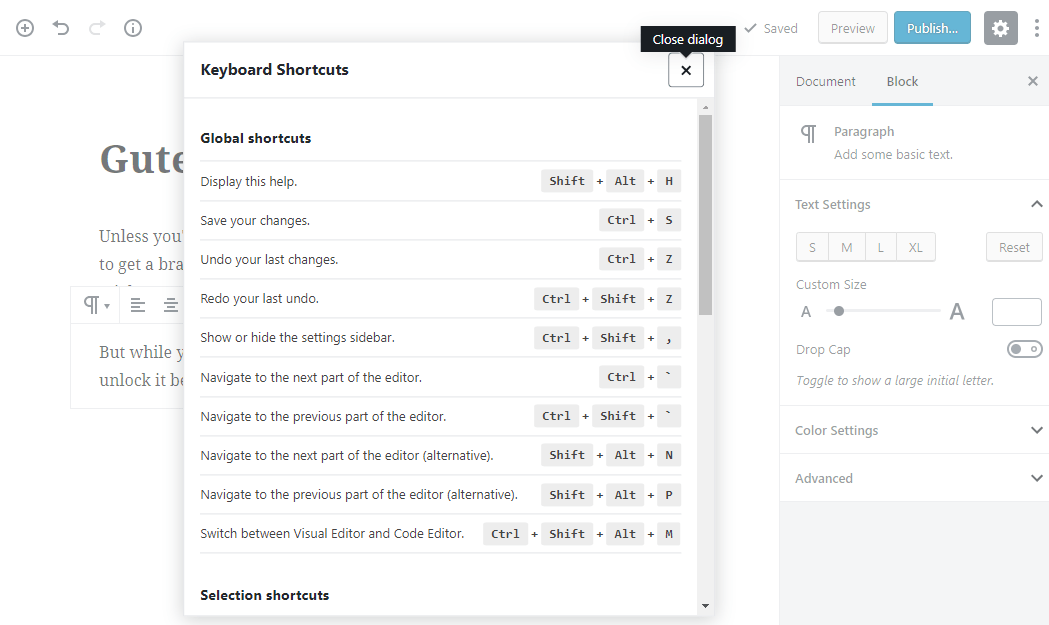
I recommend browsing the full list. But here are three of the Gutenberg keyboard shortcuts that I’ve found most useful so far:
- Ctrl + Alt + Backspace – delete the select block (this is really helpful – otherwise, you need to click multiple times to delete a block).
- Ctrl + Alt + T – insert a new block before the selected block.
- Ctrl + Alt + Y – insert a new block after the selected block.
Beyond those keyboard shortcuts, you can also use some markdown syntax. Here are some of the markdown syntax inputs that work in Gutenberg:
- ## to create a heading
- 1. to create an ordered list
- * to create an unordered list
- > to create a quote
For example, to create an H2, you’d type “##” and then hit space. Then, Gutenberg will automatically activate the heading block.
See it in action:
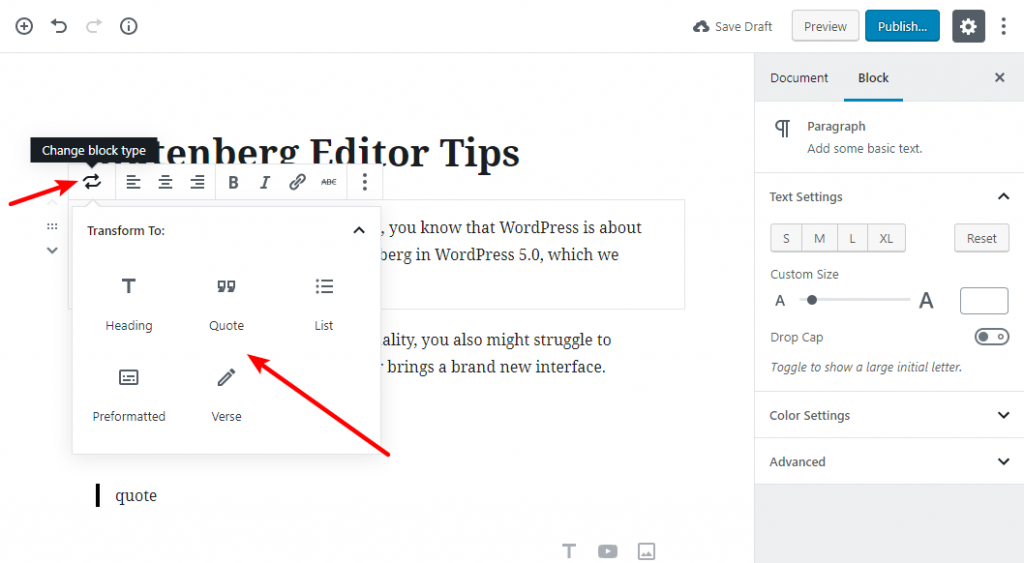
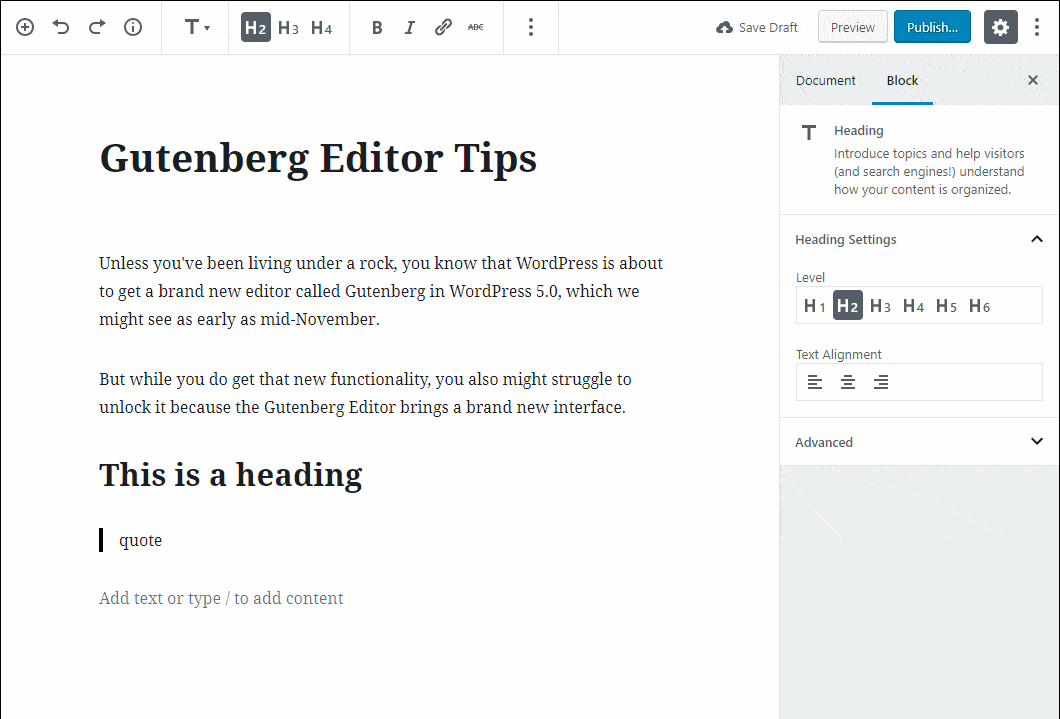
6. Transform Blocks Into Different Blocks
Rather than inserting a block for each different type of content, you can also save time by converting one block to another type of block after the fact.
This is most useful with text. For example, you can transform regular paragraph blocks into:
- Headings
- Quotes
- Lists
- Preformatted Verse
But you can also convert other block types – like turning a regular image into a cover image.
To access the transform options, you use the toolbar:
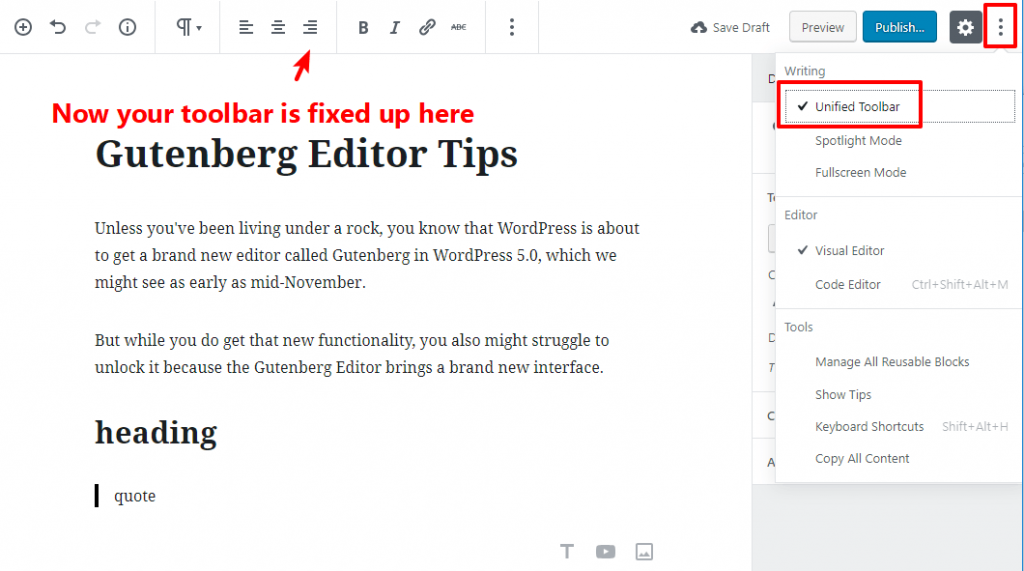
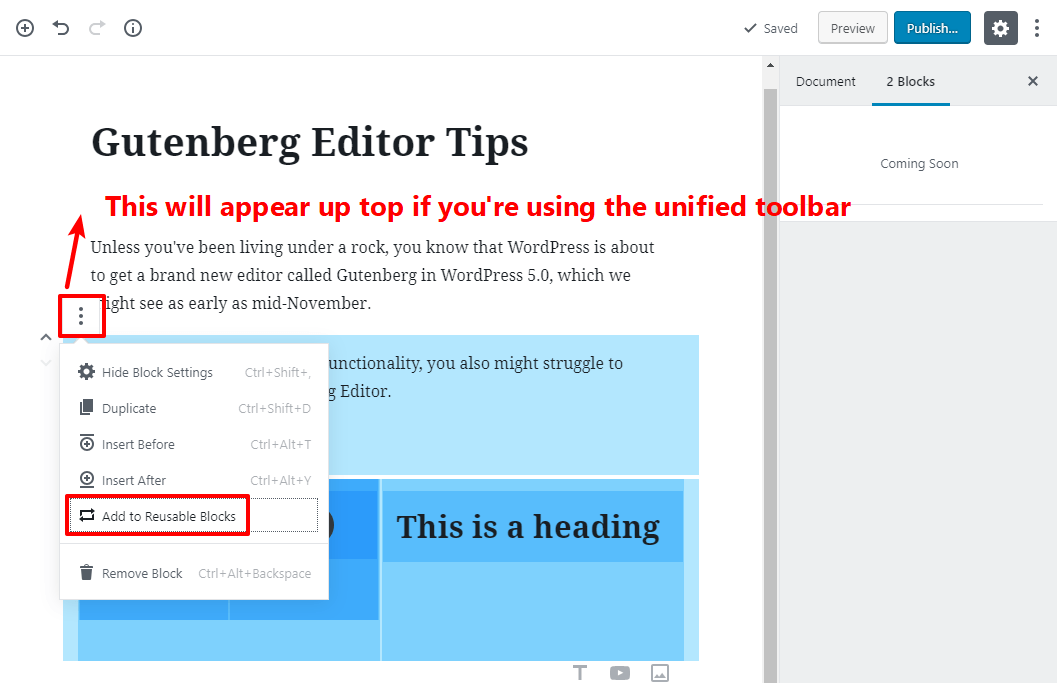
7. Add A Fixed Toolbar For Easier Formatting
Speaking of the editing toolbar…
A lot of people don’t like how the Gutenberg toolbar blinks in and out of existence as you change between blocks.
If that annoys you, Gutenberg lets you turn on a fixed toolbar mode which makes the toolbar always-accessible at the top of the editor.
You can turn this mode on by using the three dots in the top-right corner and selecting Unified Toolbar:
8. Use Drag-And-Drop To Rearrange Your Blocks
With the old editor, you had to use cut and paste to rearrange your content. While you can still do that if you want, a more convenient way is to use Gutenberg’s built-in drag-and-drop layout controls.
Yes – you can drag and drop any Gutenberg block to a new location. To turn on drag and drop mode, you need to hover over the block and then hover over the six dots icon on the left:
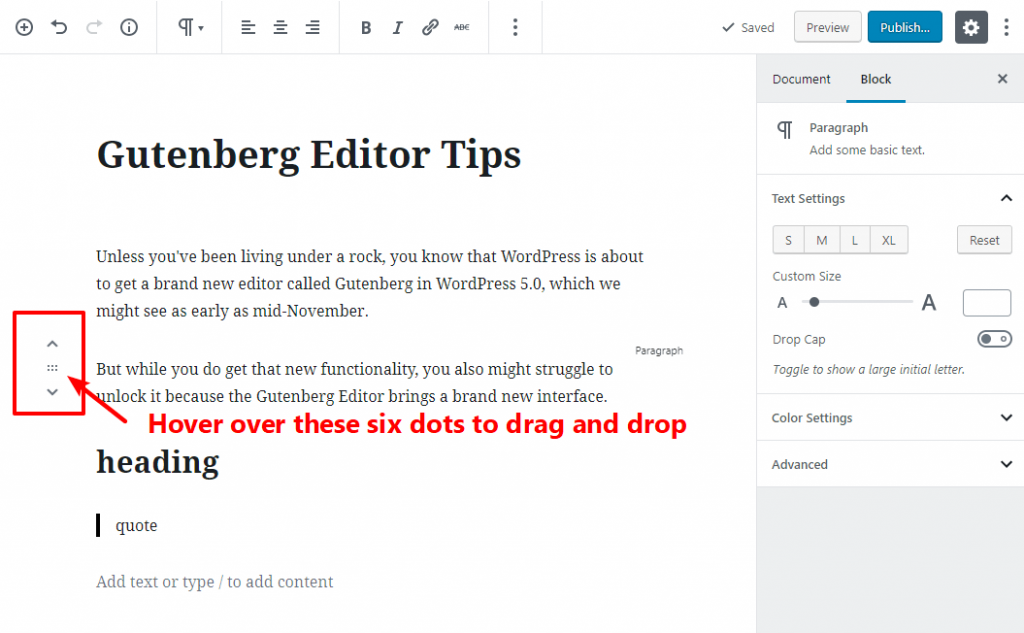
You can also use the up and down arrows to move blocks up or down one space.
Then, just click and drag:
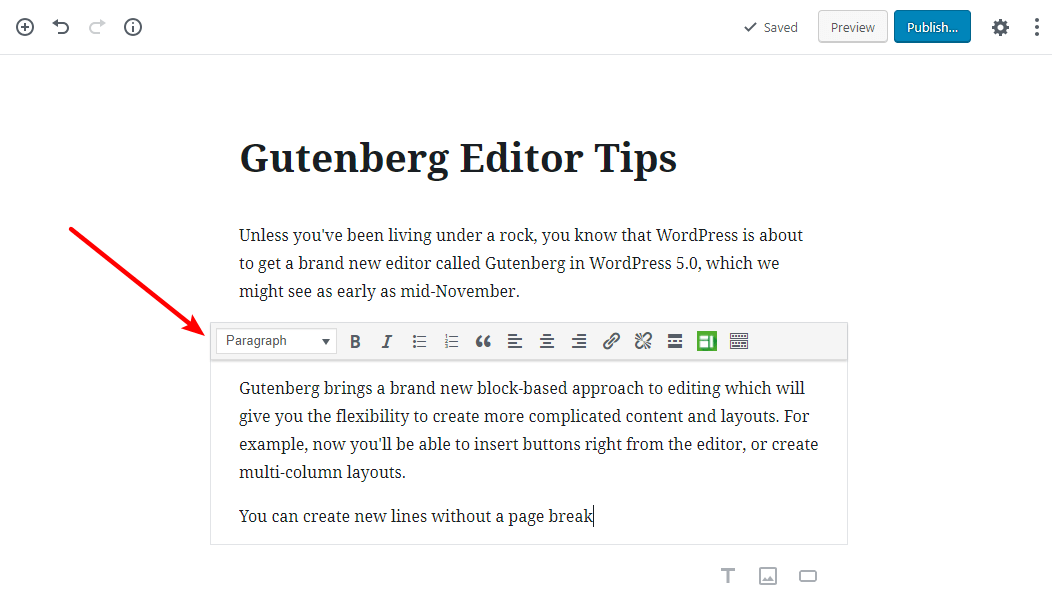
9. Use Shift+Enter For Line Breaks Without A New Block
Want to start a new line of text without creating a new paragraph block? Easy – just use Shift + Enter instead of a regular Enter:
10. Create Columns With The Columns Block
Beyond new content blocks, Gutenberg also lets you get more creative with your content’s layout in the form of the Columns block.
Once you add the Columns block, you’re able to add other blocks inside it to take advantage of the new layout. You can also nest more Columns blocks inside other Columns blocks to create more separation.
For example, here’s a “25% – 25% – 50% layout:
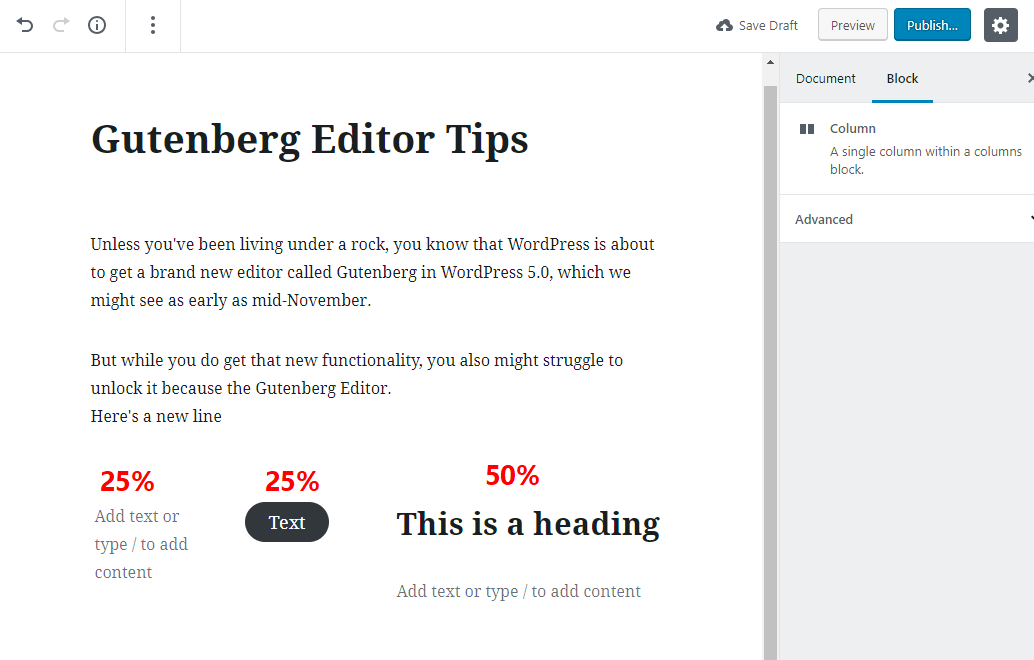
To create that, I just added another Columns block inside the left column of the existing Columns block.
While the default Columns block is functional enough, it’s pretty basic and doesn’t give you a ton of control over the column arrangement. If you want more control, check out the free Kadence Blocks plugin, which I featured in my post on Gutenberg Editor block plugins.
11. Use Third-Party Blocks Plugins To Get Access To More Content Blocks
Speaking of third-party plugins, you can also find plenty of other plugins that add both content blocks and layout blocks. I collected some of the best in this post.
With them, you’ll get dedicated Gutenberg blocks for:
These third-party blocks plugins are one of the coolest things about Gutenberg, so don’t miss out on them!
12. Create Reusable Block Templates To Save Time
Reusable block templates are a super cool Gutenberg feature that can save you a ton of time.
Let’s say you have a certain configuration of blocks that you’ll need to reuse in the future. Maybe it’s a nice column layout for a CTA or an expert quote – it doesn’t matter.
Rather than needing to assemble that layout every time, Gutenberg lets you save any set of blocks as a reusable block template.
First, you need to select all of your blocks (just click and drag like you would to select text in the current editor).
Then, click the three dots icon (if you’re using the Unified Toolbar, this icon will appear up there instead). From the drop-down, select Add to Reusable Blocks:
Then, you can give the block template a name:
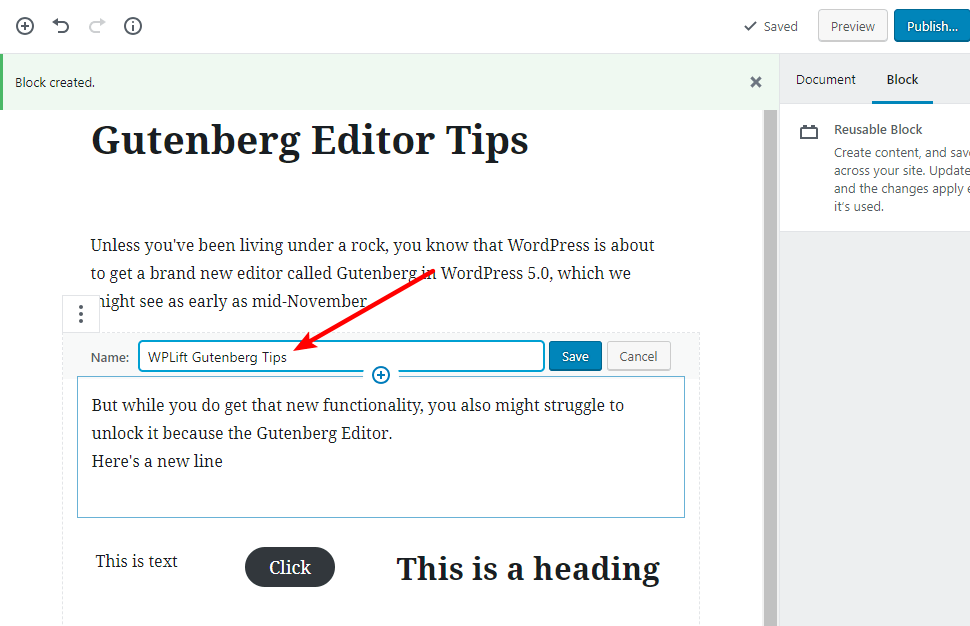
And from then on, you’ll be able to insert the entire block template just like any other Gutenberg block:
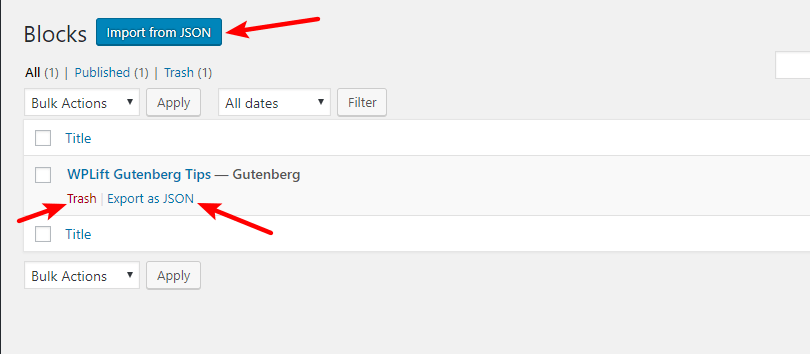
The cool thing is that you can also import/export block templates as JSON files to use them on other sites.
To access your blocks, click on the Three Dots icon in the top-right corner. Then, select Manage All Reusable Blocks.
That will take you to an area where you can:
- Import block templates from a JSON file
- Delete block templates
- Export block templates as a JSON file
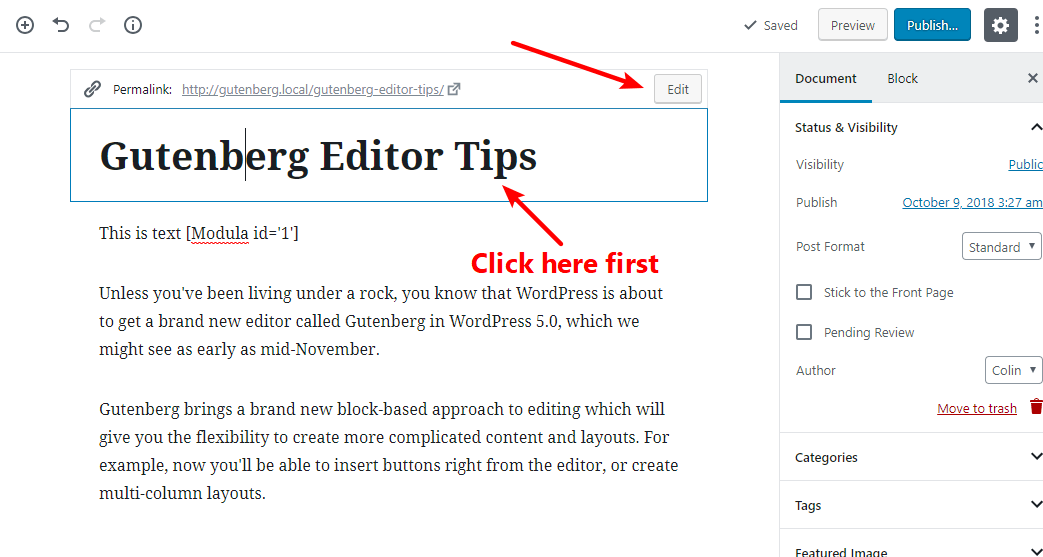
13. Edit Your Post’s Slug (It’s Hard To Find)
Controlling most back-end post settings (categories, featured image, etc.) is pretty simple because the Gutenberg sidebar is very similar to the current WordPress editor.
One thing that isn’t intuitive, though, is choosing your post’s URL slug. It took me a while to find – so here’s a tip to help you avoid the issue.
To edit the URL slug in Gutenberg, first click on the title. Then, you’ll be able to edit the URL slug:
14. Take Advantage Of The New Full-Width Image Alignment
If you have a Gutenberg-compatible theme, you’ll be able to create these awesome full-width images that stretch across the entire page.
All you need to do is select the Full width alignment (again, you’ll only see this option if your theme is Gutenberg-ready):
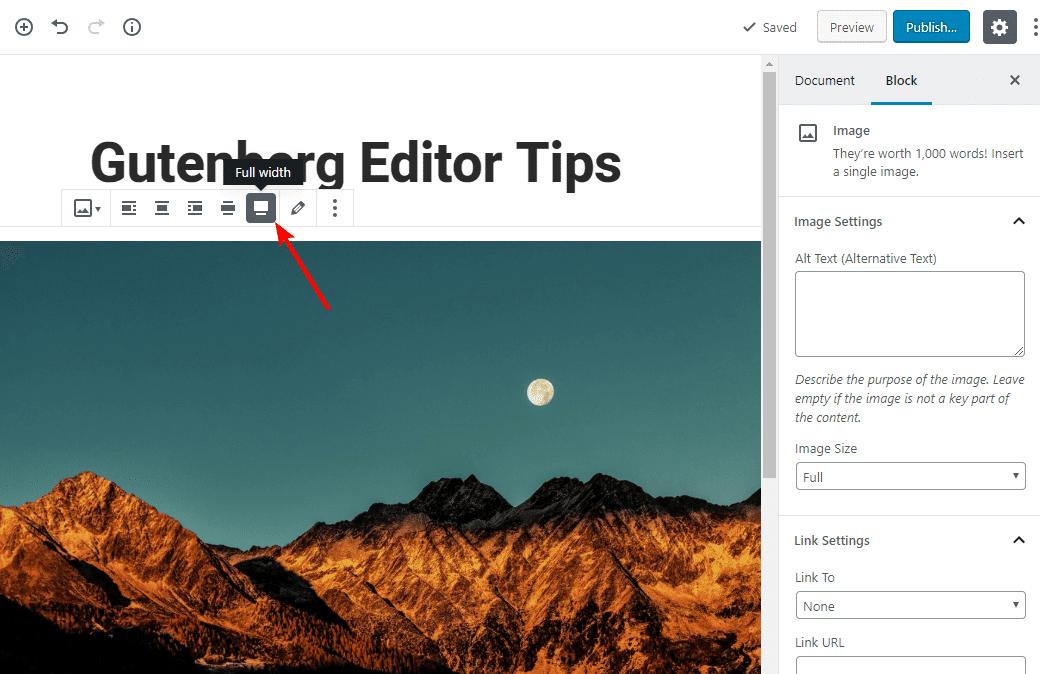
You can also use this alignment with the Cover Image block.
15. Use The Classic Block If You’re Missing The Old Editor
If you don’t like using the new paragraph blocks for your content, Gutenberg still includes a Classic block that basically embeds the current TinyMCE editor as a block.
You’ll even get the same TinyMCE toolbar, including the buttons that plugins have added to the toolbar:
16. Convert Old Posts To Gutenberg-Friendly Designs
One big reason that Gutenberg includes this Classic block is for backward compatibility.
See, there are hundreds of millions of posts written with the current editor. It would be a huge issue if Gutenberg automatically converted all those posts into blocks.
So – rather than doing that, Gutenberg just automatically puts all the content into a single Classic block.
For example, here’s a post that I created using the current editor:
And here’s what that same post looks like after I activate the Gutenberg plugin:
Notice how everything is just one single Classic block, rather than separate blocks for each paragraph/image?
If you do want to use the Gutenberg Editor with your old content, all you need to do is click the three dots icon and choose Convert to Blocks:
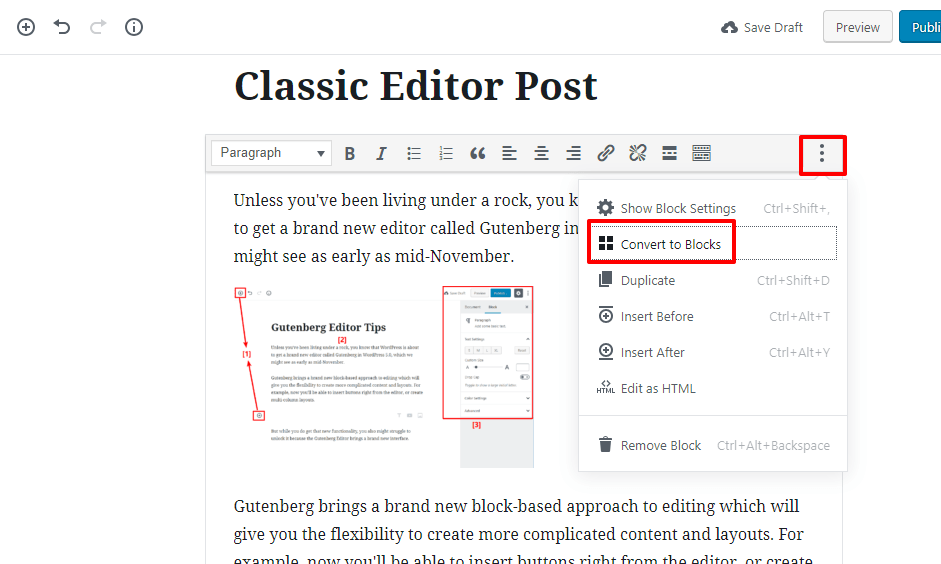
Gutenberg will then automatically put each element into its own block, and you’ll be able to manipulate it just like a post that you wrote with Gutenberg from scratch.
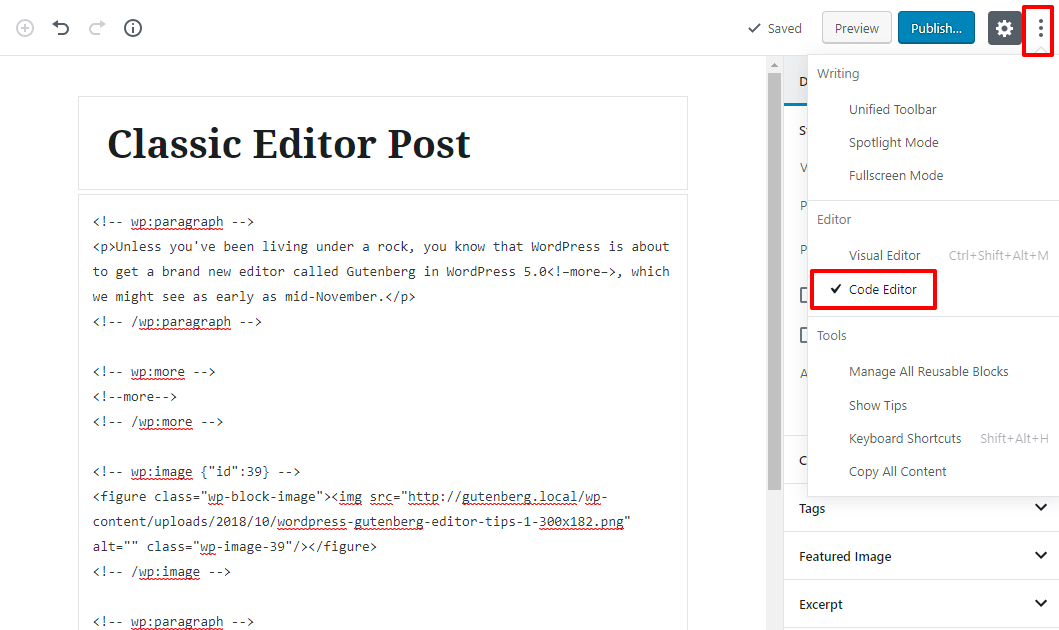
17. Hop Over To The Code Editor For Direct HTML Edits
With the current TinyMCE editor, you’re probably used to hopping over to the Text tab to make direct HTML edits.
Gutenberg still lets you do that, you’ll just have to wade through the block tags.
To access the HTML Editor, you can either use the three dots icon in the top-right corner or the Ctrl + Shift + Alt + M shortcut:
18. Include Your “Read More” Break At The Perfect Spot (Including Mid-Paragraph)
Some people have complained that Gutenberg makes it impossible to insert a “Read More” marker.
That’s not true – it’s just a little tough to figure out!
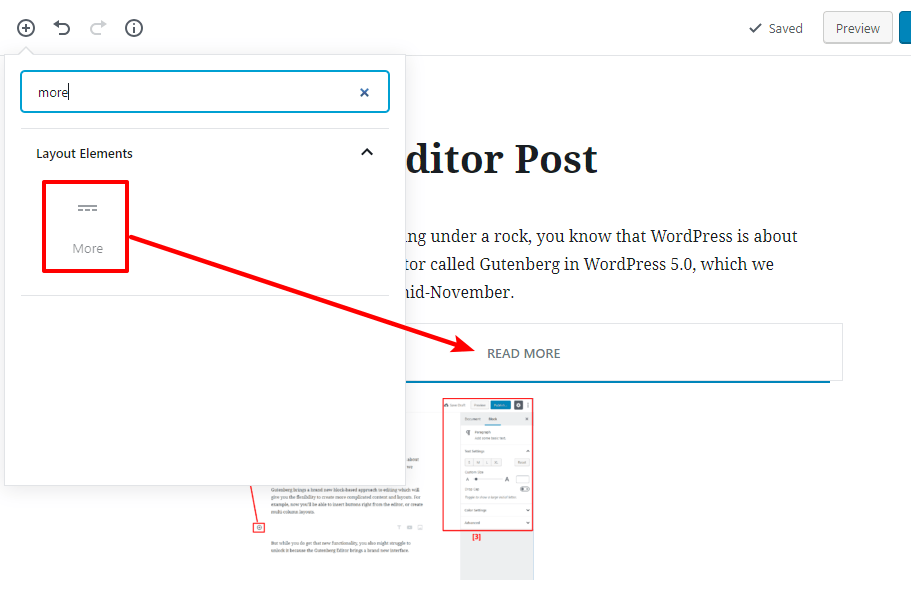
First, there’s the easy way. If you want to include the Read More break after the end of a full paragraph, all you need to do is insert the More block:
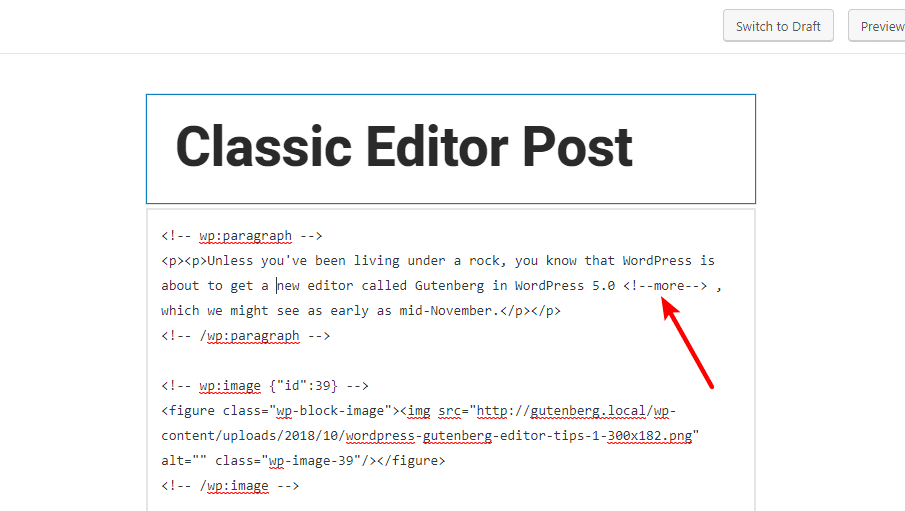
If you want your Read More break to be mid-paragraph, it’s a little more complicated, but you can still do it. All you need to do is switch to the Code Editor and insert the <!--more--> tag exactly where you want the break to happen:
So yeah – a bit awkward. But not too difficult to do.
19. Hide The Sidebar For Full-Screen Editing
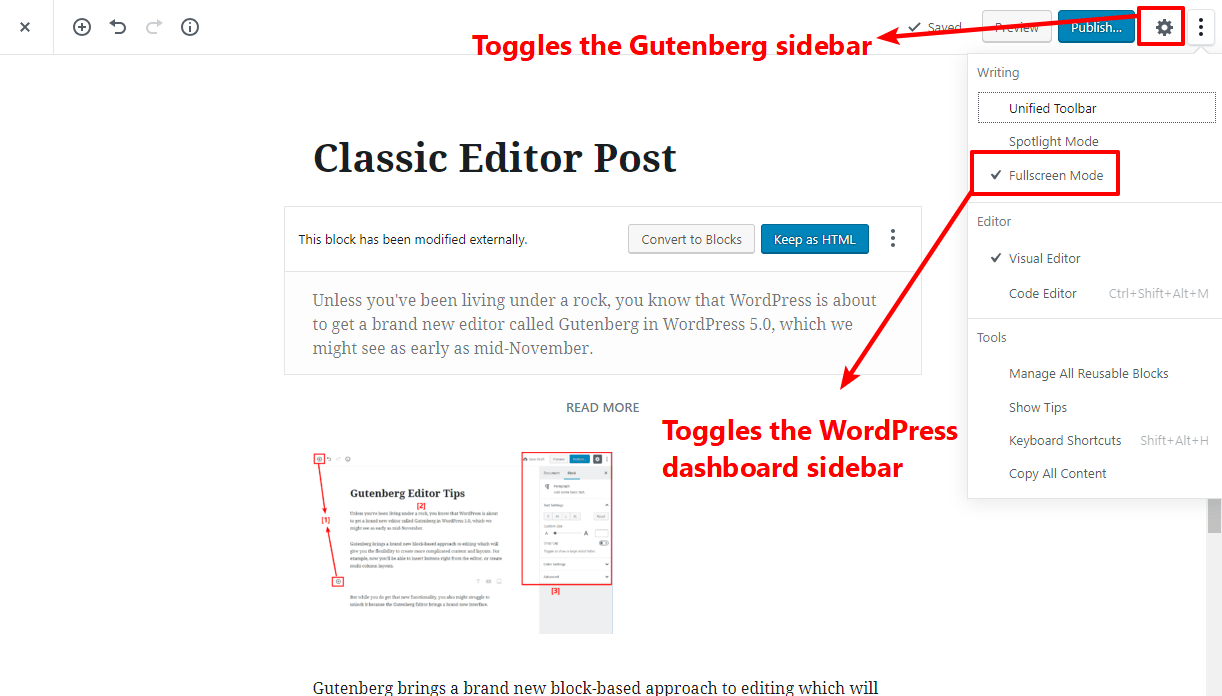
You might’ve noticed in some of the screenshots above that the sidebar is gone! That’s because you can hide it, which offers a more full-screen, distraction-free editing experience.
To toggle it on or off, just click the Gear icon. Or, if you want things to be even more fullscreen, you can also activate Fullscreen Mode to hide the WordPress dashboard sidebar, as well:
20. Deactivate The Gutenberg Editor If None Of These Tips Helped
Finally, if none of these Gutenberg Editor tips have helped you fall in love with Gutenberg, you might just want to deactivate it and keep using the TinyMCE Editor.
To do that, all you need to do is install and activate the official Classic Editor plugin.
And that wraps up all the tips that I’ve found for using the Gutenberg Editor. Have you found any other helpful tips for using the new WordPress Gutenberg Editor? Share them in the comments so that we all benefit!