Are you looking to create a staging site for WordPress but not sure where to start?
A WordPress staging site is a test site that you can use to “safely” make plugin updates and other changes before going live.
In the past, it used to be very difficult to setup a WordPress staging site, but now that has changed so even a non-technical person can do it.
In this step by step guide, we will show you how to easily create a staging environment for your WordPress site. We will cover several different methods and most of them only require a few clicks.
What is a Staging Site?
A staging site is a clone of your live website that is used for testing changes before making them live. Staging sites help you catch errors, so you don’t end up breaking your live website.
A lot of users install WordPress locally on their Windows or Mac computers to test changes. Once they’re done with the updates, they simply upload those changes from localhost to live server
The biggest problem with this approach is what if something that worked on your localhost does not work on the live server?
Often localhost and live WordPress hosting servers are not running the same environment.
Since the staging site lives on your web hosting server, you can easily prevent all those errors because it runs the same server configuration as your live site.
With that said, let’s take a look at how to setup a staging site for WordPress.
How to Easily Create a WordPress Staging Site
There are multiple ways to create a staging site for WordPress. The easiest of them is to use your hosting provider’s built-in staging site feature.
Some of the best WordPress hosting companies already offer 1-click staging websites. If your website is hosted with one of them, then you can easily create a staging site without any hassle.
If you’re not with one of these popular hosting solutions, then we also have a solution to help you create a WordPress staging site using a plugin (and even manually).
For faster browsing, you can use the navigation below to jump to the section that’s most applicable to you:
- Creating a staging site on Bluehost
- Creating a staging site on SiteGround
- Creating a staging site on WP Engine
- Creating a staging site using a plugin
- Creating a staging site manually
Creating A Staging Site on Bluehost
Bluehost is one of the best WordPress hosting companies. They offer a quick 1-click staging site solution which comes with all their plans.
First, you need to login to your WordPress site’s admin area and go to Bluehost » Staging page.
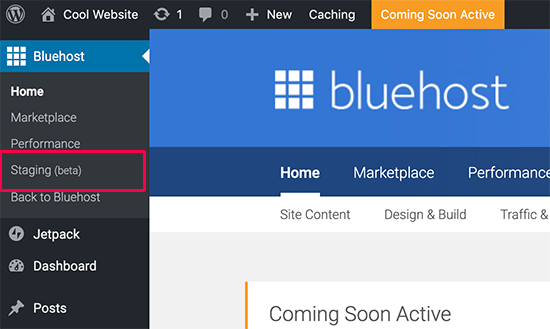
This will bring you to the Bluehost’s staging site wizard. Next, you need to click on the ‘Create Staging Site’ button to continue.
Bluehost will now prepare the staging environment for your website. Once finished, you will see a success message with a link to visit your staging site.
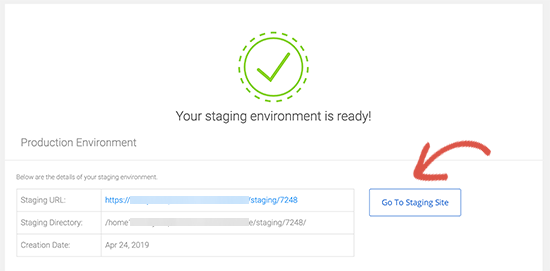
Now, you can click on the ‘Go to staging site’ button to continue.
You will reach the admin area of your staging WordPress site. You will see a red button on top of the admin bar to indicate that you are working in the staging environment.
You can go ahead and work on your website without worrying about it affecting your live site.
Deploying changes from staging to live site on Bluehost
Once you are ready to push changes from staging to the live site, simply go to Bluehost » Staging page.
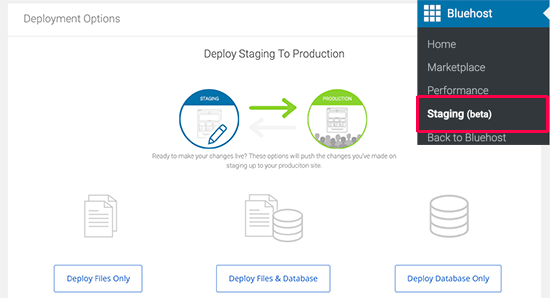
Scroll to the Deployment Options section. You will see three options for deployment. You can deploy only the files, only the database, or both files and database.
If you’re not sure, then click on the Deploy Files and Database button to deploy all changes from the staging environment.
This will bring up a popup where you will be asked to confirm that you want to deploy the staging site to the production site. Click on ‘Yes, Let’s Deploy’ button to continue.
Bluehost will now start deploying your staging site to the live site. Depending on the size of your website, this may take a while.
The pop up will automatically disappear when deployment is over. You can now visit your live website to see the changes applied to your production site.
Creating a Staging Site on SiteGround
SiteGround is another top WordPress hosting company offering 1-click staging feature with their GrowBig and GoGeek plans. If your website is hosted with SiteGround, then this is how you would set up a staging website.
First, you need to login to your SiteGround cPanel dashboard. Next, scroll down to the ‘WordPress Tools’ section and then click on the Staging icon.

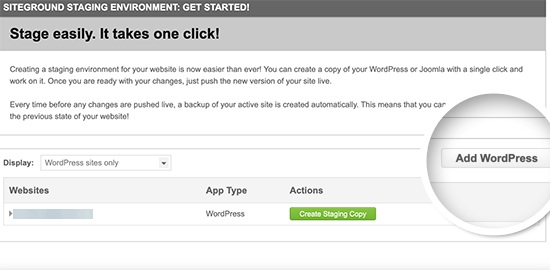
This will bring you to the staging sites page. From here, you need to add your website to the staging site manager. Once you’re done, click on the ‘Add WordPress’ button to continue.

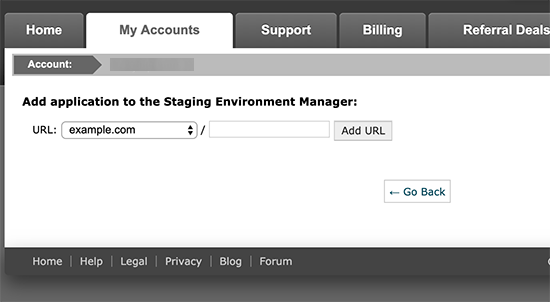
On the next screen, you need to select the URL where your website is installed. If your WordPress site is installed in a sub-directory, then you can add that in the field next to it and click on the Add URL button to move forward.
The staging site manager will detect your website and add it to the page. You can now click on the ‘Create Staging Copy’ button to continue.
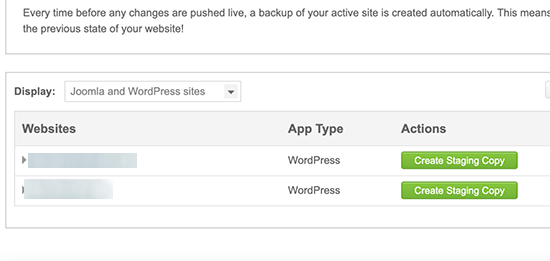
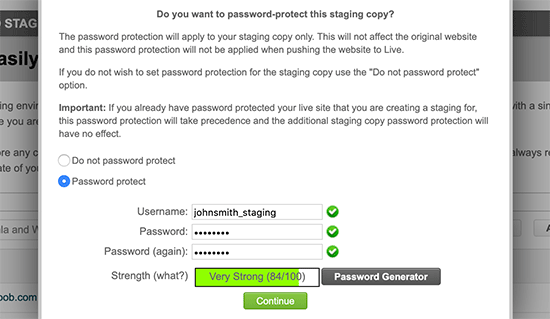
You will see a popup that allows you to password protect your staging site. This is a good idea because it prevents others from accessing your site. It also prevents Google from indexing duplicate content.
Go ahead and provide a username / password and then click ‘Continue’.
SiteGround will now create the staging environment for your WordPress website.
Once it’s done, you will see the staging site manager with links to the admin area of your staging site. Go ahead and start working on your WordPress staging site.
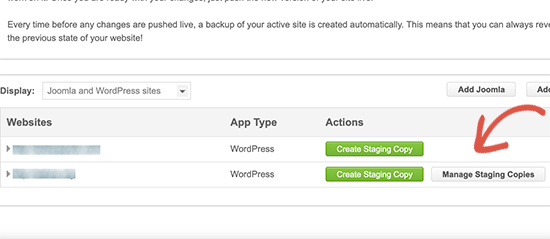
After you are done making changes to your website, you can push it live by going to the staging page in cPanel. You need to click on the ‘Manage Staging Copies’ button next to your website.
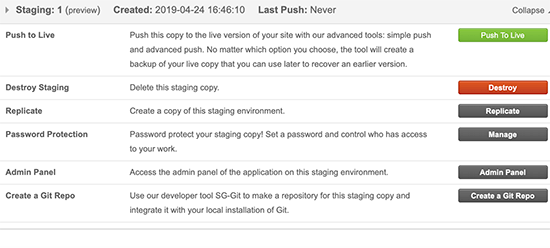
On the next page, you can click on the ‘Push to live’ button to push changes from staging to your live website.
Creating a Staging Site on WP Engine
WP Engine is the best WordPress managed hosting company in the world. Managed WordPress hosting is a concierge service for your WordPress site where the hosting provider takes care of updates, backups, security and performance.
WP Engine offers one-click staging solution with all their plans. If you are using WP Engine to host your website, then this is how you would set up a staging environment for your site.
First, you need to login to your WP Engine dashboard. Next, go to the Sites page and select your website by clicking on it.
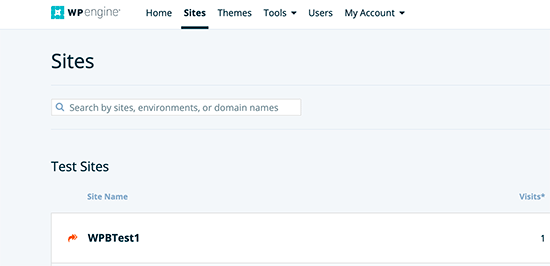
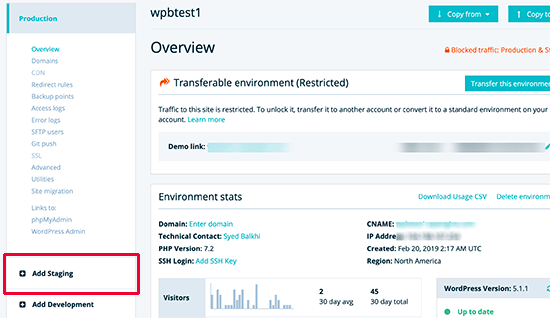
This will bring you to your website dashboard. Now, you need to click on the Add Staging link from the left column.
On the next screen, you need to enter a name for your staging site under the ‘Create New’ tab. This name will also be the subdomain of your staging site.
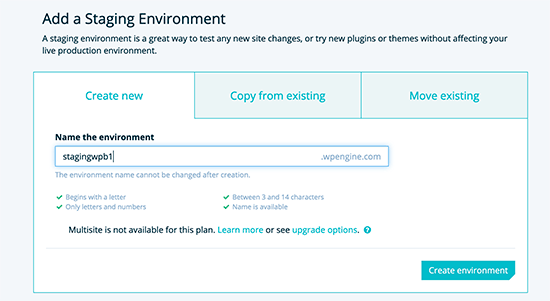
Click on the Create Environment button to continue.
WP Engine will now create a staging site for you. However, this staging environment is just an empty WordPress site that does not have any content of your live website.
Let’s change this.
Switch to your production environment by clicking on production from the left column. On the next screen, click on the Copy to button at the top right corner of the screen.
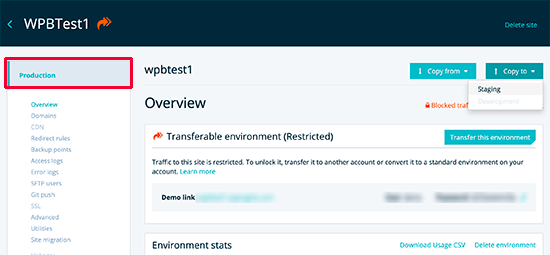
Next, you will be asked to select the backup point you want to use for your staging site. If unsure, select the most recent back up of your website.
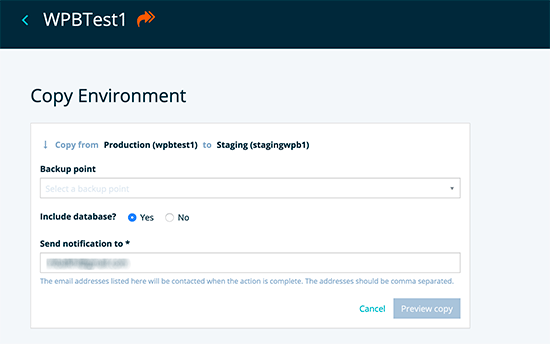
Click on the preview copy button to continue.
You will see a warning popup informing you that you are copying the source website to the staging environment. Click on the Copy Environment button to proceed.
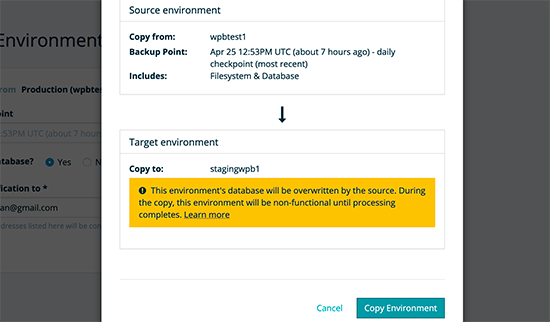
WP Engine will now copy your live website to the staging environment. You will recieve an email notification when it is done.
After that, you can login to your staging website using the same admin username and password as your live website.
Deploying Staging to Live Website on WP Engine
When you are ready to push the changes from your WordPress staging site to live site, first you will need to create a backup point for your staging site.
A backup point is just like saving your progress in a game. You need to create one before deploying your staging site’s changes to the live site.
Simply head over to WP Engine dashboard and click on Staging » Backup Points menu from the left column.
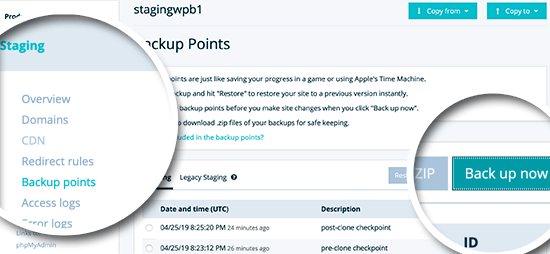
Next, provide a description for your backup so you can remember the changes later, and then click on ‘Create staging backup’ button.
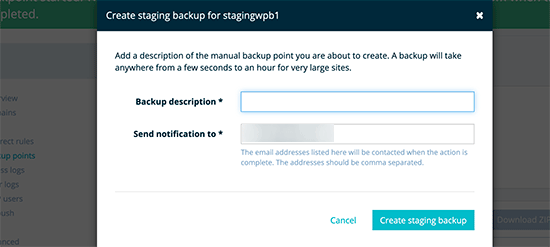
WP Engine will now create a backup point for your website. You will receive an email notification when your backup is complete.
You are now ready to deploy your staging site.
Simply click on the ‘Copy to’ button at the top right corner of the screen and select ‘Production’.
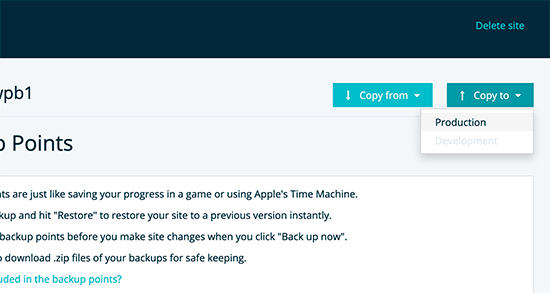
Next, you will be asked to select a backup point. This time select the backup you created earlier and click on the preview button.
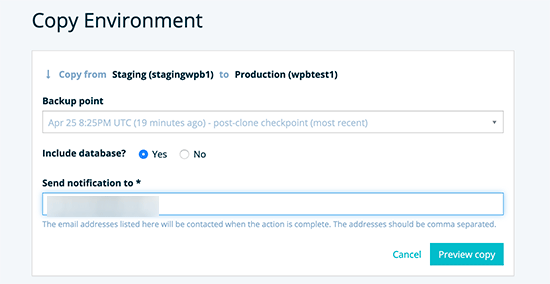
You will see a warning message, but go ahead and click on the ‘Copy Environment’ button to proceed.
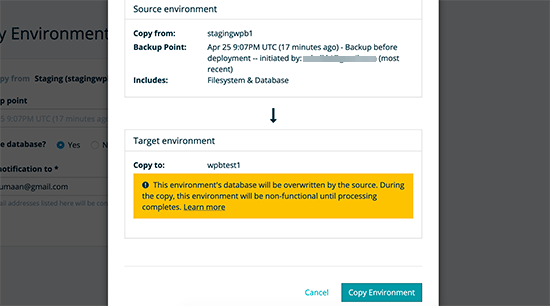
WP Engine will now copy your staging environment to your live website. You will recieve an email notification when it is complete.
After that, you can log in to your live website to ensure everything is working fine, and it should because you tested all your changes on staging.
Creating A Staging Site using WordPress Plugin
If your WordPress hosting company does not provide a staging site feature, then you can still create a staging website using a WordPress plugin.
There are some disadvantages to using this method.
First, a plugin would have limited control on your hosting server. This is why it may not always give the best results.
Secondly, the plugin we will be using will store your staging site on their own servers. If you are concerned about privacy and data protection, then this may not be the ideal situation for you.
That being said, let’s see how to create a staging WordPress site using a WordPress plugin.
The first thing that you need to do is install and activate the WP Stagecoach plugin. For more details, see our step by step guide on how to install a WordPress plugin.
Upon activation, the plugin will add a new menu item labeled WP Stagecoach to your admin bar. Clicking on it will take you to plugin’s settings page.
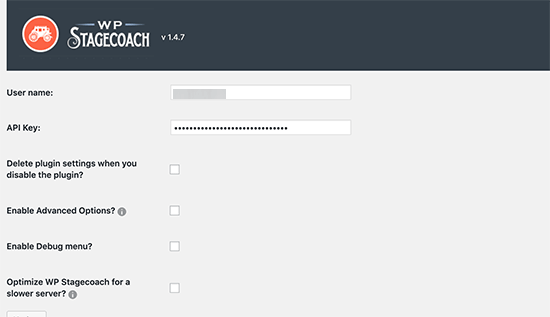
You will need to enter your WP Stagecoach username and the API key which you can find under your account on the plugin website.
After that, you will be able to create your staging website.
You need to provide a name for your staging site. This name will also be used as the subdomain of your WordPress staging website.
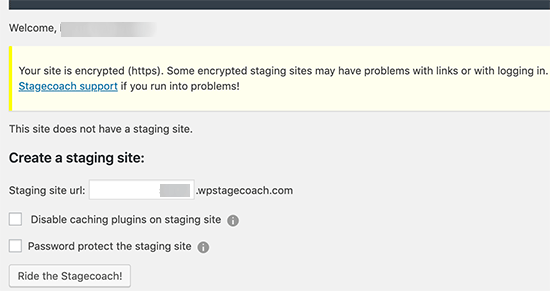
Don’t forget to check the box next to ‘Password protect the staging site’ option. It will protect your staging website from public view and search engines.

Next, click on the ‘Ride The Stagecoach’ button to continue.
The plugin will now create a backup of your WordPress files and database to export them for your staging site. Once finished, you will see the link to your staging site, and its admin area.
You can click the link to visit your staging site and start working on it.
Deploying Staging Site to Live Using WP Stagecoach
Once you are ready to import changes to your live site, head over to WP Stagecoach » Import Changes page and click on the check for changes button.
The plugin will now check for changes on your staging site and then show you options to import them.
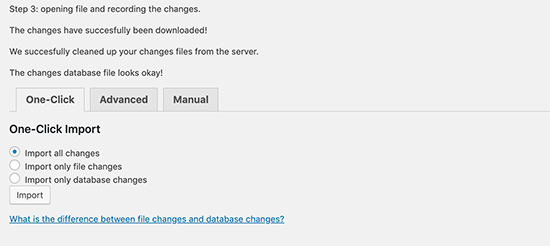
You can select to import only file changes, only database changes, or all changes. Next, click on the import button to continue.
The plugin will show you the progress of the import and will notify you when it is done. You can now test your live site to see if all changes were successfully imported.
Create a Staging Site for WordPress Manually
This method requires you to manually create a staging site for your WordPress install. It is for advanced users and requires more work than other methods described above.
Another disadvantage of this method is that your website will be temporarily unavailable when deploying changes back from staging to live server.
That being said, let’s see how to manually create a staging environment for your WordPress site.
First, you need to create a subdomain for your staging website. Go to your hosting account’s dashboard and click on the Subdomains link located under the domains section.
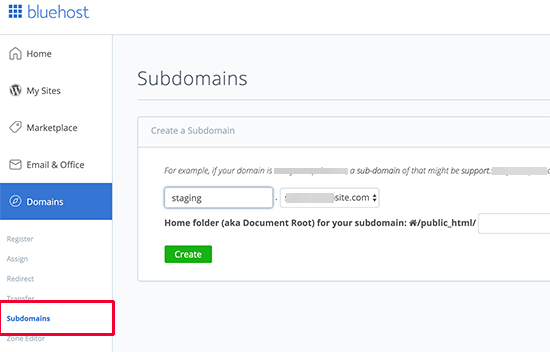
Note: We’re using Bluehost in our example screenshot, so your screen may look different.
Provide a name for your subdomain (for example, staging) and then click on the create button.
Your hosting control panel will now add your subdomain, which you can use to import your live WordPress site.
Next, you need to install and activate the Duplicator plugin on your live site.
Upon activation, you need to click on the Duplicator menu in your WordPress admin sidebar and click on the create new button.
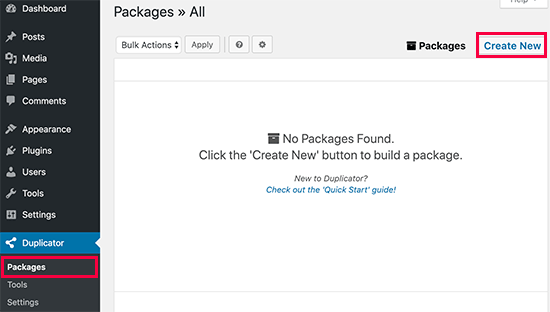
After that, you will be asked to click on the Next button to continue.
Duplicator will now run the website duplicator wizard. First, it will run some tests to see if everything is in order. If all items are marked ‘Good’, then click on the ‘Build’ button.
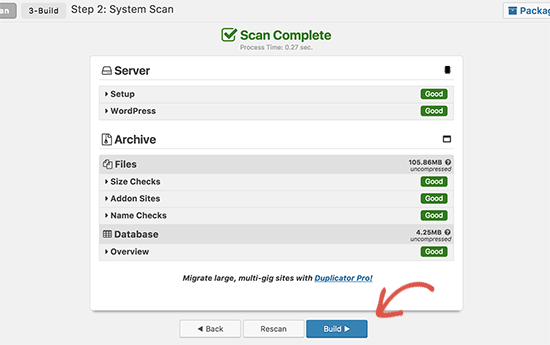
The plugin will now start creating a duplicator package of your WordPress site. This process may take a few minutes depending on the size of your website.
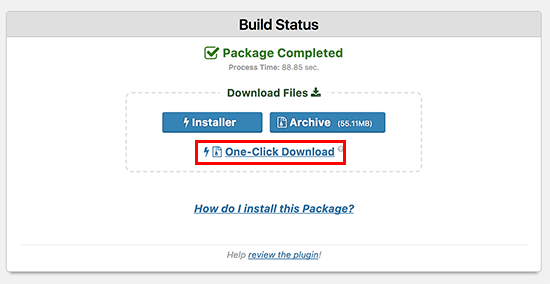
Once finished, you’ll see download options for Installer and the Archive package. You need to click on the ‘One click download’ link to download both files on your computer.
Your new staging WordPress site will need a new database. Let’s create one.
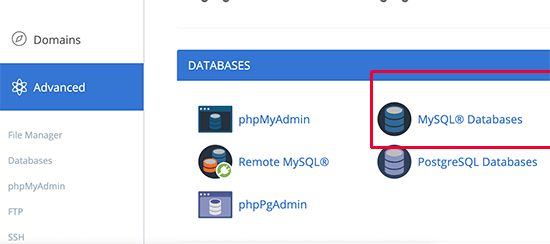
Head over to your WordPress hosting account’s control panel and click on MySQL Databases icon located under the Databases section.
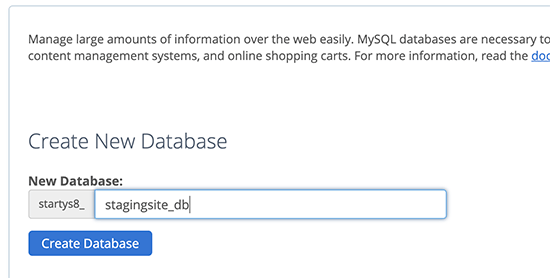
On the next screen, provide a name for your database and then click on the create database button.
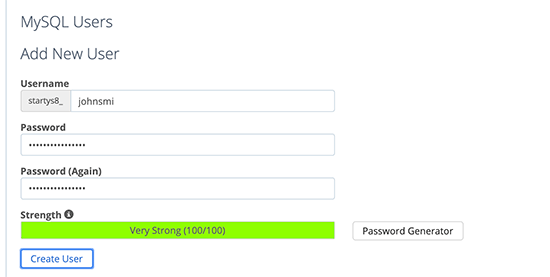
Next, you need to create a MySQL user for your database. Scroll down to the MySQL Users section and provide a username and password for your new database user.
Now you need to give this user permissions to access and modify the database you created earlier. Simply scroll down to the ‘Add user to database’ section and select your database and the user you just created.
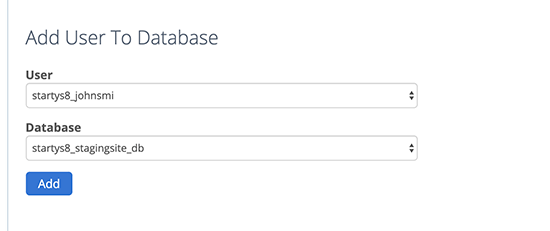
After that, click on the ‘Add’ button to continue.
You will be asked to select privileges for the user. Go ahead and select ‘All Privileges’ checkbox and then click on the ‘Make changes’ button.
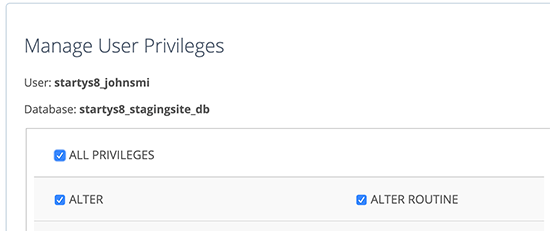
Now your database is ready to be used for your staging website.
Next, you need to open a new browser tab and visit enter the subdomain of your staging site like this:
https://yoursubdomain.example.com/installer.php
Don’t forget to replace yoursubdomain with the actual subdomain and example.com with your own domain name.
This will launch the Duplicator installer wizard.
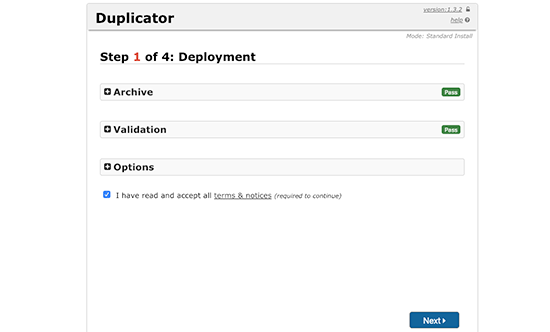
The installer will look for the archive file. You need to check the terms and conditions checkbox and click on the next button to continue.
Now, the installer will ask you to enter your WordPress database information.
Your host will likely be localhost. After that, you will enter the details of the database you created for your new domain name in the earlier step.
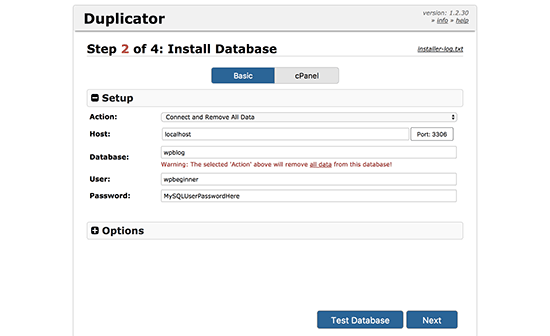
Once done, click on the next button to continue.
Duplicator will now unpack your WordPress database backup from the archive into your new database.
Next, it will ask you to update the site URL or Path. You shouldn’t have to change anything since it automatically detects the URL of your new subdomain and its path.
If it doesn’t, then you can change the URL to your new subdomain. After that, click on the next button to continue.
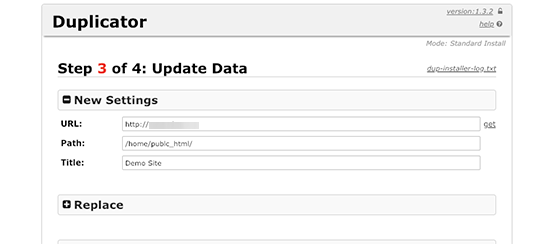
Duplicator will now finish the migration.
You can click on the ‘Admin Login’ button to enter the WordPress admin area of your website on the new staging site.
Now you have your staging site set up. Let’s protect it by adding password protection to your subdomain.
Head over to your hosting account’s cPanel dashboard and click on the directory privacy icon.
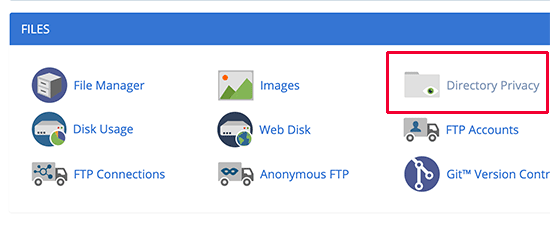
Next, you need to select your subdomain folder and then select the option to ‘password protect this directory’ checkbox. You will be asked to provide a name for this setting, and then enter a username and password.
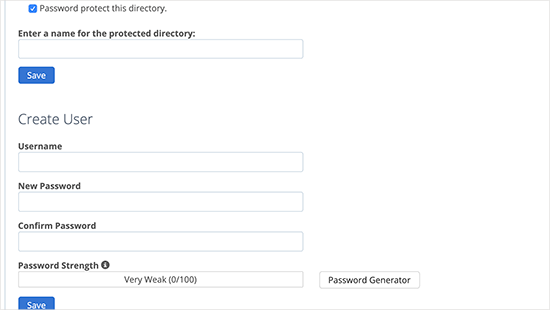
Click on the save button to store your settings. Your staging site will now be hidden behind the password protection.
You can now work on your staging site and make any changes you want.
Manually Deploy Staging Site to Live
After you are ready to deploy changes from your staging site to the live server, you will follow the same steps described above.
Simply create a new Duplicator package on your staging site and download the Installer and Archive files to your computer.
Next, you need to head over to your live site and create a complete WordPress backup (you can use Duplicator to create a complete backup as well).
Once you are done, you will need to delete all WordPress files and folders from your live website. This means your WordPress site will be down for a while.
Finally, follow the instructions above to run the Duplicator installer wizard to import staging site to live server.
As you can see, the last method is not the best method at all. You should avoid this at all costs. We recommend using a reliable hosting provider like Bluehost, SiteGround, or WP Engine that offers built-in staging site features.
We hope this article helped you learn how to easily create a staging environment for your WordPress site. If you run into any issues, check out our ultimate guide to fixing the most common WordPress errors.
If you liked this article, then please subscribe to our YouTube Channel for WordPress video tutorials. You can also find us on Twitter and Facebook.
The post How to Easily Create a Staging Site for WordPress (Step by Step) appeared first on WPBeginner.


